
Settings » Domain Manager » Cloudflare Connection and Settings
Link: https://support.brilliantdirectories.com/support/solutions/articles/12000109759
The Cloudflare tab connects a Cloudflare-managed domain to Domain Manager. A connected account can support website pointing, DNS record management, email-authentication publication, and Cloudflare settings from the BD admin area.
Before starting
- Use a custom domain that exists in an accessible Cloudflare account.
- Have permission to authorize that account and domain.
- Keep a record of the current DNS and email settings.
- Use Sign in with Cloudflare to authorize your account and connect your domain to Domain Manager. For a free directoryup.com address, use the domain connection wizard to authorize Cloudflare and choose a custom domain.
For creating the Cloudflare zone and moving nameservers, see Connecting a Site to Cloudflare. Authorizing Domain Manager is separate from registering a domain or changing its nameservers.
Connect a domain while changing the website address
- Open the domain connection wizard.
- Select Use a domain from my Cloudflare account.
- Sign in and authorize the intended account.
- Filter the domain list and select the intended domain.
- Choose the main address or enter the required subdomain.
- Click Use this address to prepare its DNS records.
- Review Switch Over, then complete its separate confirmation.
A domain whose main address is already in use can still offer an available subdomain. Selecting the main address also points the root domain; selecting a subdomain leaves other addresses on that domain unchanged.
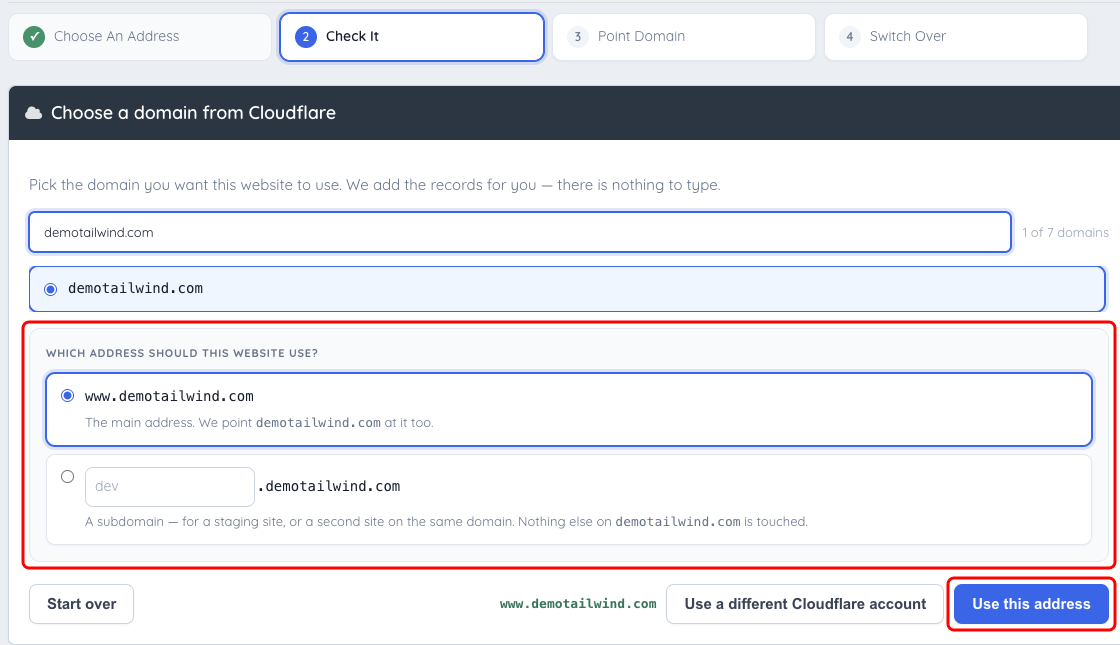
The Cloudflare connection wizard offers the main domain or a subdomain after authorization.
Alternative: connect an account for the current domain
Use these steps when the website already has its domain and Cloudflare still needs to be connected. If the wizard above already connected the account, continue to the next section.
- Open Settings > Domain Manager > Cloudflare.
- Click Sign in with Cloudflare.
- Sign in to the appropriate Cloudflare account.
- Review and authorize the requested access.
- Return to Domain Manager.
- Confirm that Connected to Cloudflare shows the intended domain.
If sign-in cannot find the domain or authorization is unavailable, check the account and domain access before making changes. Do not continue using a connection associated with a different domain. A connection made earlier with a Cloudflare API token shows An API token under Signed in using, with a Switch to signing in with Cloudflare link. New connections use Cloudflare sign-in only.
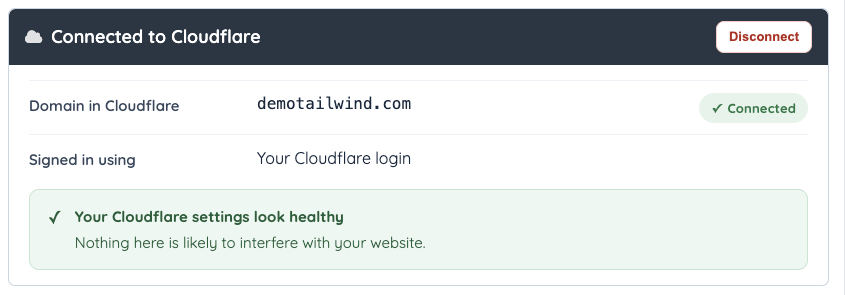
A successful authorization identifies demotailwind.com as the connected Cloudflare domain.
Point the website and publish email records
- Review the connected domain and the website's displayed target.
- Use Point my domain at my website when that action is needed.
- Review the resulting connection status.
- Under Email delivery records, use Add my email records to Cloudflare when offered.
- Open Emails and recheck sender authentication.
For changing the website to a different domain, follow the separate connection wizard. Pointing records and switching the website's primary address are distinct actions.
Manage DNS records
Use the DNS tab to inspect, add, edit, or delete supported records. Through Cloudflare sends supported website traffic through the Cloudflare proxy. Direct exposes the underlying DNS destination. Email-related records must use the mode required by the mail provider; sender-authentication CNAME records should remain Direct. See DNS Records.
Review Cloudflare settings
Set recommended defaults applies the Domain Manager's recommended configuration. Review the current settings and the confirmation before applying it, especially when the domain already has a custom configuration.
- Always use https controls redirection to HTTPS.
- Security level & bot fighting controls the available security level.
- Minimum encryption version sets the lowest accepted TLS version.
The recommended defaults enable Always use https and insecure-image HTTPS rewrites, select Full encryption, set minimum TLS to 1.2 and security to Medium, enable HTTP/3, faster repeat visits, Brotli, Early Hints, and Smart Tiered Cache, and turn off Hotlink protection. Bot Fight Mode is not changed by this action. Check the result for any setting the Cloudflare account does not allow to be updated.
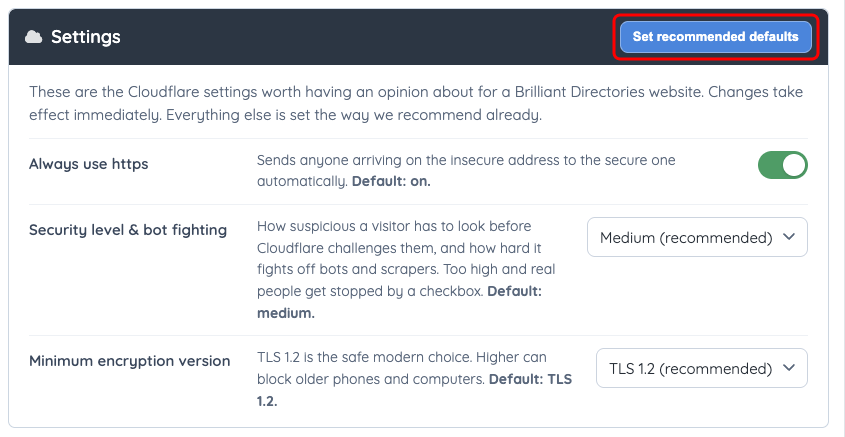
The Settings card with the recommended values shown: Always use https on, security level Medium, and minimum TLS 1.2. Set recommended defaults applies them in one step.
Page caching
- Find Page caching.
- Review the displayed caching behavior.
- Set the offered cache lifetime within the supported 30–3600 second range.
- Click Turn on page caching.
- Review the saved status.
Use Clear cached pages when cached pages need to be refreshed. Check important public and signed-in workflows after changing caching behavior.
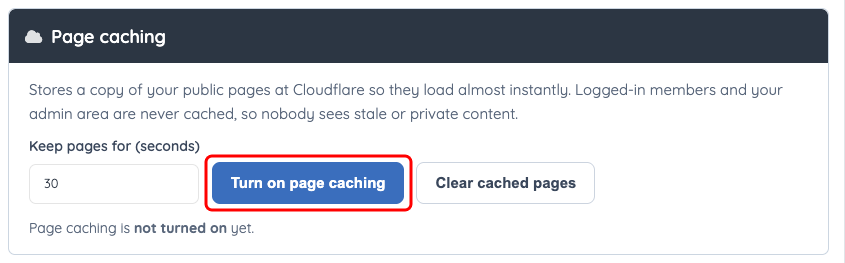
Page caching has its own lifetime and activation controls. This example shows caching turned off.
Advanced settings
Click Show beside Advanced settings to inspect HTTP/3, faster repeat visits, compression, Early Hints, Smart Tiered Cache, encryption mode, insecure-image handling, Bot Fight Mode, and hotlink protection. Availability and allowed changes can depend on the Cloudflare account and the current site configuration.
Full (strict) requires a trusted certificate for the website hostname on the origin server. Review SSL > Certificate on your server before changing encryption mode. If the panel refuses an unsafe change, resolve the stated prerequisite instead of forcing the setting at another screen.
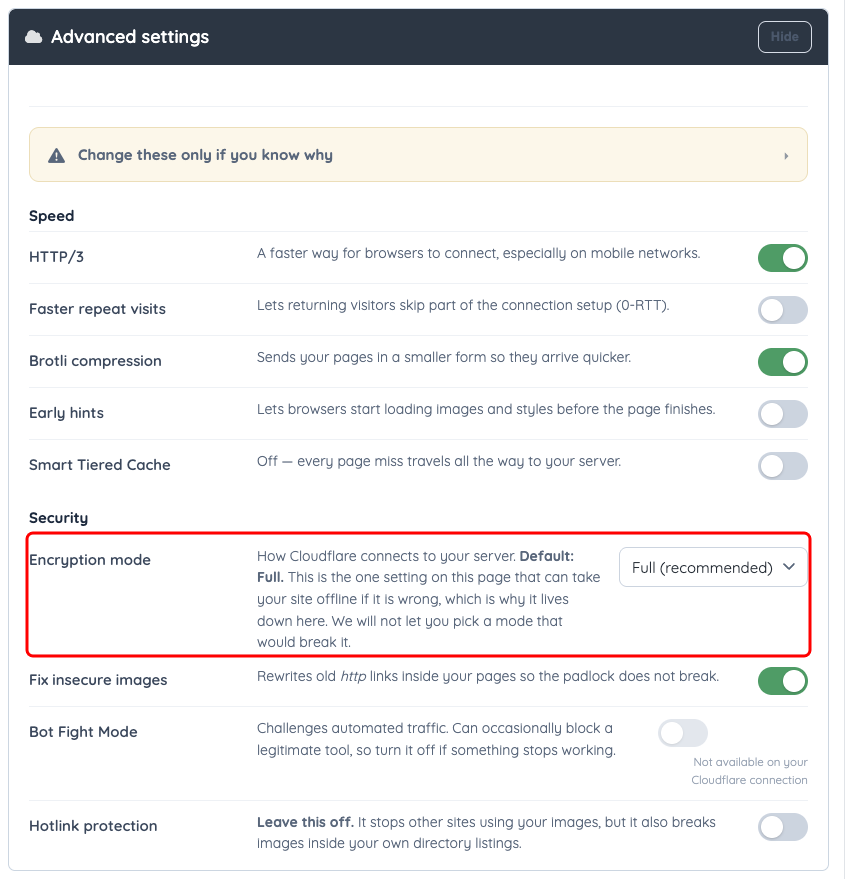
Show expands the advanced settings. Encryption mode, marked, is the one setting here that can take the website offline if it is wrong; Full is recommended. Unavailable controls depend on the Cloudflare connection.
Disconnect
Disconnect stops Domain Manager from managing Cloudflare. Existing DNS records remain in place, and existing Cloudflare settings and proxying continue until separately changed. Reconnect the account to resume management from Domain Manager.
The wizard can publish website sender-authentication records without creating incoming mailboxes or their MX records. Review Mailboxes separately if the domain will receive email.
A completed setup shows the correct connected domain, the expected website connection, and verified email-authentication records. Test the website and email after applying any settings.
