
Settings » Domain Manager » DNS Records
Link: https://support.brilliantdirectories.com/support/solutions/articles/12000109758
The DNS tab in Settings > Domain Manager shows the records used by the website domain. Depending on where DNS is hosted, this tab is either an editor for the connected zone or a read-only view of public records.
Identify which mode is available
| DNS arrangement | Available behavior |
|---|---|
| Connected Cloudflare account and matching domain | Read and edit records in the connected Cloudflare zone, including supported proxy controls. |
| Brilliant Directories nameservers and an available hosted zone | Read and edit the domain's BD-hosted DNS records. |
| Third-party DNS with the domain pointed at the BD site | Inspect public records. Make changes at the external DNS provider. |
The tab may be absent when the website still uses a free platform address or the domain has no supported connection to inspect. Check Domain first.
On a website whose address is a subdomain, such as members.example.com, the tab shows the parent domain's zone (example.com). If the subdomain has been given its own separate DNS zone, its records are not listed here; manage them at the DNS provider for that zone.
Search and inspect editable records
- Open Settings > Domain Manager > DNS.
- Review All DNS records.
- Use the search box to find a name or value.
- Filter by record type when needed.
- If a required record is not listed, click the Show all button below the list (for example, Show all 31 records). The default view lists the most relevant records first; a search or type filter always includes every matching record.
Refresh reloads the record list. Copy controls help transfer an exact value without retyping it. Records can also be sorted by their name or type.
Brilliant Directories DNS example: selfautomated.com
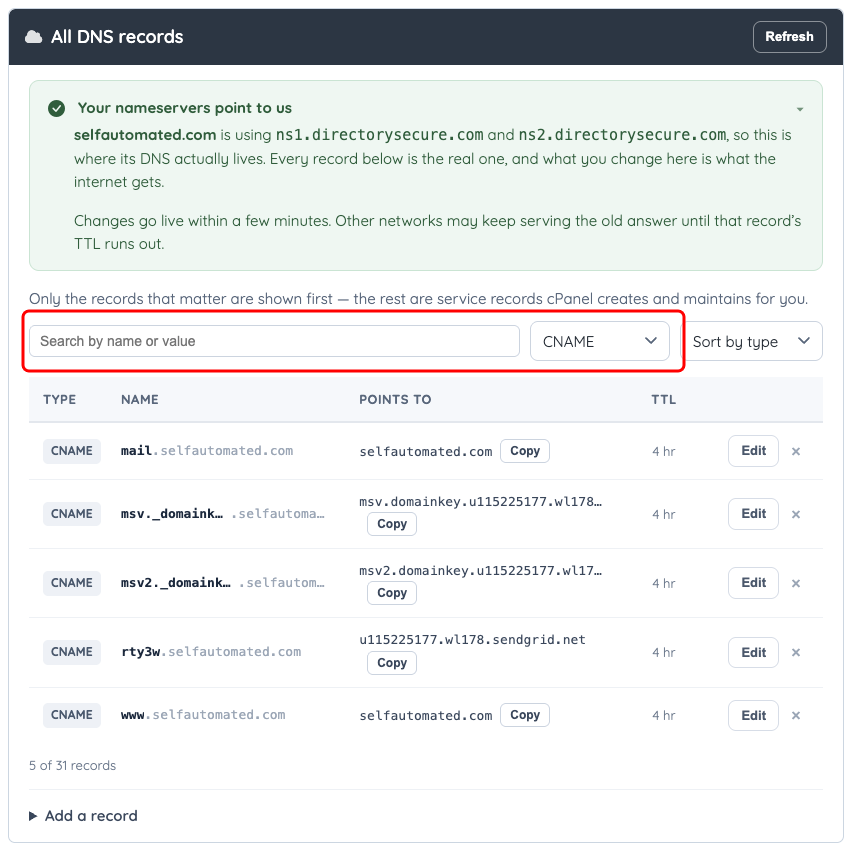
A BD-hosted DNS zone filtered to CNAME records. Use the record filter and search to locate the required entry.
Cloudflare DNS example: demotailwind.com
This is a separate domain using the Cloudflare editor. It illustrates the alternative DNS arrangement, rather than the next step for selfautomated.com. On a Cloudflare-connected site, the DNS tab also shows the Cloudflare connection, Point your domain with a different DNS host, and Email delivery records above the record list.
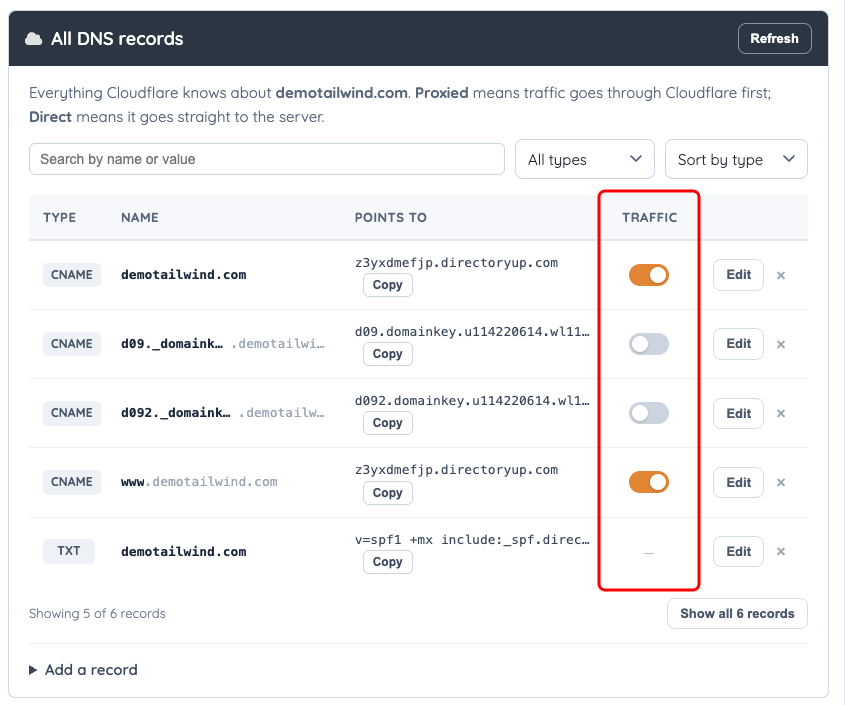
The connected Cloudflare DNS editor exposes the proxy controls. Website records are proxied in this example; sender-authentication records remain Direct.
Add or change a record
- Confirm that the displayed zone is the intended domain.
- Choose the add-record action, or the edit action on the existing record.
- Select the required record type: A, AAAA, CNAME, TXT, or MX.
- Enter the name and value supplied by the service being configured.
- For supported Cloudflare address records, choose Through Cloudflare or Direct as appropriate.
- Save the record.
- Refresh the list and confirm the saved values.

The add-record form shown here returns to the selfautomated.com example with Brilliant Directories DNS. Expand Add a record to enter the values supplied by the service being configured.
For MX changes that require a specific priority, use the authoritative DNS provider’s full DNS editor. The basic record form does not expose a separate priority field. To move incoming email to a different provider, follow the checks in Mailboxes and Email Routing.
Website pointing records should use the site-specific instructions in the connection guide. Email-authentication records should use the values generated in Emails > Sender Authentication. Avoid generic examples for either task.
Editing or deleting a record can interrupt the website, email, or another service. Keep the original values and remove only the intended record. Do not proxy mail-service or sender-authentication records that need Direct / DNS only access.
Inspect public records at another provider
- Open Public DNS records.
- Click Check again.
- Review the record's purpose, value, and Seen by result.
- Make any required correction at the DNS provider.
- Return to the tab and recheck after the provider publishes the change.
The public view compares answers from Google and Cloudflare resolvers for the records it checks, including nameservers, web addresses, mail servers, SPF, other TXT records, DKIM, DMARC, and DNSSEC delegation records. Google + Cloudflare indicates agreement; Needs attention can indicate a missing record or differing answers. This view does not enumerate every possible hostname or grant editing access to the provider's zone.
Success means the intended value is saved in the authoritative DNS editor and the public checks reflect the required configuration. Public resolvers can temporarily disagree while cached answers expire.
