
Settings » Domain Manager » Emails and Sender Authentication
Link: https://support.brilliantdirectories.com/support/solutions/articles/12000090615
The Emails tab in Settings > Domain Manager checks the website's outgoing email identity and sender authentication. These checks help receiving mail systems recognize authorized website messages. Incoming mailbox delivery is managed separately in Mailboxes.
Before starting
Connect a custom domain first. Have access to the domain's DNS provider unless the DNS zone is already managed through Brilliant Directories or a connected Cloudflare account. Keep existing records for other legitimate sending services.
Review the sending checks
- Open Settings > Domain Manager > Emails.
- Review Will your emails reach the inbox?.
- Check the sending address and each SPF or DKIM finding.
- Use the action beside the specific finding when further setup is needed.
SPF identifies authorized senders for a domain. DKIM lets receiving systems verify signed messages. The record values generated for a site must be copied exactly; another site's authentication records cannot be reused.
Choose the action for the specific check
- Email provider: shows where incoming mail for the domain is delivered. Needs attention here usually means the domain publishes no MX records. Incoming mail is managed in Mailboxes.
- Your "from" address: use Edit to correct the website sending address.
- SPF (spoof protection): use View or Fix to inspect the current policy and proposed correction. A result of Correct · upgrade available offers an optional shorter record; the current record keeps working if it is left in place. A record that lists the same entry more than once reads Your SPF record is correct, but it repeats itself; see When the SPF record repeats itself.
- Sender authentication: use View or Set up. A connected Cloudflare setup can offer Set up my email authentication.
- Your mailboxes' signature (DKIM): use Fix it when shown. This separate check covers messages sent from the hosted mailboxes. The panel publishes the record where it has DNS access or shows the record for manual publication elsewhere. When the domain has no mailboxes on the Brilliant Directories server, an unsigned result shows a grey No mailboxes status with the note that nothing is sent from the server unsigned and that this only matters once a mailbox is created. That row then does not count as an item needing attention.
Every row marked as needing attention counts toward the number on the Emails tab and toward the Domain Manager summary, so the summary reads Everything looks good only when no email row needs attention.
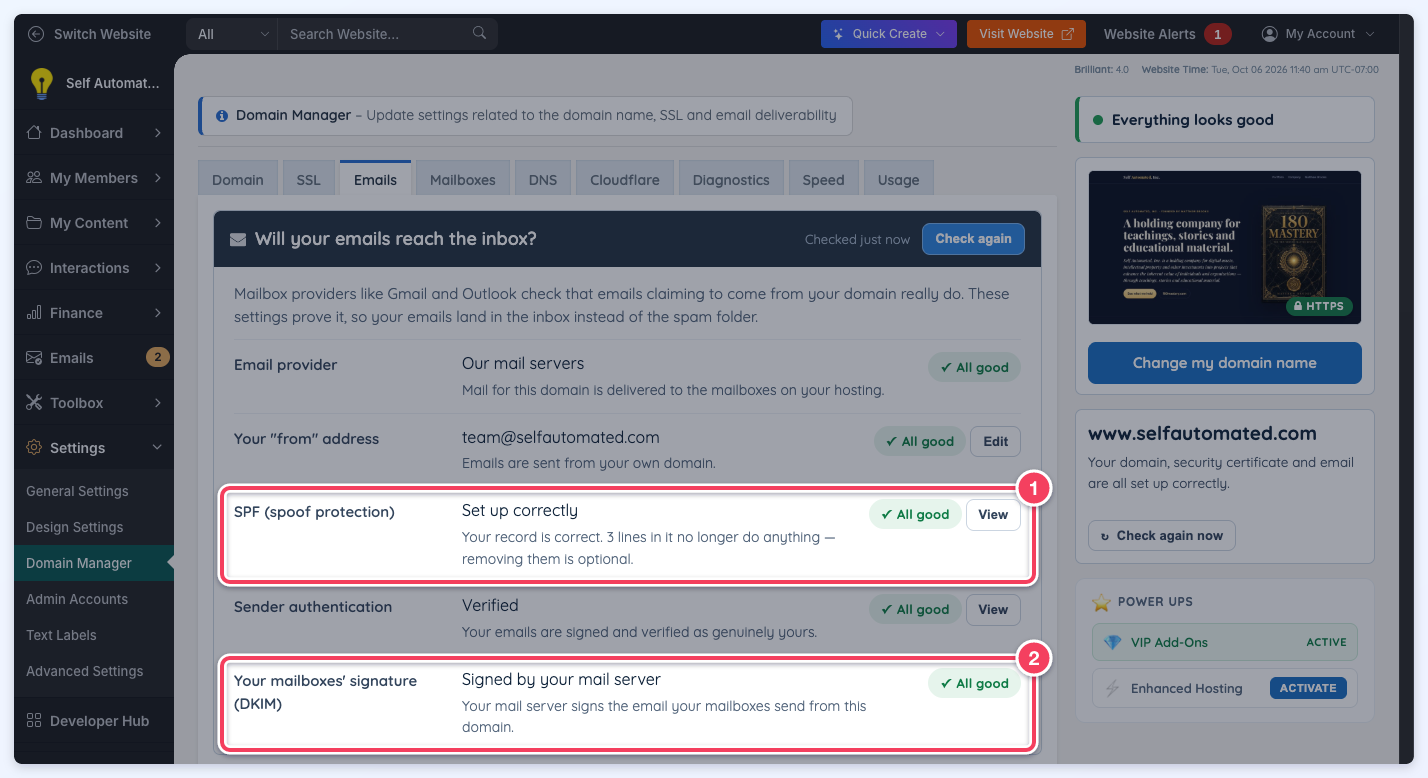
The sending checks on selfautomated.com, where every row is green. The SPF row (1) is where a repeated entry is reported; the mailbox signature row (2) shows No mailboxes when the domain has no mailboxes on the Brilliant Directories server.
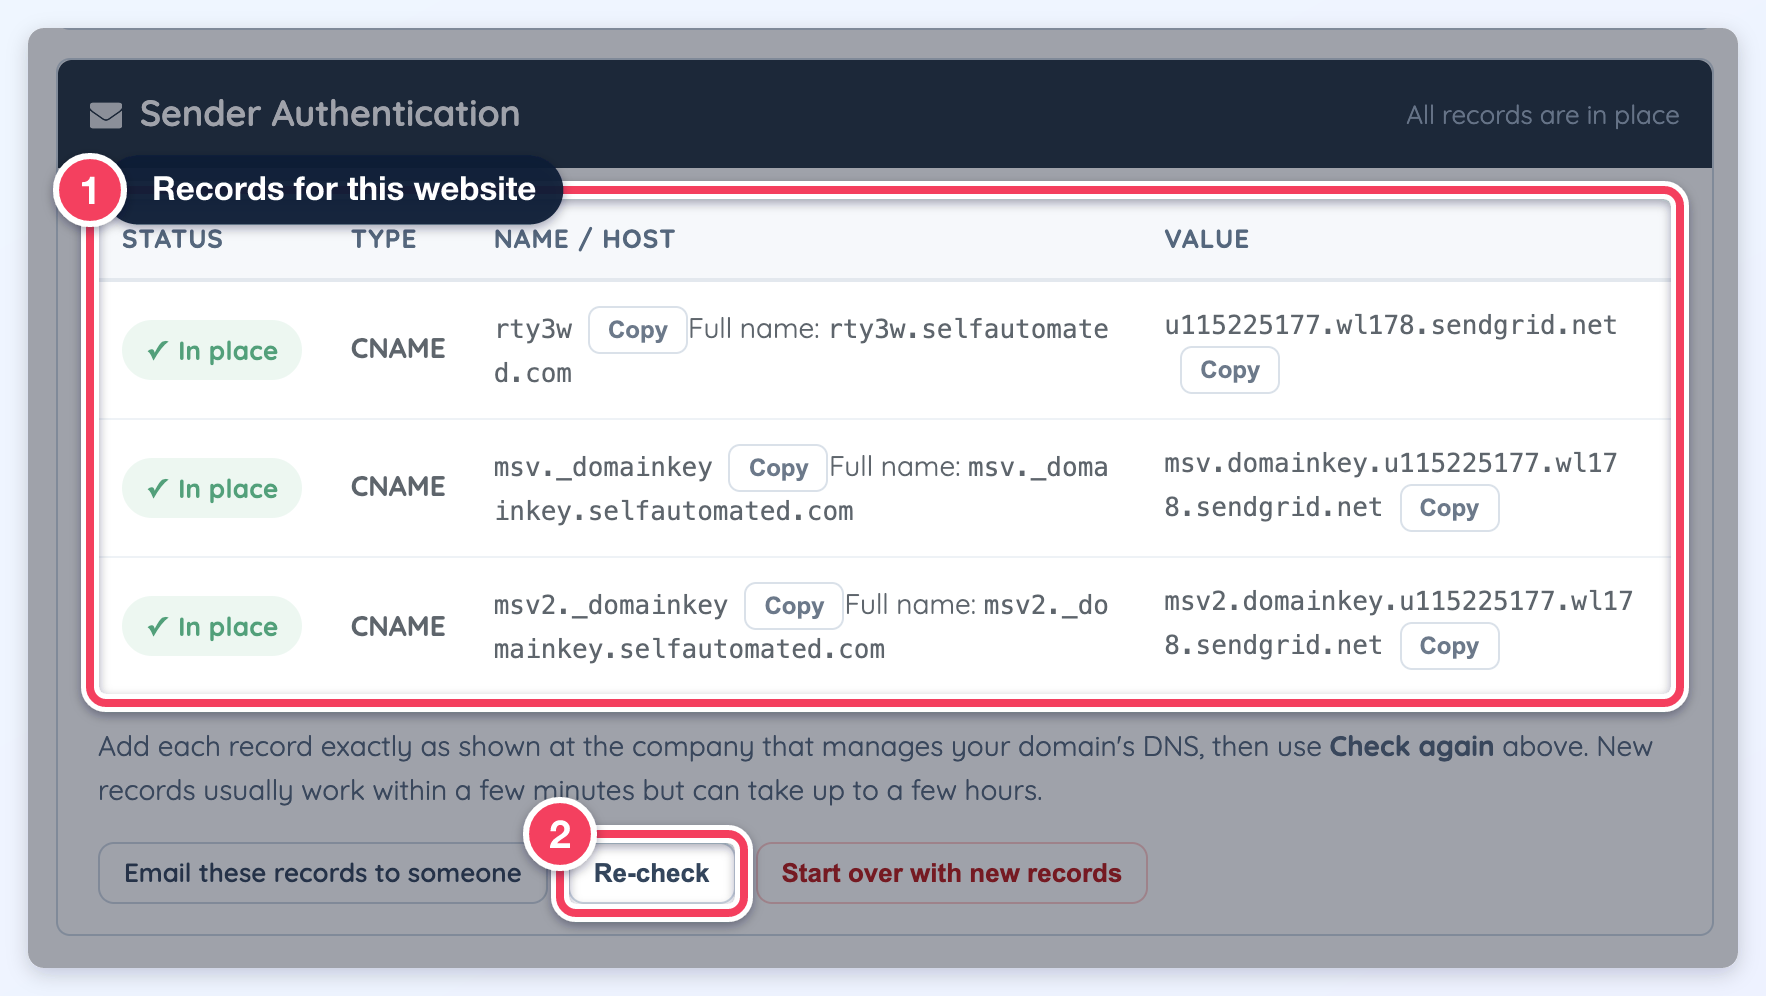
The Sender Authentication records generated for this website (1), all In place. After adding them at the DNS provider, click Re-check (2). Copy the values generated for the site being configured.
Complete Sender Authentication
- Locate the Sender Authentication card.
- If setup is offered, follow its setup action to generate the site's records.
- Review the status, type, host, and value of each displayed record.
- If the panel offers automatic publication, review and apply that action.
- If manual publication is required, add the records at the active DNS provider.
- Click Re-check after the records are saved.
The panel can publish records when the DNS is hosted by Brilliant Directories or the correct Cloudflare zone is connected. DNS hosted elsewhere still requires a change at that provider. During a domain switch, the system attempts the same authentication setup and reports whether manual work remains.
A record should be entered using all of its displayed fields:
Type: The type shown for that record
Name: The exact Name / Host shown
Value: The exact generated value shown
Some DNS providers automatically append the domain to a host entry. Check the resulting complete hostname so the domain is not appended twice. Cloudflare email-authentication CNAME records must use DNS only / Direct, rather than its website proxy.
Preserve existing SPF senders
Do not add a second SPF policy or replace a working policy with a generic example. The panel's supported SPF update preserves existing permitted senders when it can safely merge the required addition. If it reports multiple SPF policies or a policy that cannot be safely updated, have the DNS administrator reconcile the existing policy before retrying.
When the panel can safely publish the missing or merged policy to a supported DNS zone, it may complete that correction automatically. With external DNS, Copy this record provides the value to publish there. A conflict can instead offer Replace them with this single record; review the proposed policy and every sending service before explicitly confirming a replacement.
When the SPF record repeats itself
An SPF record that lists the same entry twice, such as the same include: term, still works. Each copy spends one of the ten DNS lookups that mail providers allow, and the second copy authorizes nothing new. In that case the SPF row reads Your SPF record is correct, but it repeats itself, names the repeated entry, and states that switching is optional. The SPF details show a Your record repeats itself warning listing each repeated entry, and the proposed record below it keeps one copy of each entry and everything else unchanged.
- Click View on the SPF (spoof protection) row.
- Compare the proposed record with the current one; only the repeated copy is removed.
- Publish the proposed record where the panel offers it, or replace the record at the DNS provider with the proposed value.
- Click Check again.
A repeated entry inside one record is different from a domain that publishes two separate SPF records, which is reported as Your domain publishes a number of SPF records and needs the records merged into one.
Other available actions
- Email these records to someone sends the instructions to the specified recipient. Confirm the intended recipient before sending.
- Start over with new records replaces the current sender-authentication setup. The newly generated records must then be published. Use this only when restarting authentication is intended.
- An Email delivery card appears when SendGrid has stopped delivering to one of the website's own addresses: the sending address, the default website email, an admin login, or a mailbox on the domain. Bounces, blocks, and addresses SendGrid judged invalid are cleared automatically when the tab opens, and the card lists them under Email delivery restored. A spam report or an unsubscribe is not reversed automatically, because the person at that address asked to stop receiving mail: the card reads An address needs your OK, and Start delivering again clears it. Fix the cause of a real bounce, such as a full mailbox or a mistyped address, or the address can be suppressed again.
Confirm the result
After rechecking, each required authentication record should show a successful result. Send a website-generated test message and confirm its arrival. Authentication improves delivery but does not guarantee inbox placement; mailbox rules, message content, complaints, and recipient-provider policies can still affect delivery.
If a record remains unverified, compare its full hostname, type, target, and Cloudflare proxy state with the values in the card. DNS publication and verification can take time. Use the DNS tab to compare published records, and contact support with the specific failed record if the values remain correct but verification fails.
