
How to Cancel a Brilliant Directories Subscription
Link: https://support.brilliantdirectories.com/support/solutions/articles/12000109071
Active Brilliant Directories subscriptions can be managed from the account management area, including the option to cancel a subscription when needed.
This article explains how to access the cancellation option, review important account and billing details, and complete the cancellation process for an active subscription.
For a full overview of the Account Dashboard, see this article:
Access Payments
Subscription details are managed from the Brilliant Directories Account Dashboard.
- From the top navigation menu, click Payments.
- Select Website Plans from the dropdown menu.
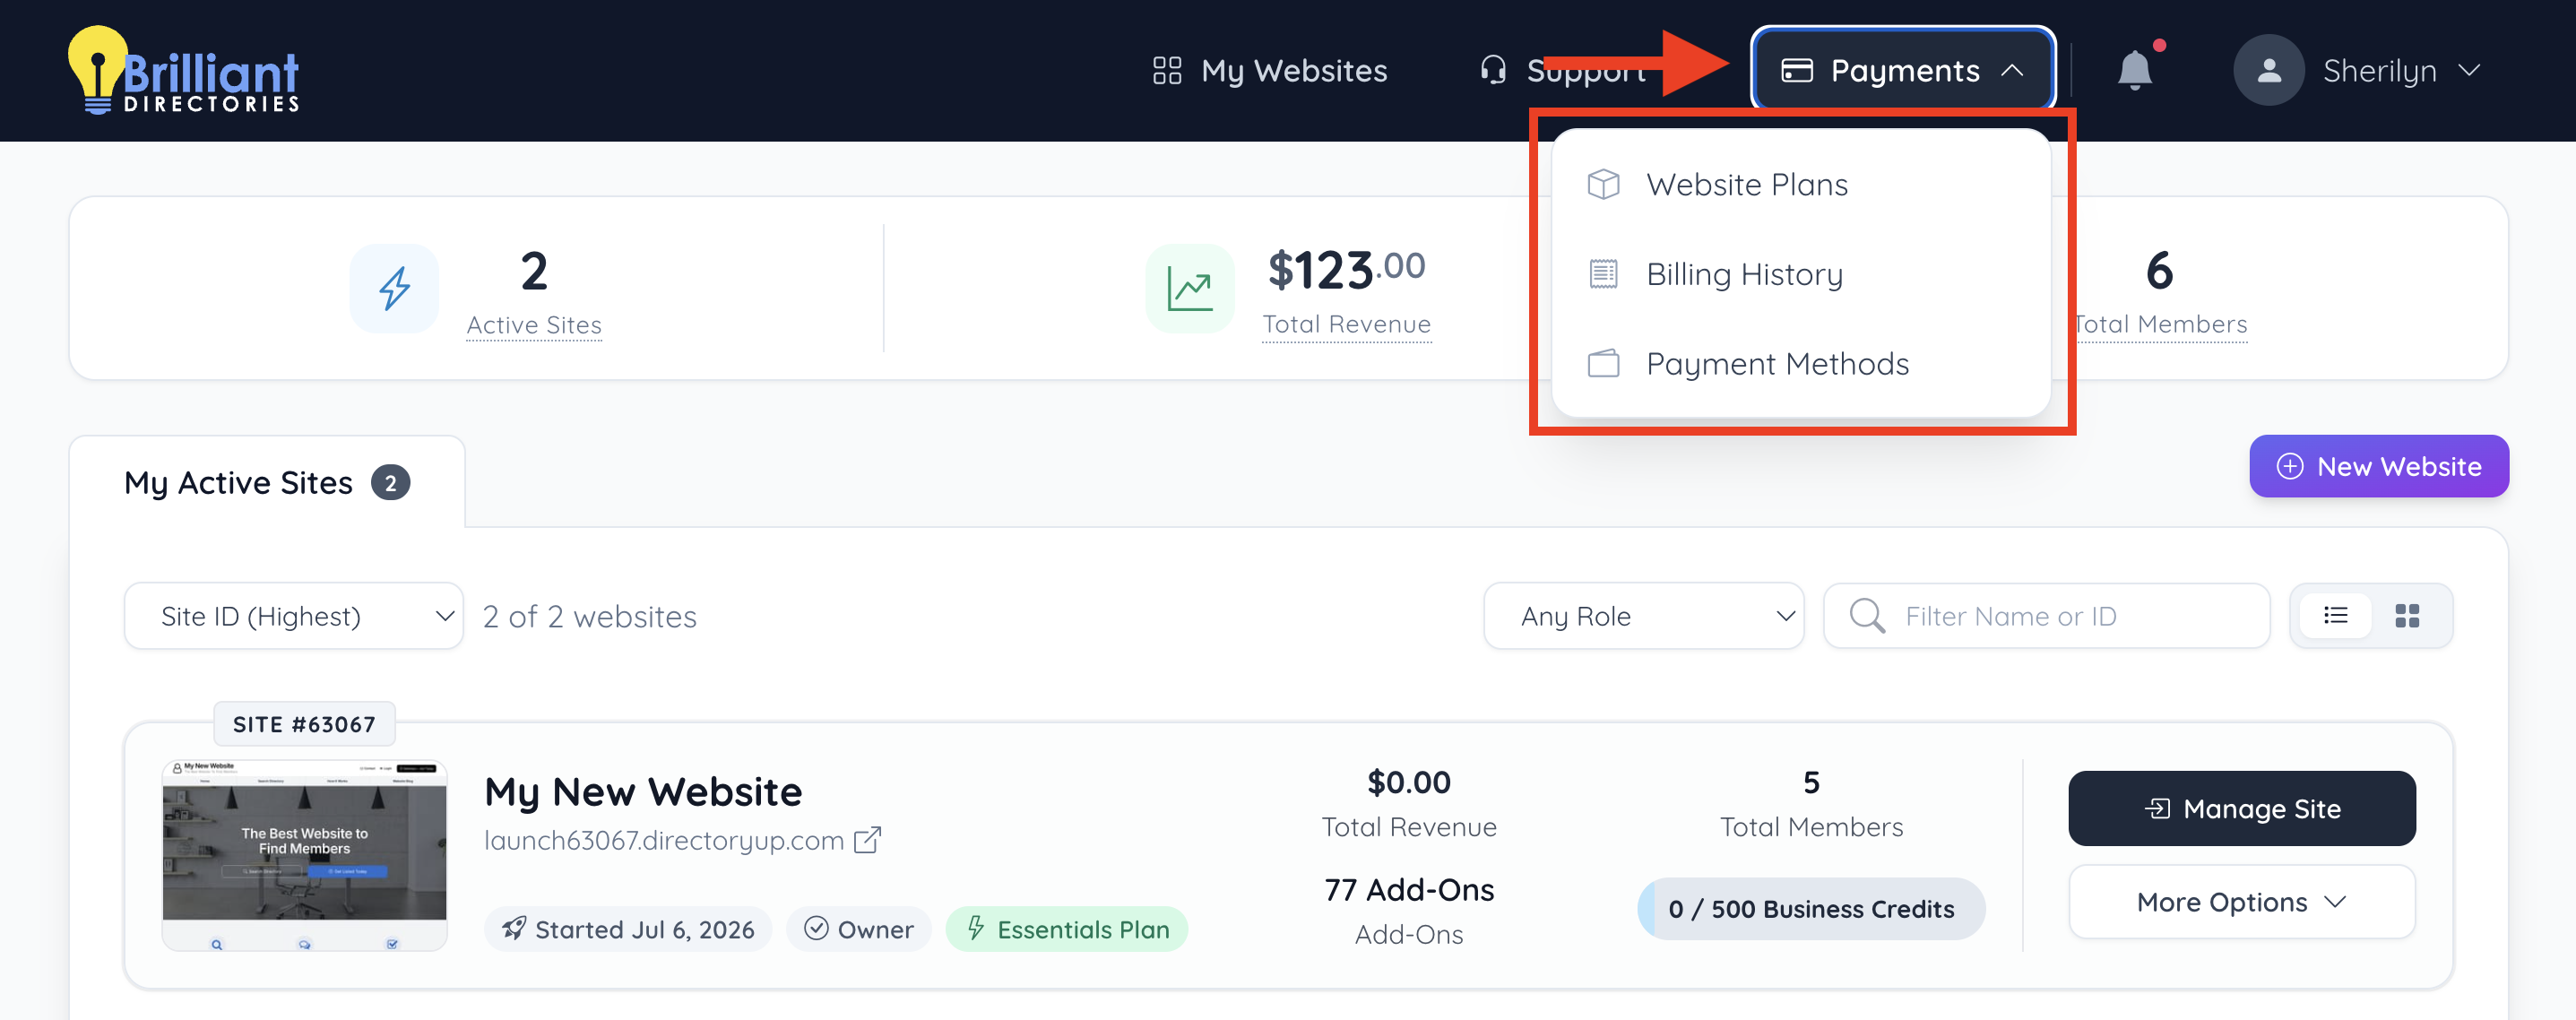
The Payments menu also includes access to:
- Billing History
- Payment Methods
Website Plans Tab
The Website Plans tab displays the active subscription details for each website connected to the account.
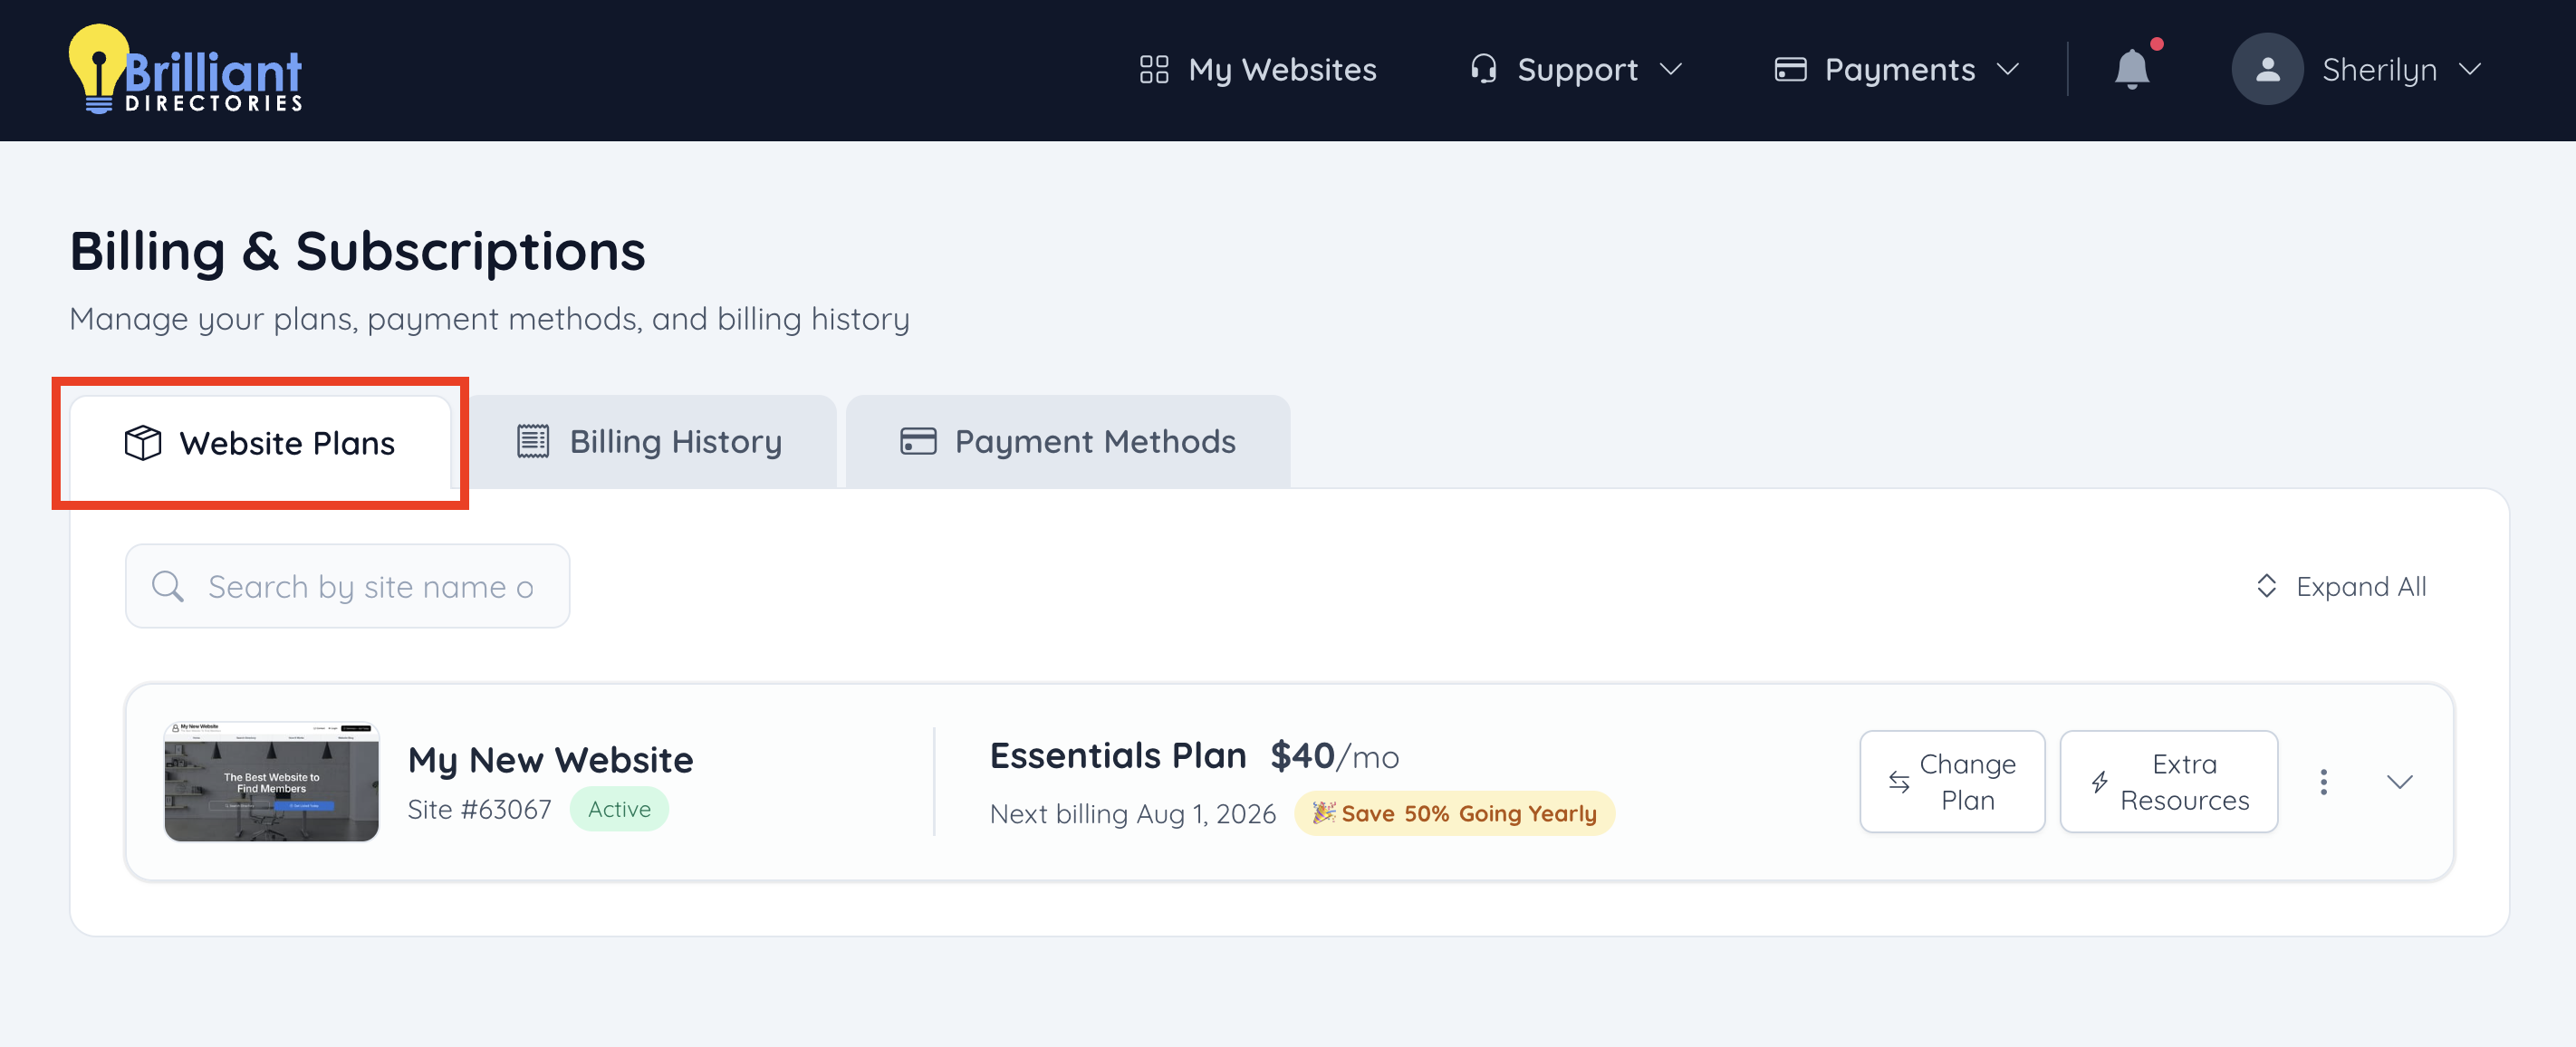
Each website plan card can include:
- Website name
- Site ID
- Website status
- Current plan name
- Monthly or yearly subscription amount
- Next billing date
- Change Plan button
- Extra Resources button
- Three-dot menu with additional options
- Expandable usage details
If multiple websites are connected to the same account, confirm the correct website name and Site ID before making any plan, billing, subscription, or cancellation changes.
Change Plan
The Change Plan button opens the available plan options for the selected website.
- Go to the Website Plans tab.
- Locate the website that needs to be updated.
- Click Change Plan.
- Review the available plan options.
- Select the preferred plan option when ready to make a change.
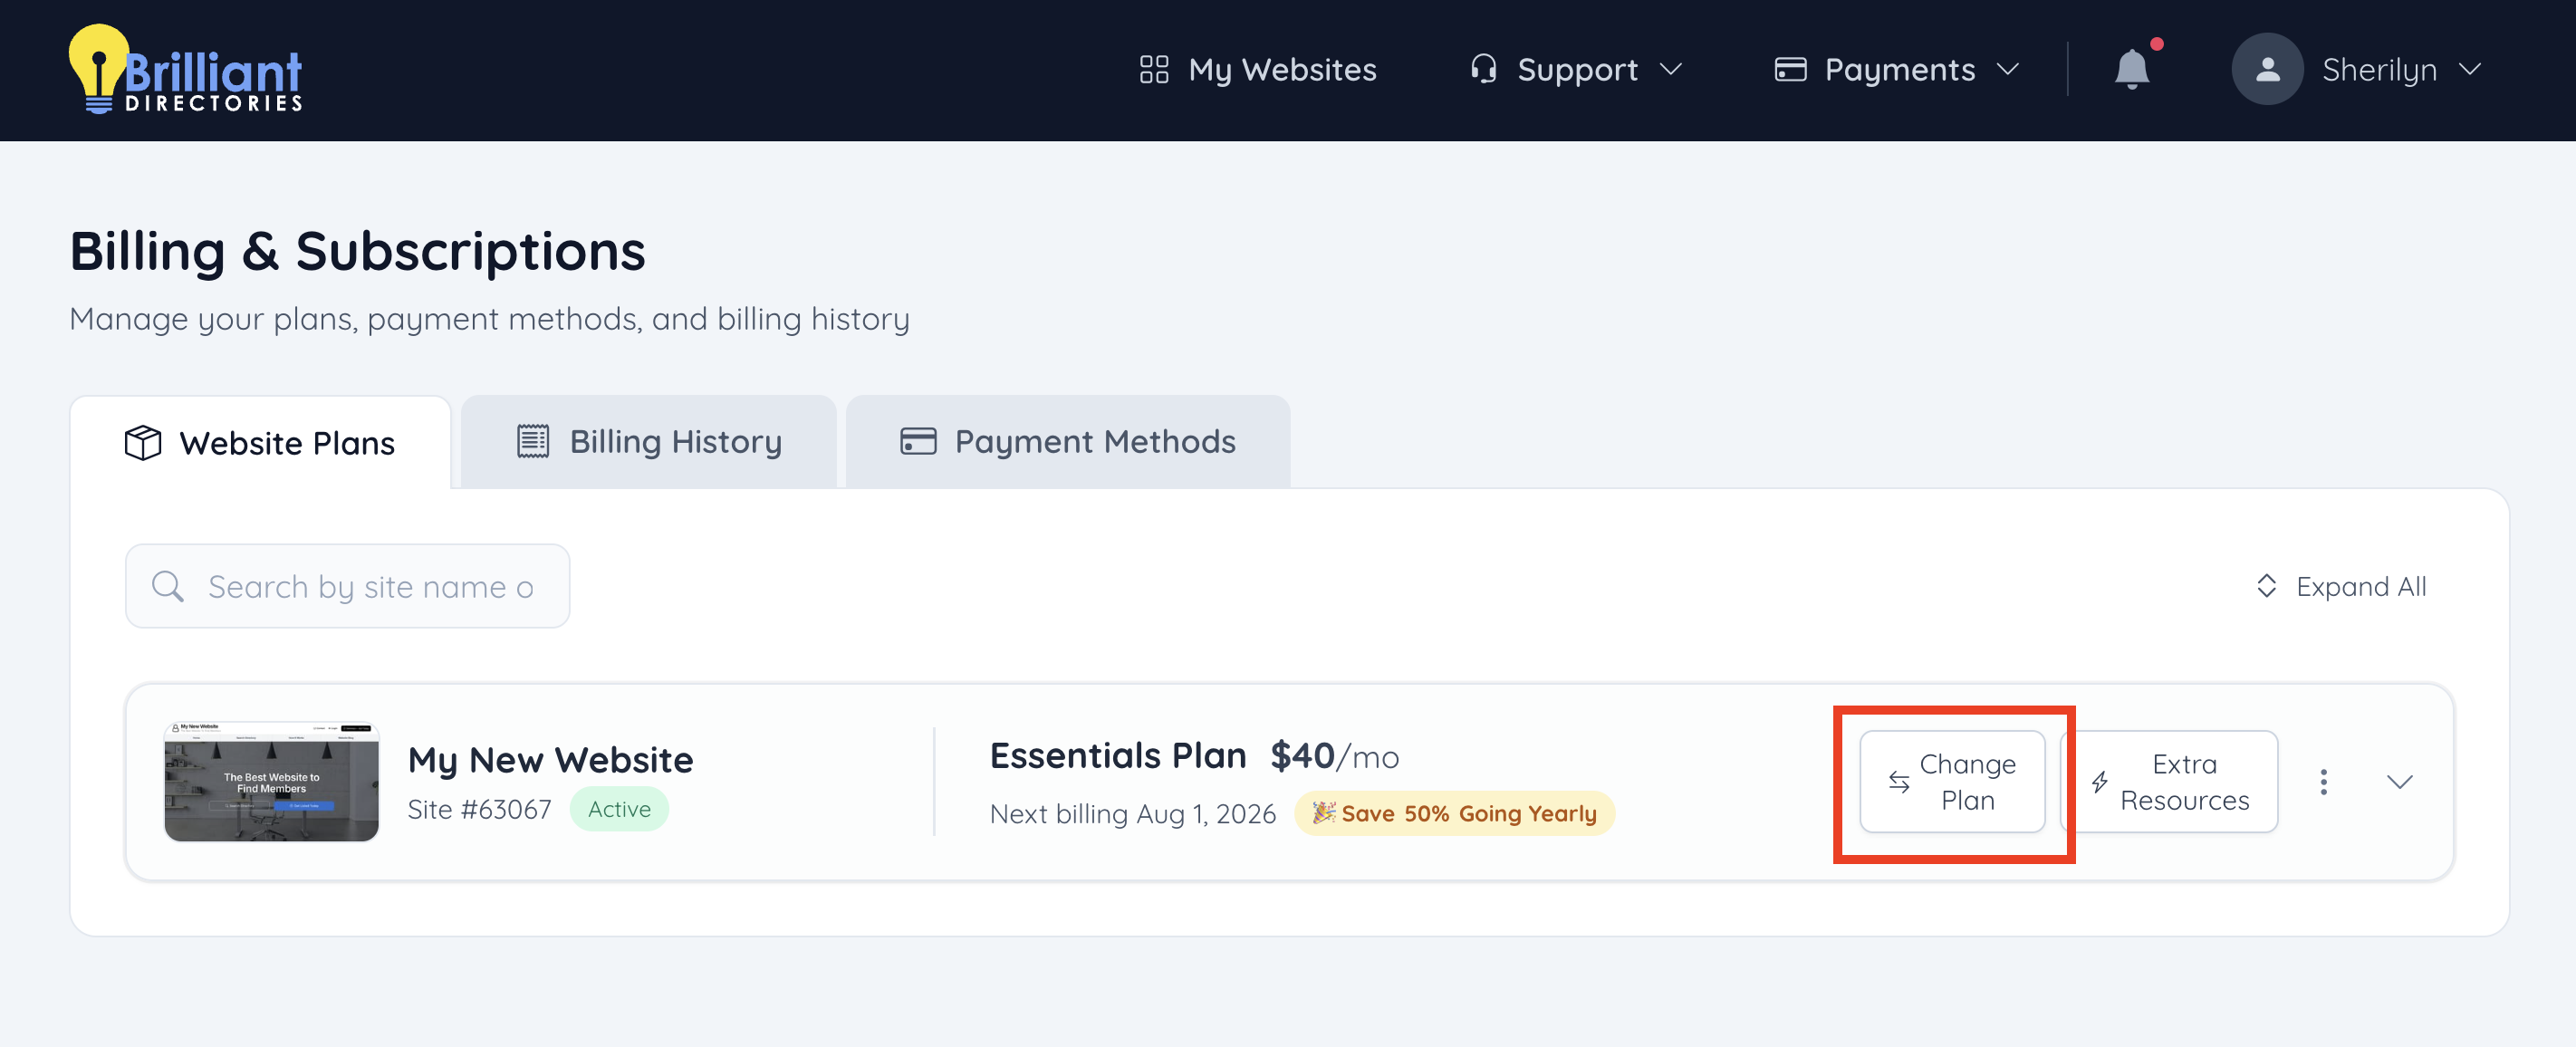
The Change Plan screen displays the current plan, available plan options, plan pricing, and usage comparisons. Plan changes may apply immediately and may include prorated billing depending on the selected change.
Extra Resources
The Extra Resources button opens the resource management window for the selected website.
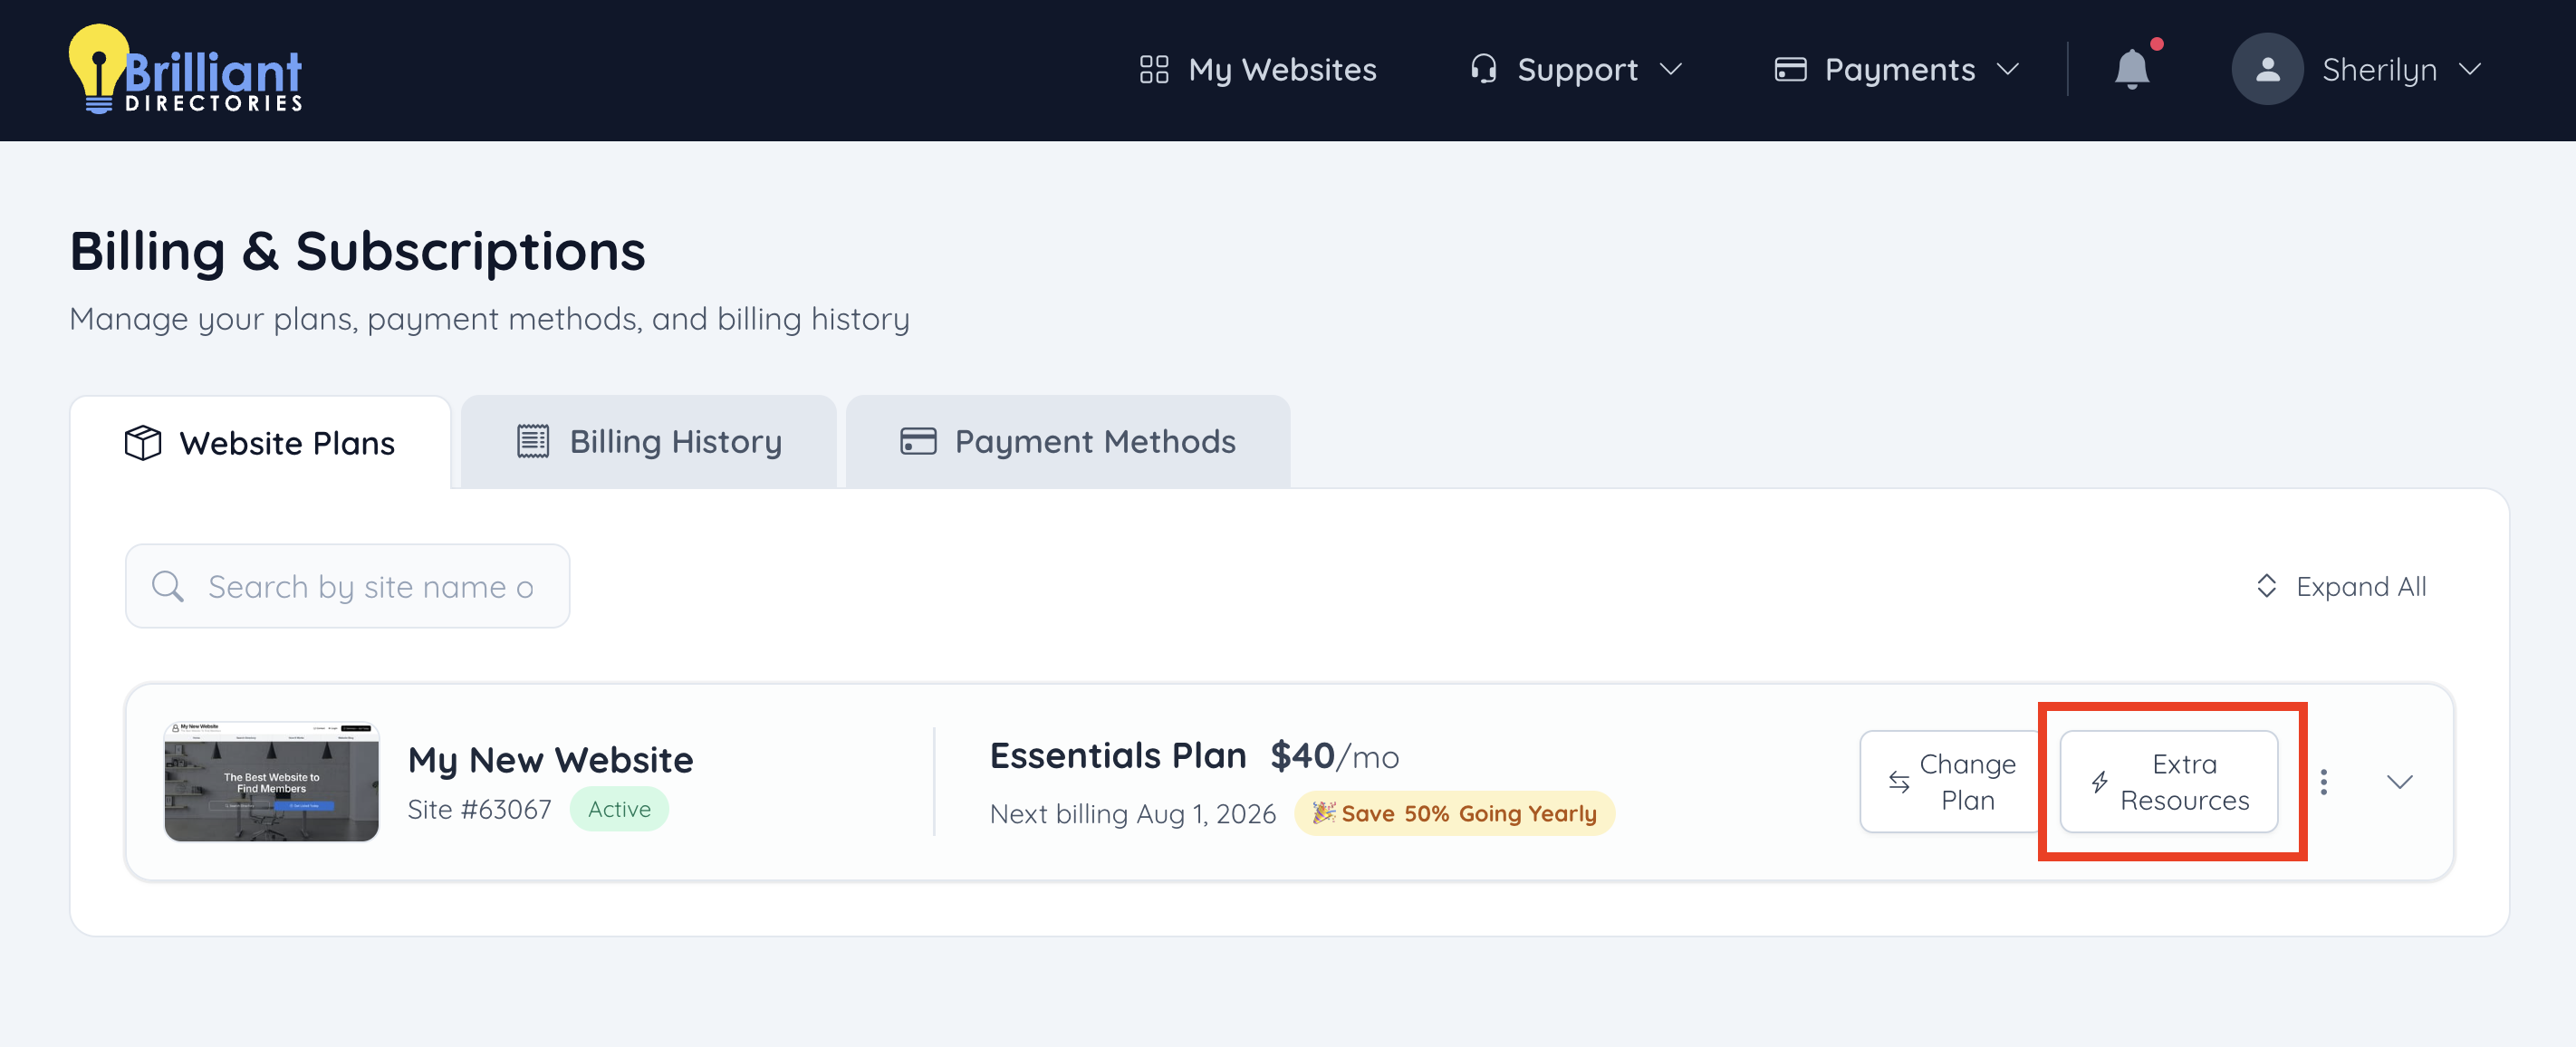
Extra resources can include:
- Extra members
- Extra emails
- Extra bandwidth
- Extra storage
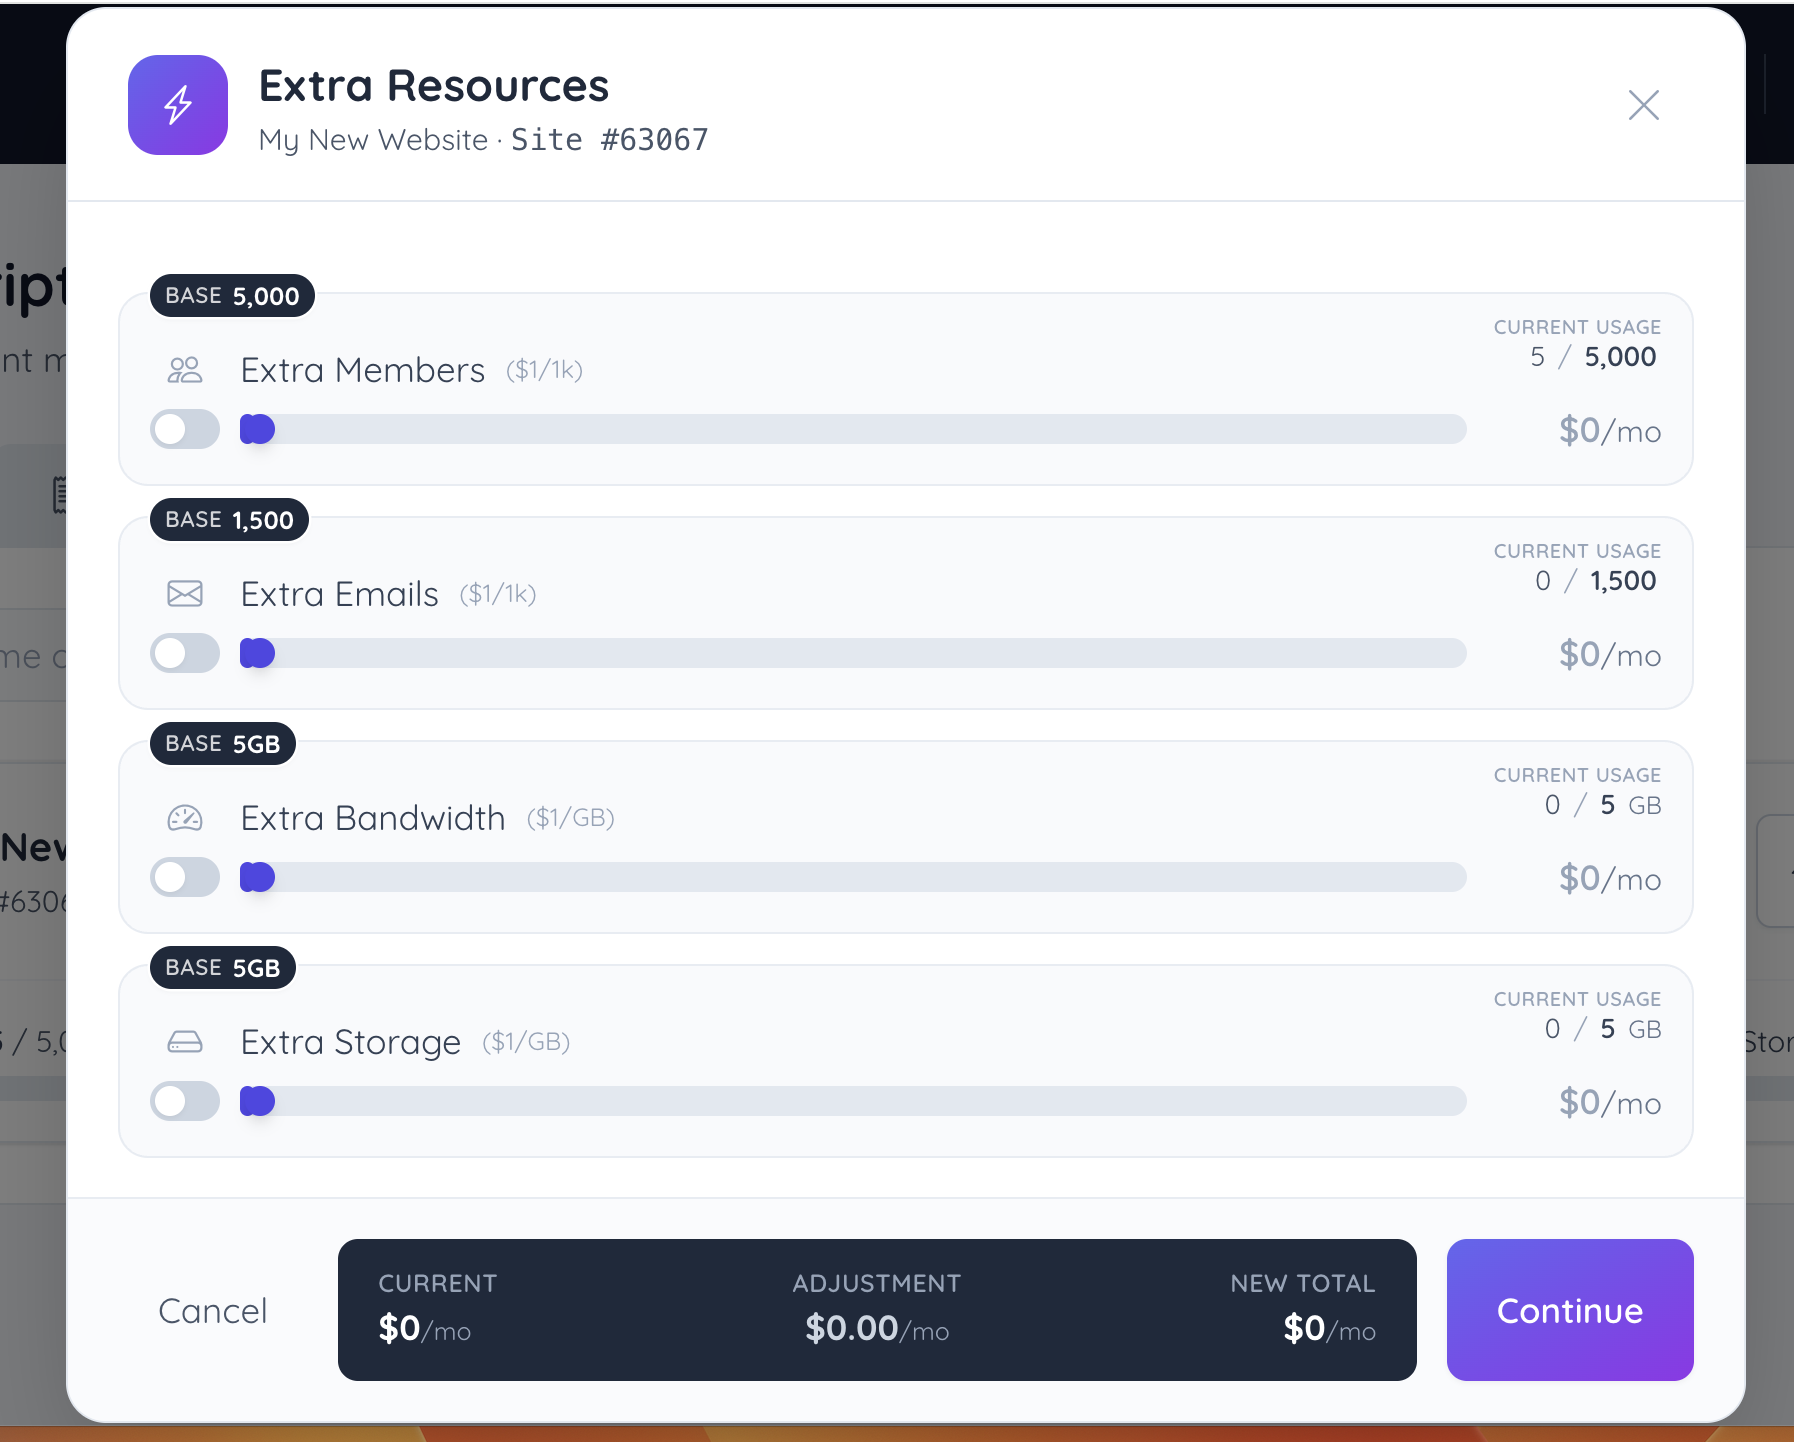
The Extra Resources window displays the base amount included with the plan, current usage, available adjustment controls, and the updated monthly total before continuing.
- Go to the Website Plans tab.
- Locate the website that needs additional resources.
- Click Extra Resources.
- Adjust the available resource options as needed.
- Review the current total, adjustment amount, and new total.
- Click Continue to proceed.
View Website Usage Details
The arrow button on the website plan card expands the usage details for the selected website.
- Go to the Website Plans tab.
- Locate the website plan card.
- Click the arrow icon on the right side of the card.
- Review the usage details displayed below the plan card.
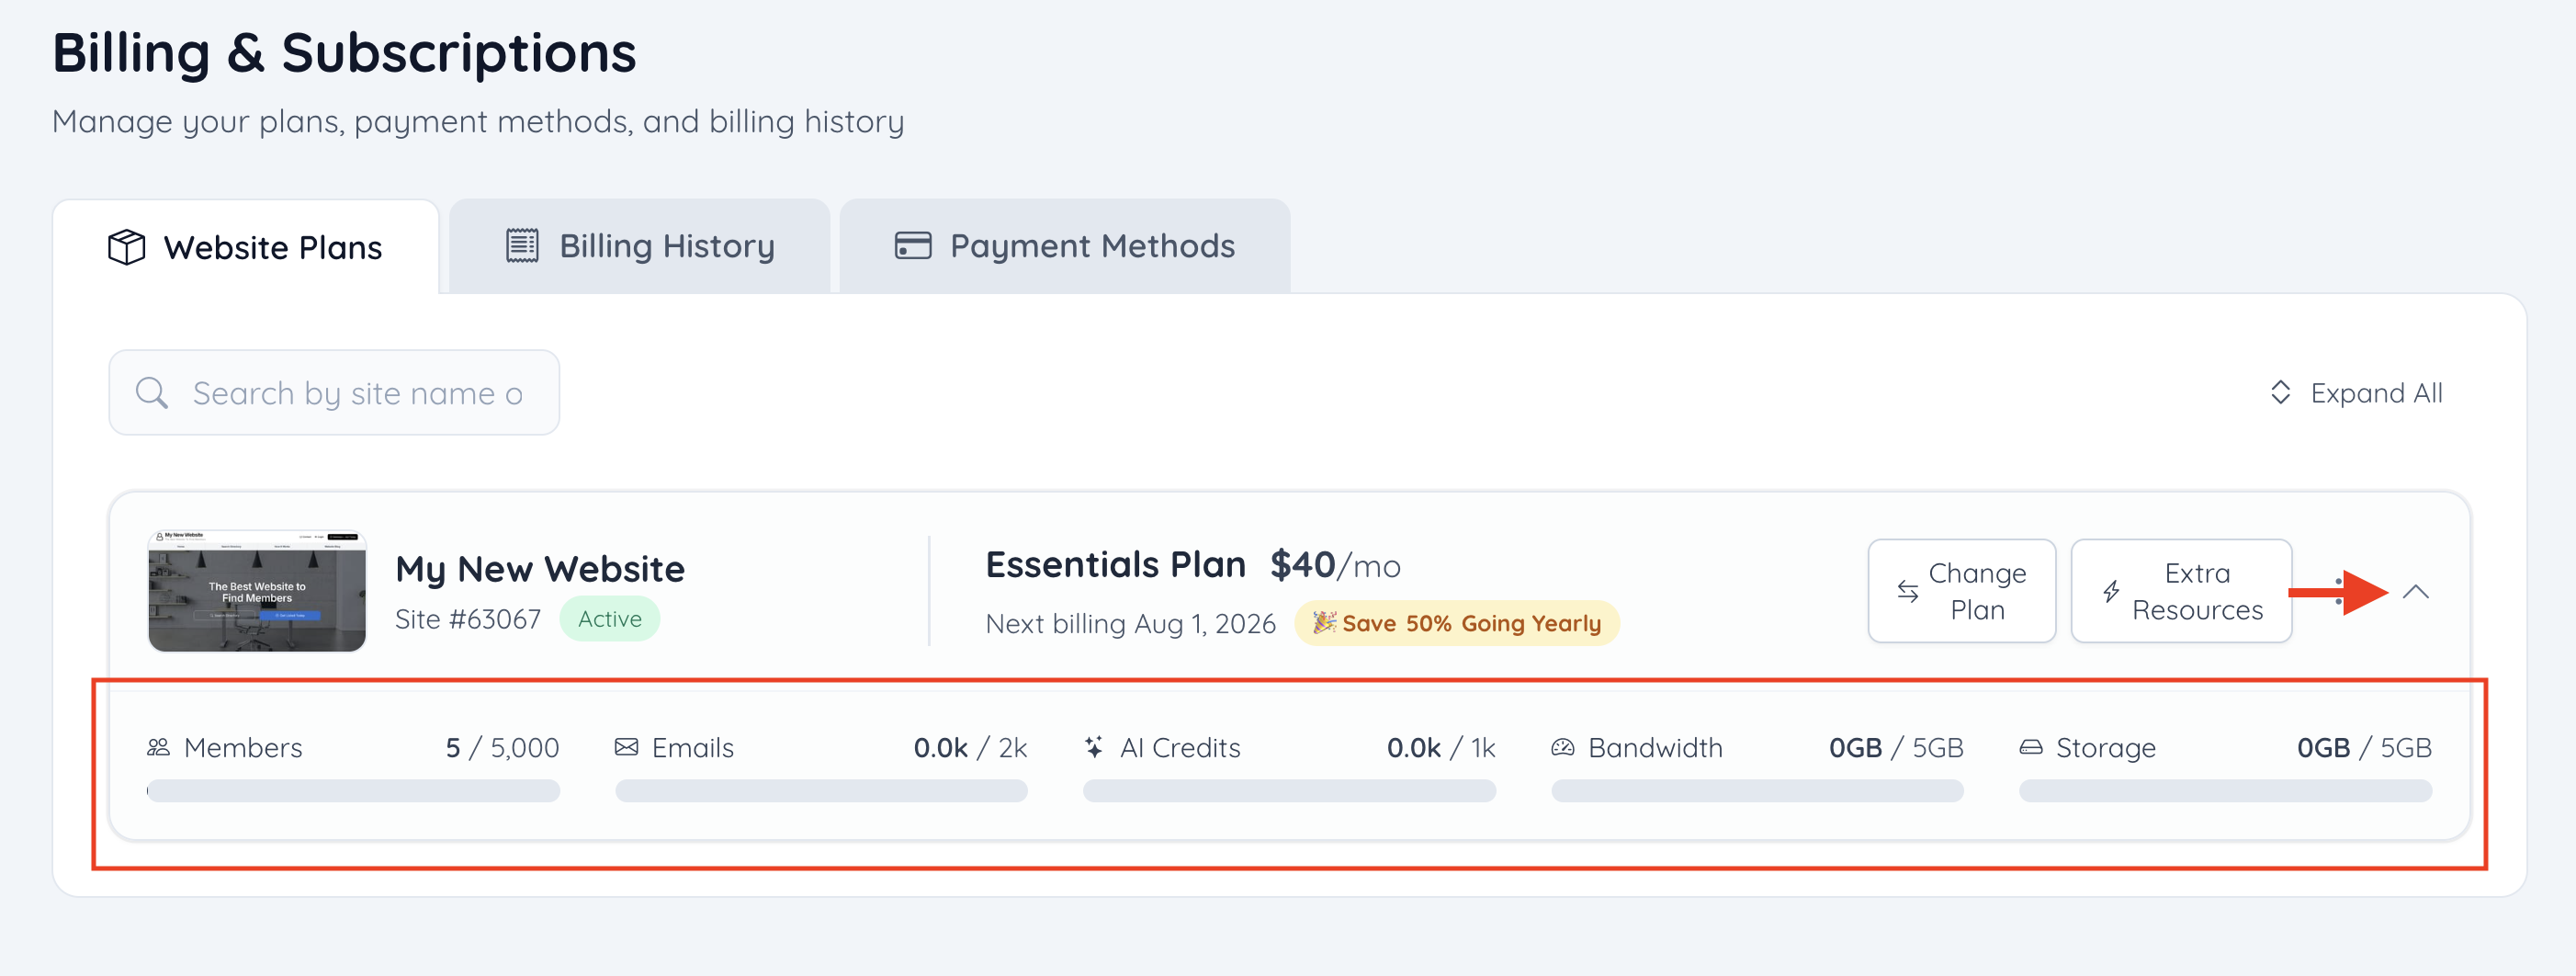
When expanded, the website plan card can show usage information for:
- Members
- Emails
- AI Credits
- Bandwidth
- Storage
Additional Website Plan Options
The three-dot menu on the website plan card includes additional actions for the selected website.
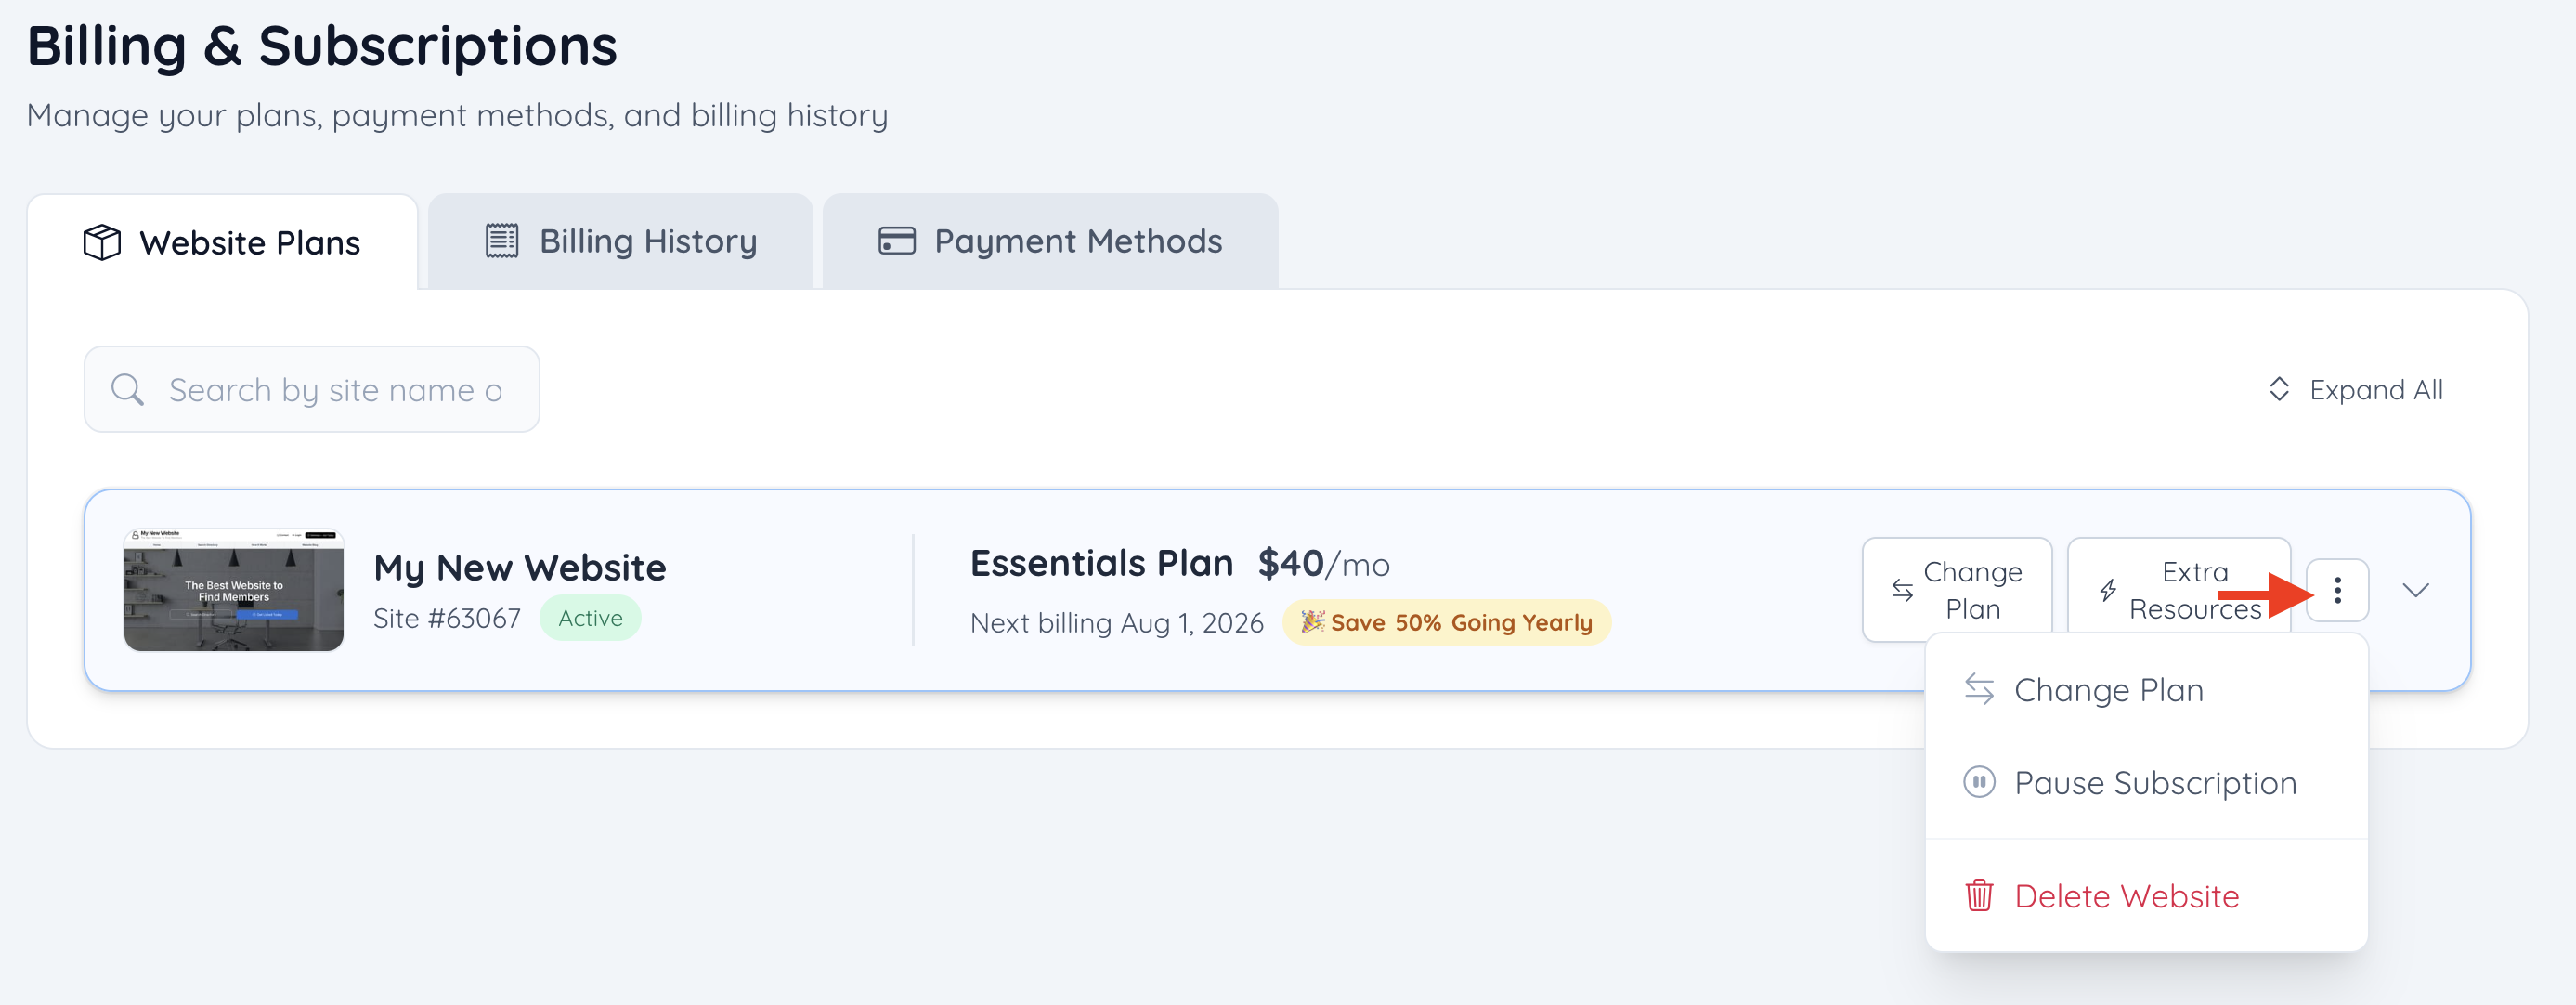
The available options include:
- Change Plan: Opens the plan selection screen.
- Pause Subscription: Opens the subscription pause flow.
- Delete Website: Opens the website cancellation flow.
Important: Pausing a subscription and deleting a website are separate actions. The Delete Website option starts the cancellation process for the selected website subscription.
Pause a Subscription
The Pause Subscription option is available from the three-dot menu on the website plan card.
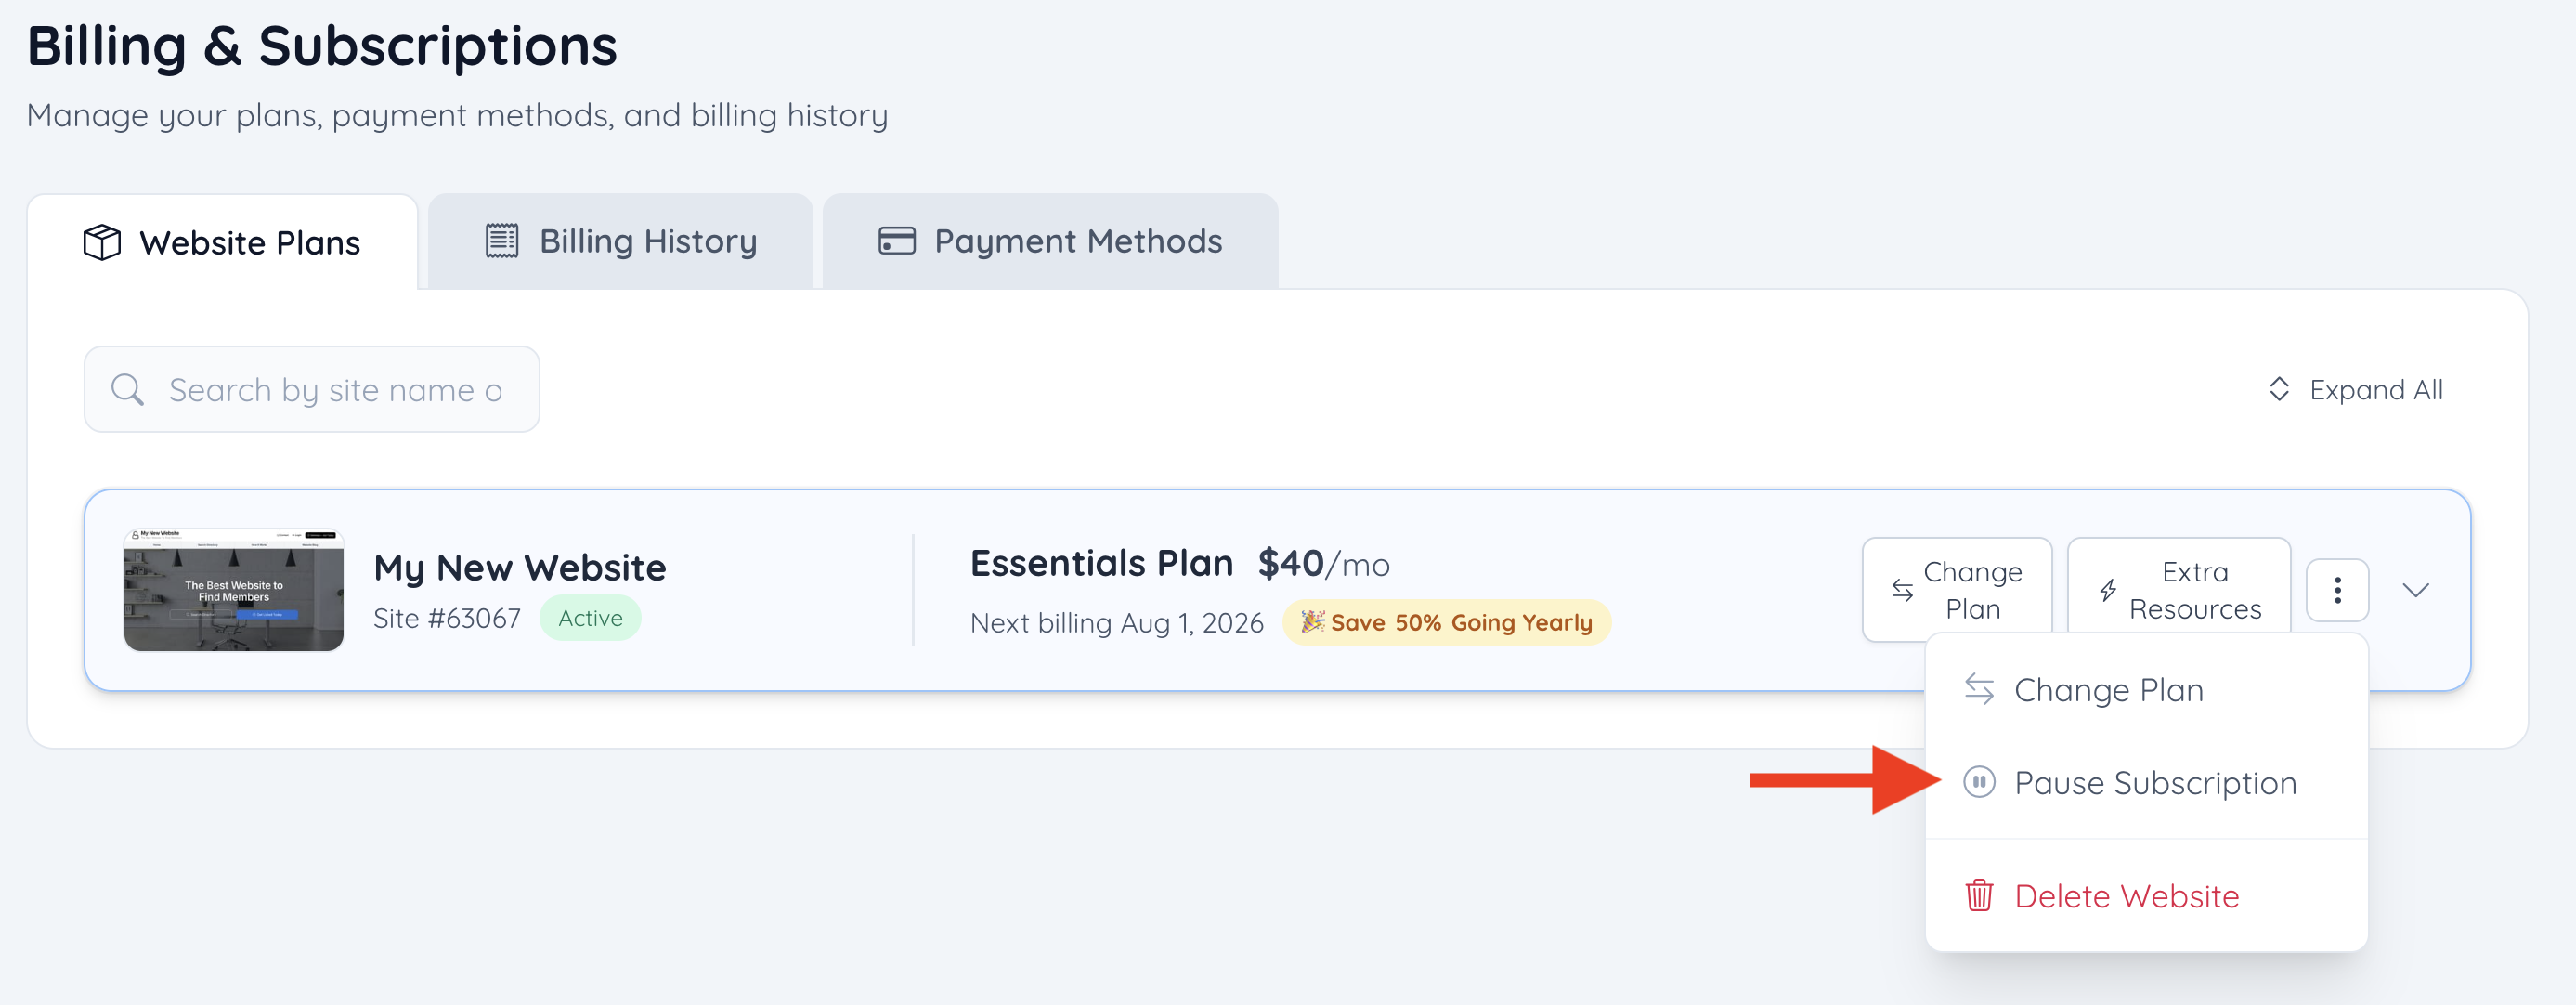

- Go to the Website Plans tab.
- Locate the website subscription that needs to be paused.
- Click the three-dot menu on the right side of the website plan card.
- Select Pause Subscription.
Before You Go Screen for Pausing
After selecting Pause Subscription, a Before You Go window may appear.
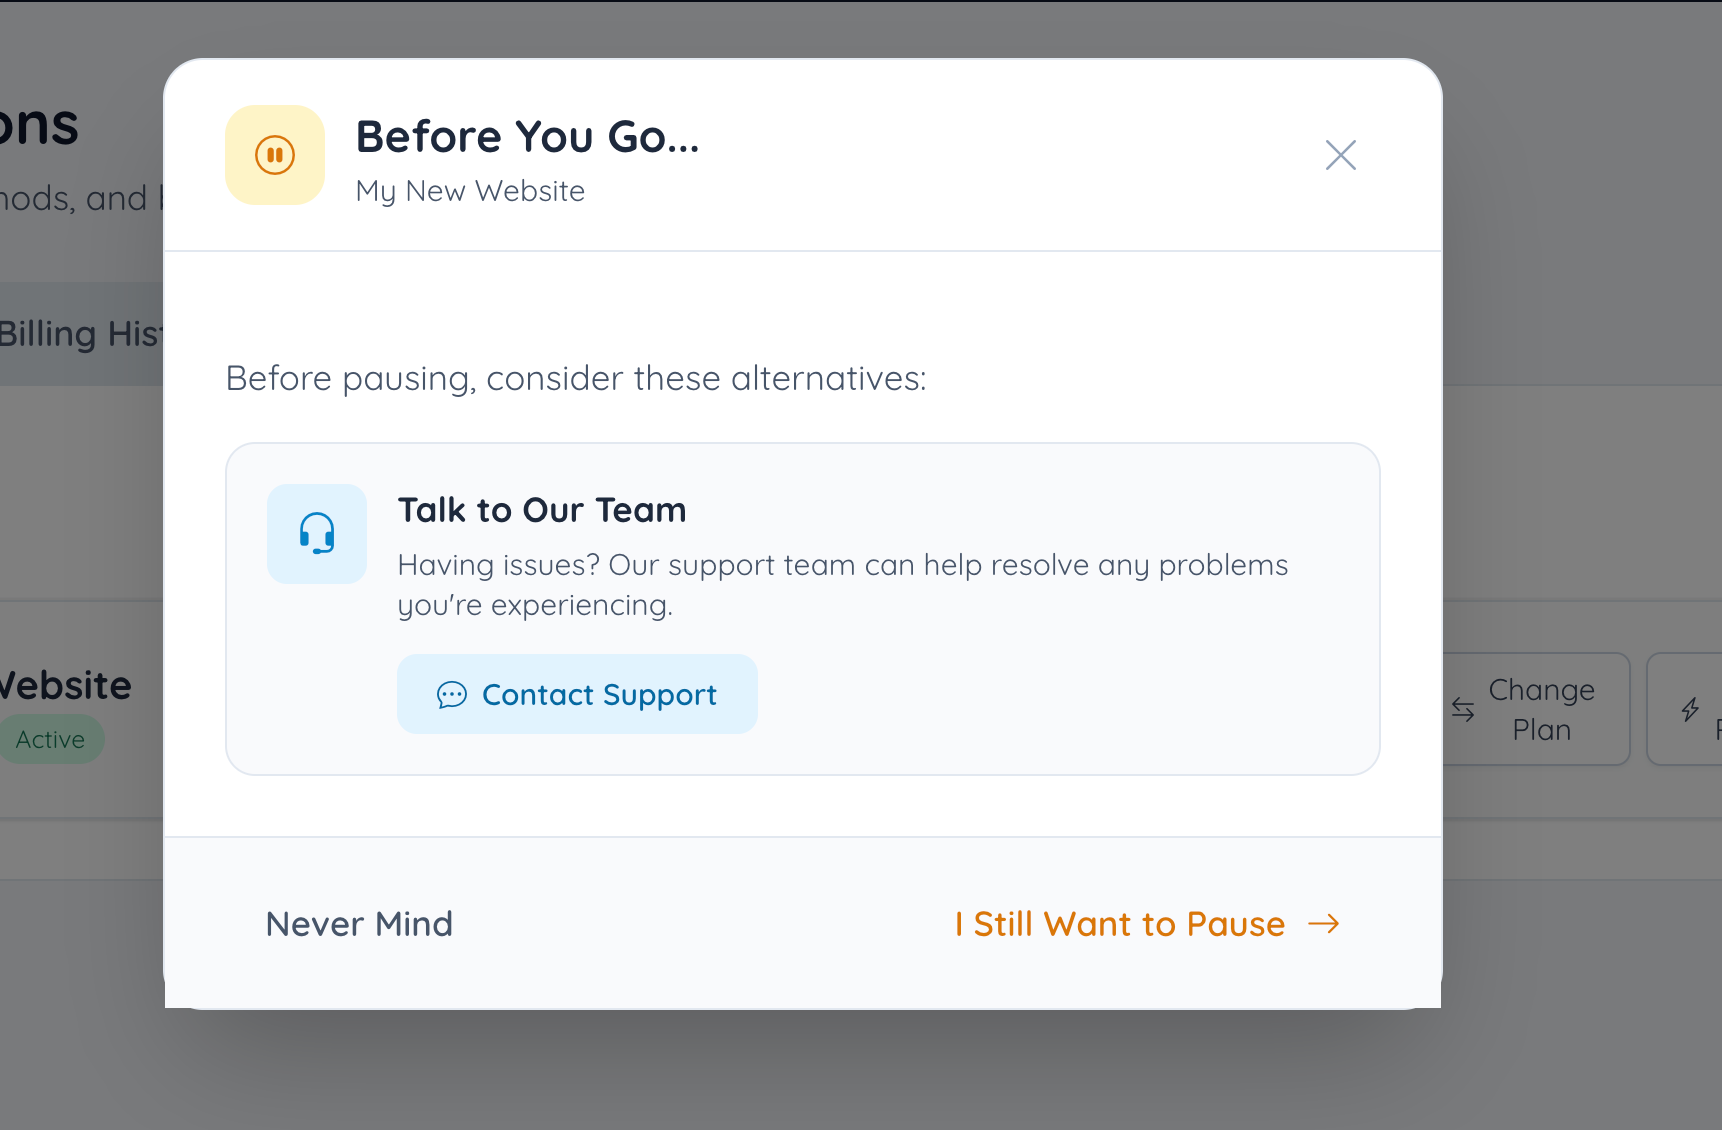
This screen includes an option to contact the support team before continuing with the pause request.
The available options include:
- Contact Support: Opens the support option for help with the account or website.
- Never Mind: Closes the pause flow and keeps the subscription active.
- I Still Want to Pause: Continues to the subscription pause options.
Choose When the Pause Takes Effect
The Pause Subscription window allows the account owner to choose when the pause should take effect.
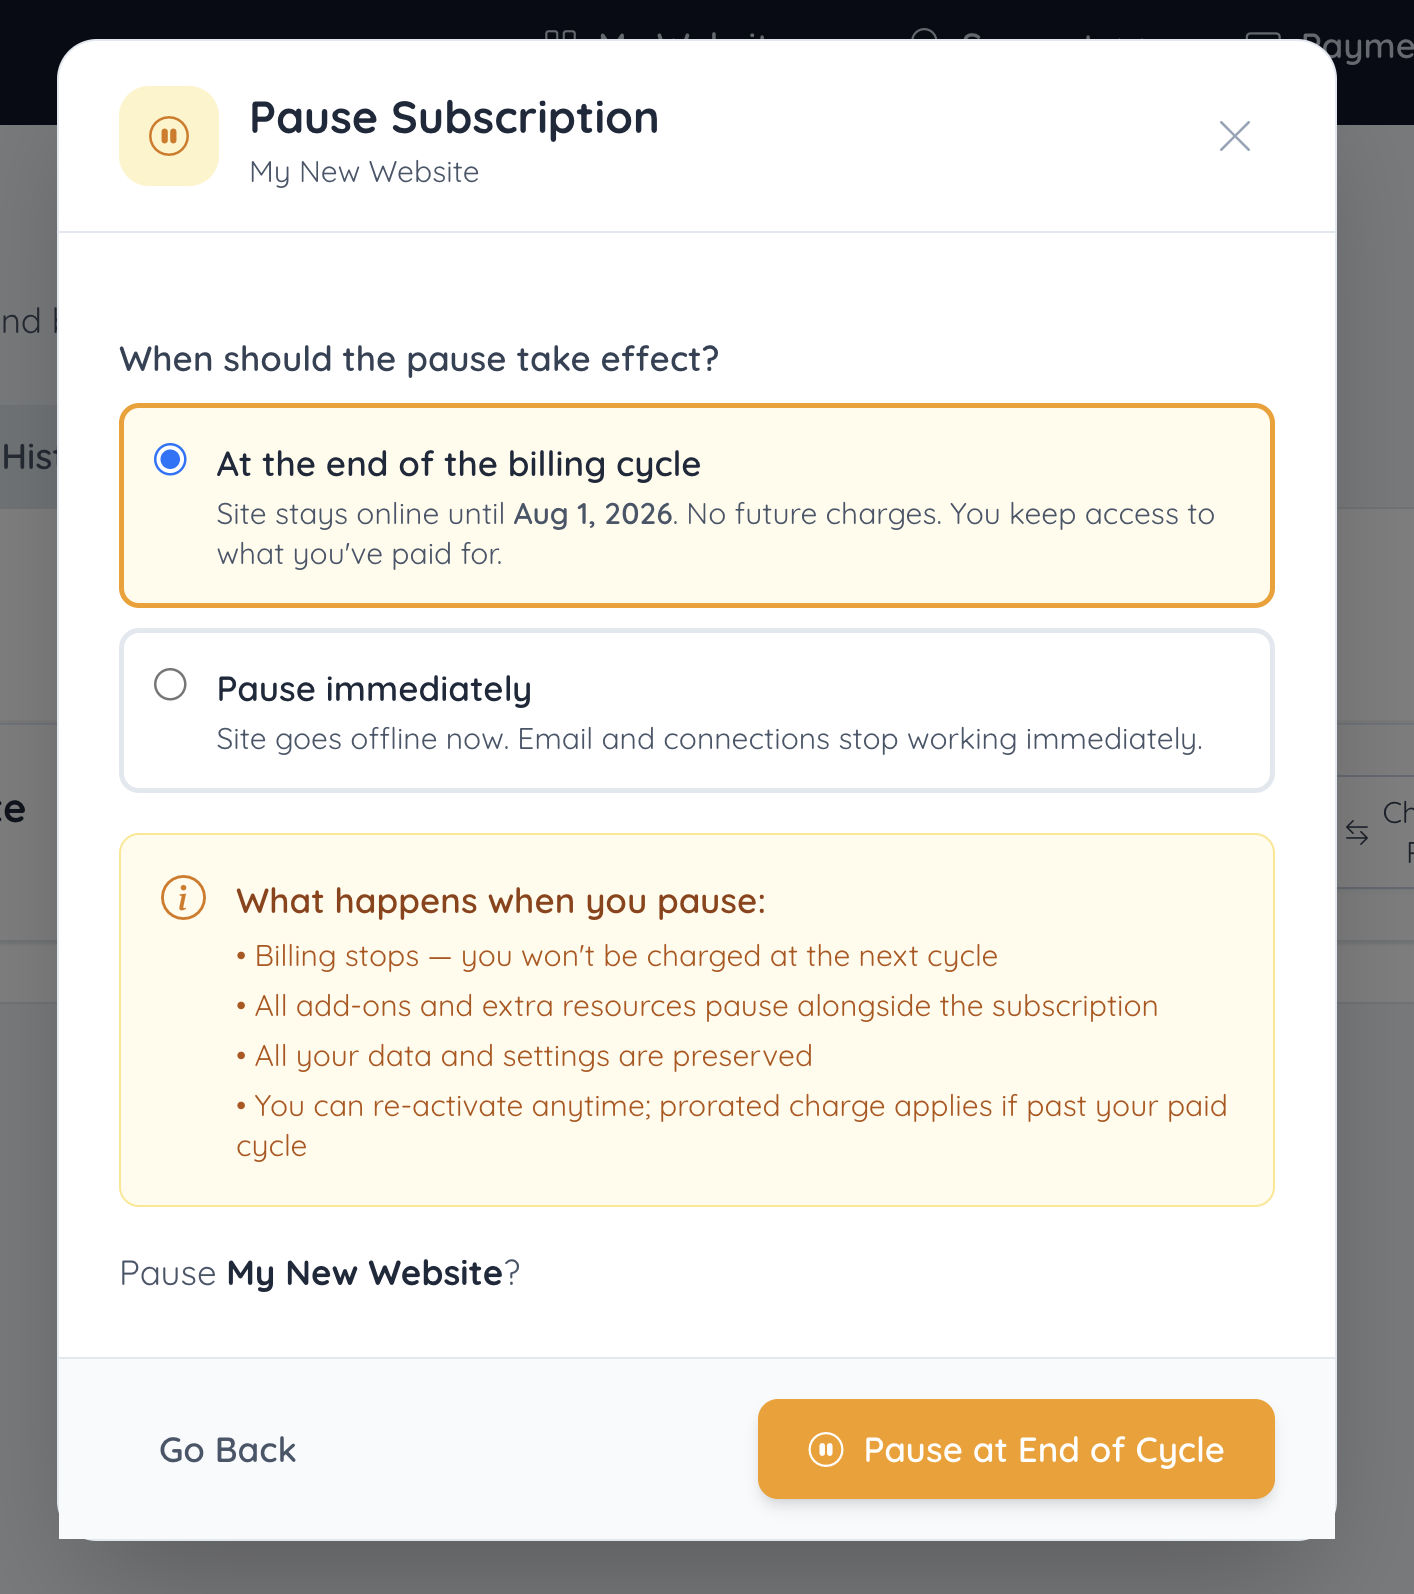 | 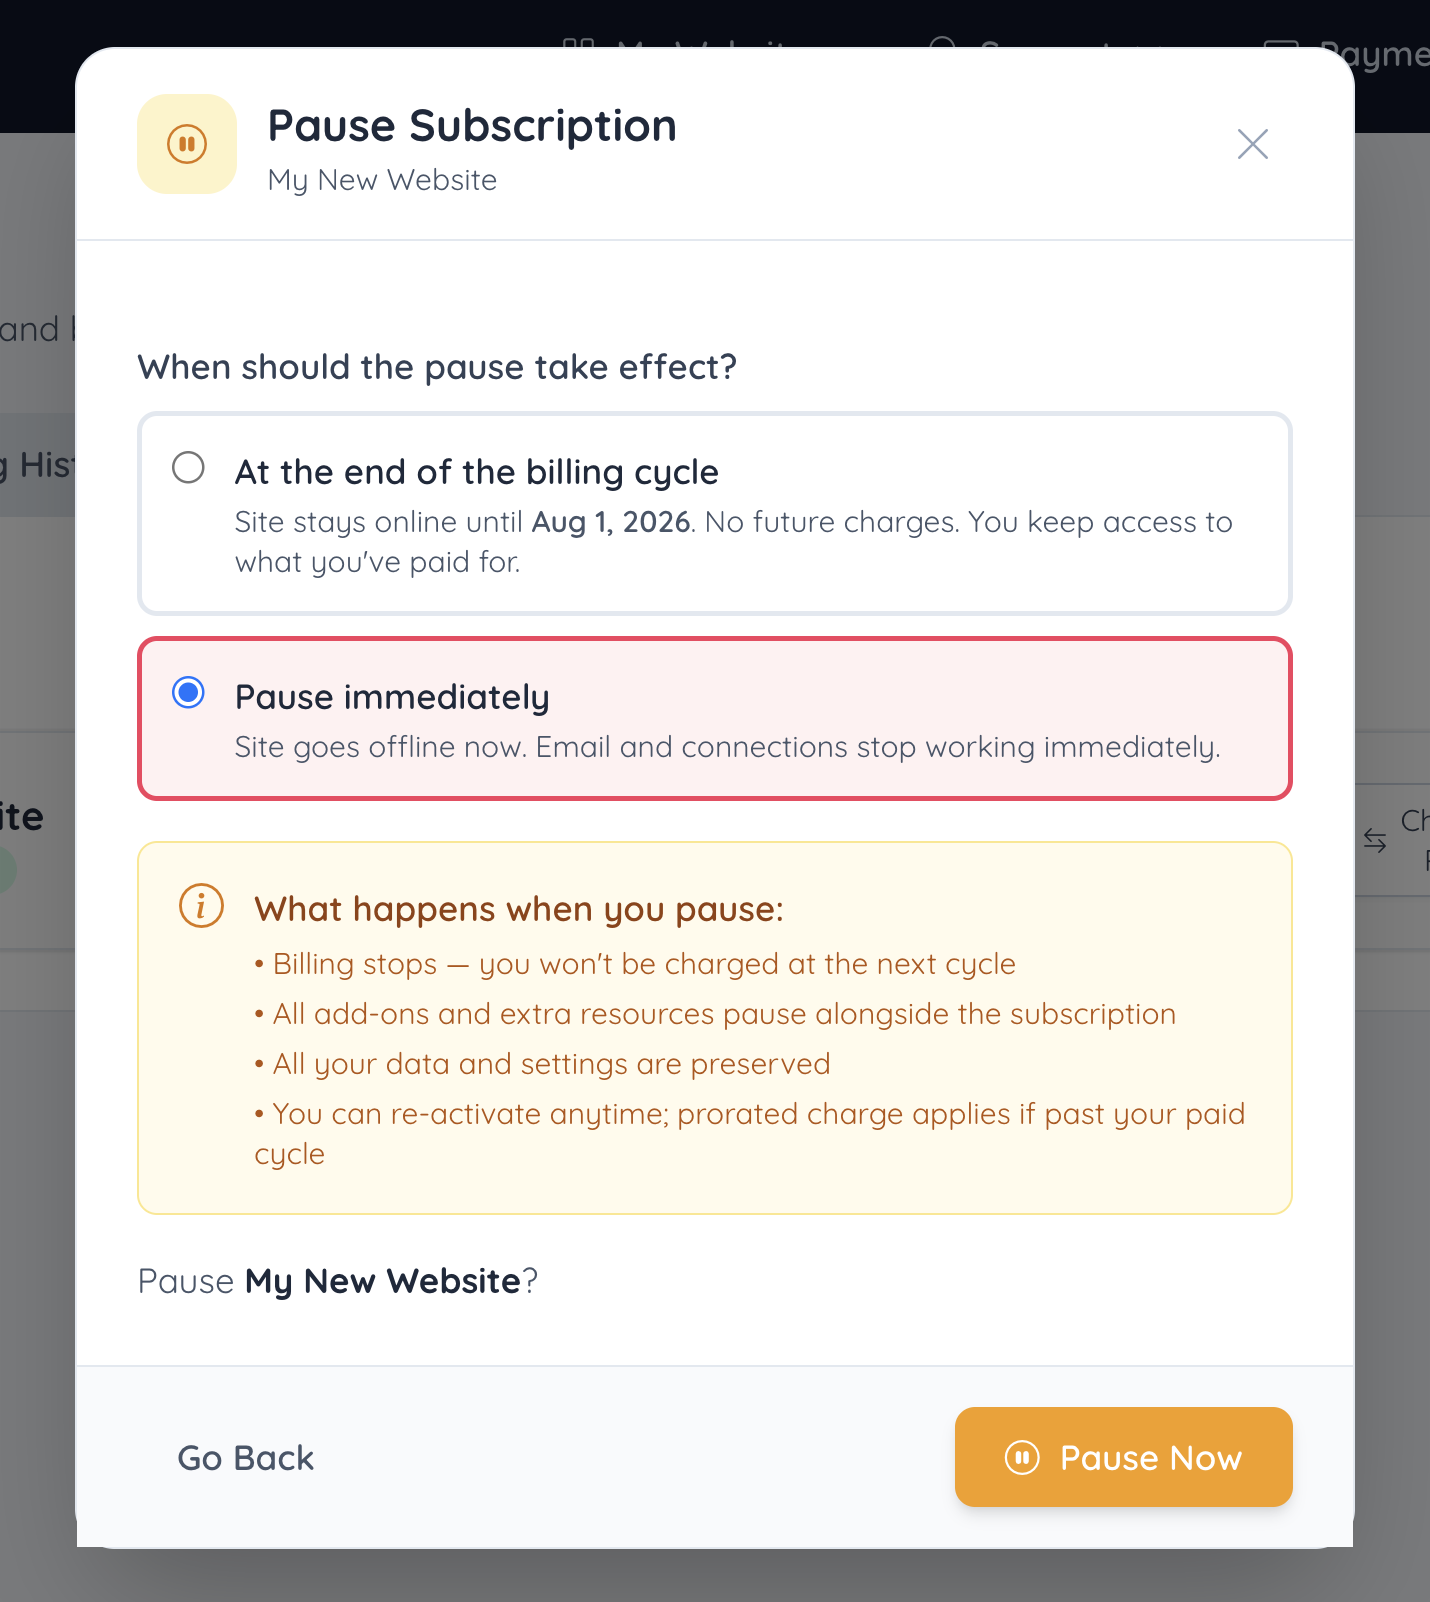 |
The available pause options are:
- At the end of the billing cycle: The website stays online until the listed billing date. No future charges are made after the paid billing cycle ends.
- Pause immediately: The website goes offline immediately. Email and connections stop working immediately.
The selected option controls when the subscription pause takes effect.
What Happens When a Subscription Is Paused
The Pause Subscription window explains what happens when a website subscription is paused.
- Billing stops and the account will not be charged at the next cycle.
- Add-ons and extra resources pause alongside the subscription.
- Website data and settings are preserved.
- The subscription can be reactivated later.
- A prorated charge may apply if the subscription is reactivated after the paid cycle has ended.
Review these details carefully before confirming the pause request.
Cancel a Website Subscription
The Delete Website option opens the cancellation flow for the selected website subscription.
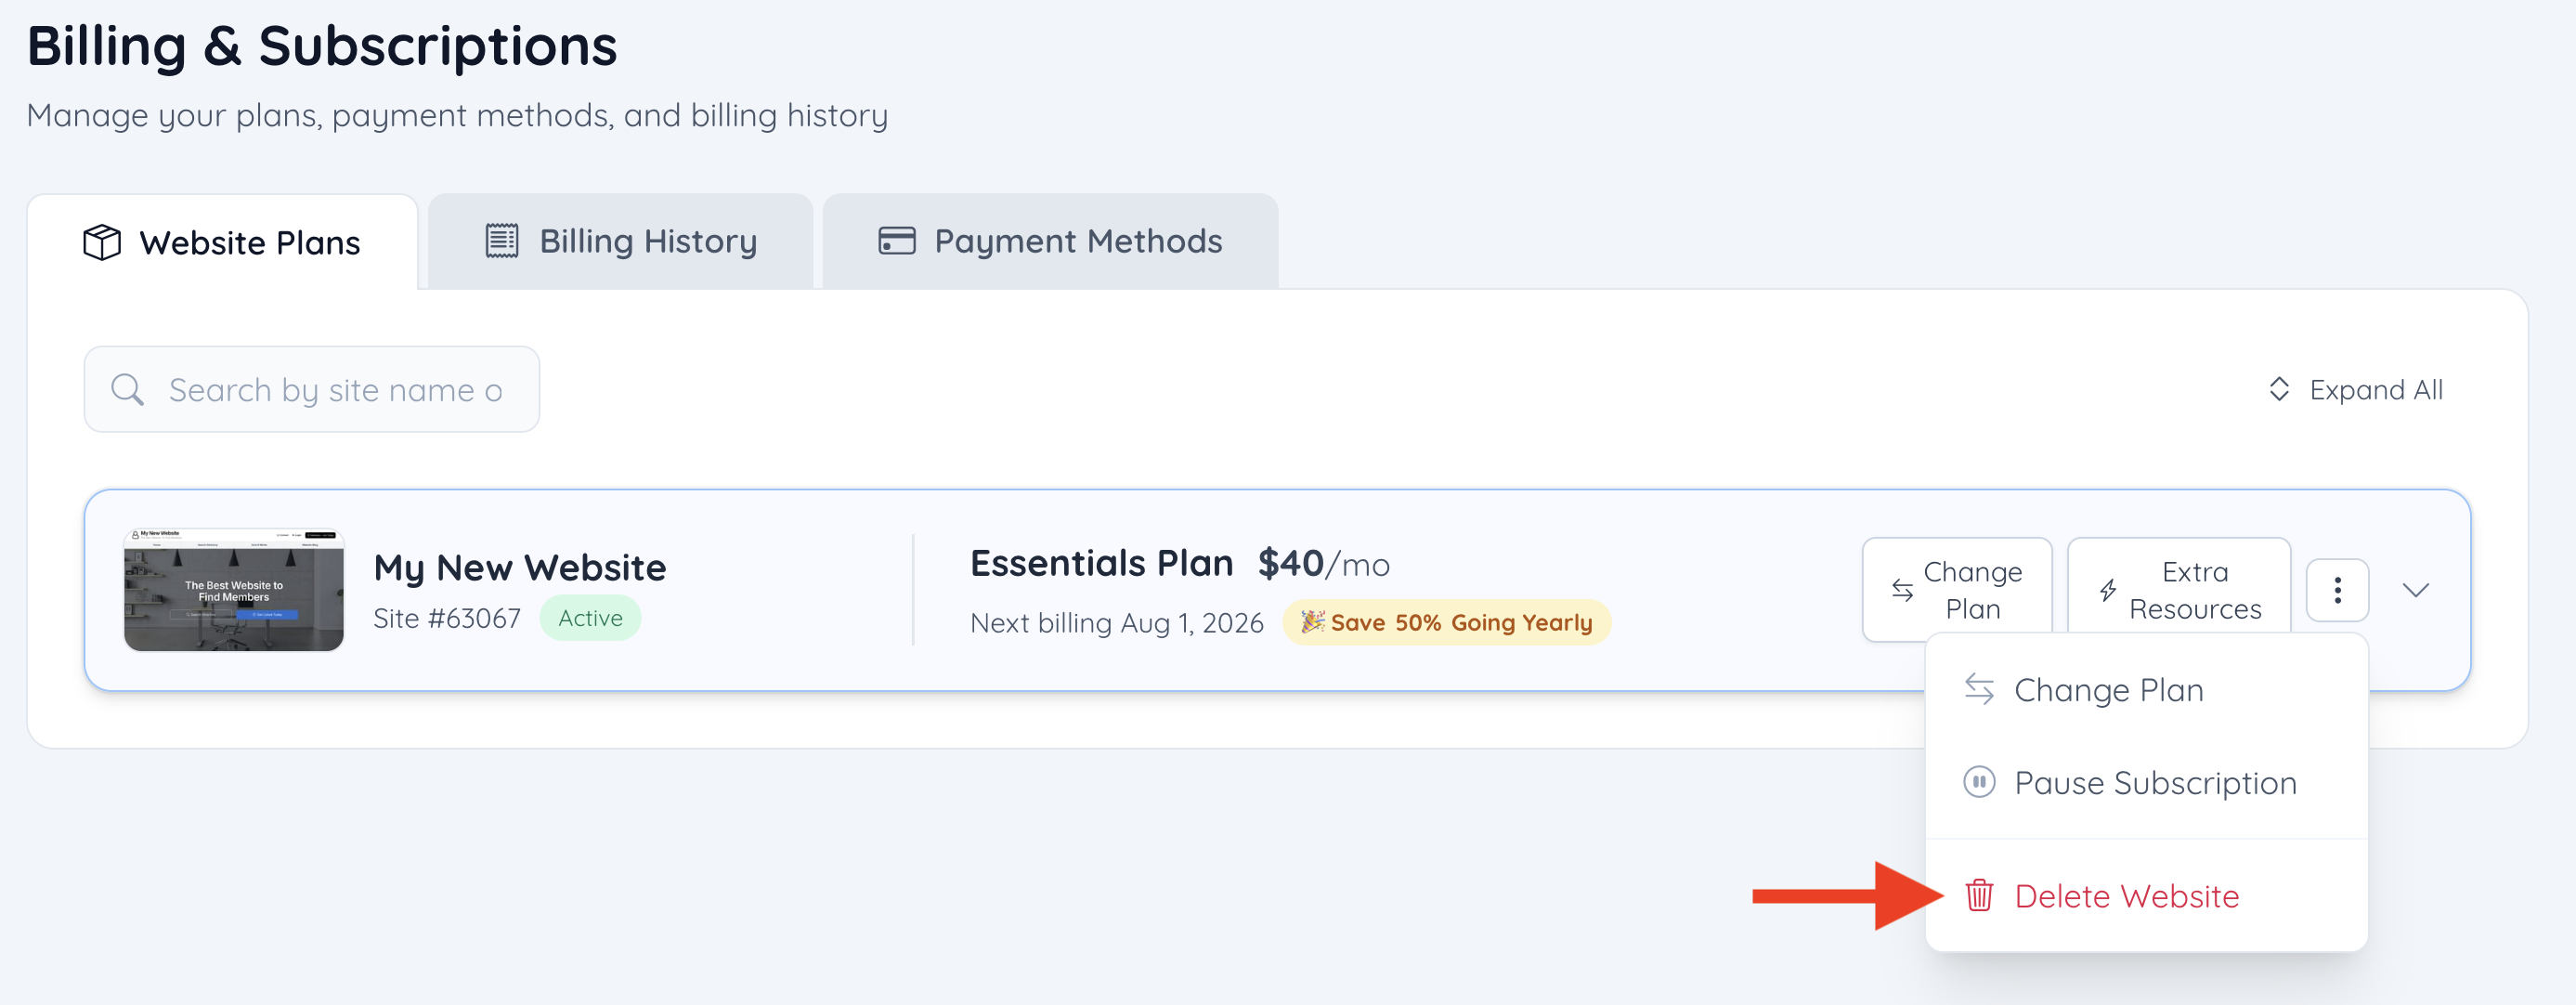
- Go to the Website Plans tab.
- Locate the website subscription that needs to be canceled.
- Click the three-dot menu on the right side of the website plan card.
- Select Delete Website.
A confirmation window will open before the cancellation options are shown. Confirm the correct website name is displayed before continuing.
Before You Cancel Screen
After selecting Delete Website, a We’d Love to Keep You window may appear. This screen provides alternatives before continuing with the cancellation request.
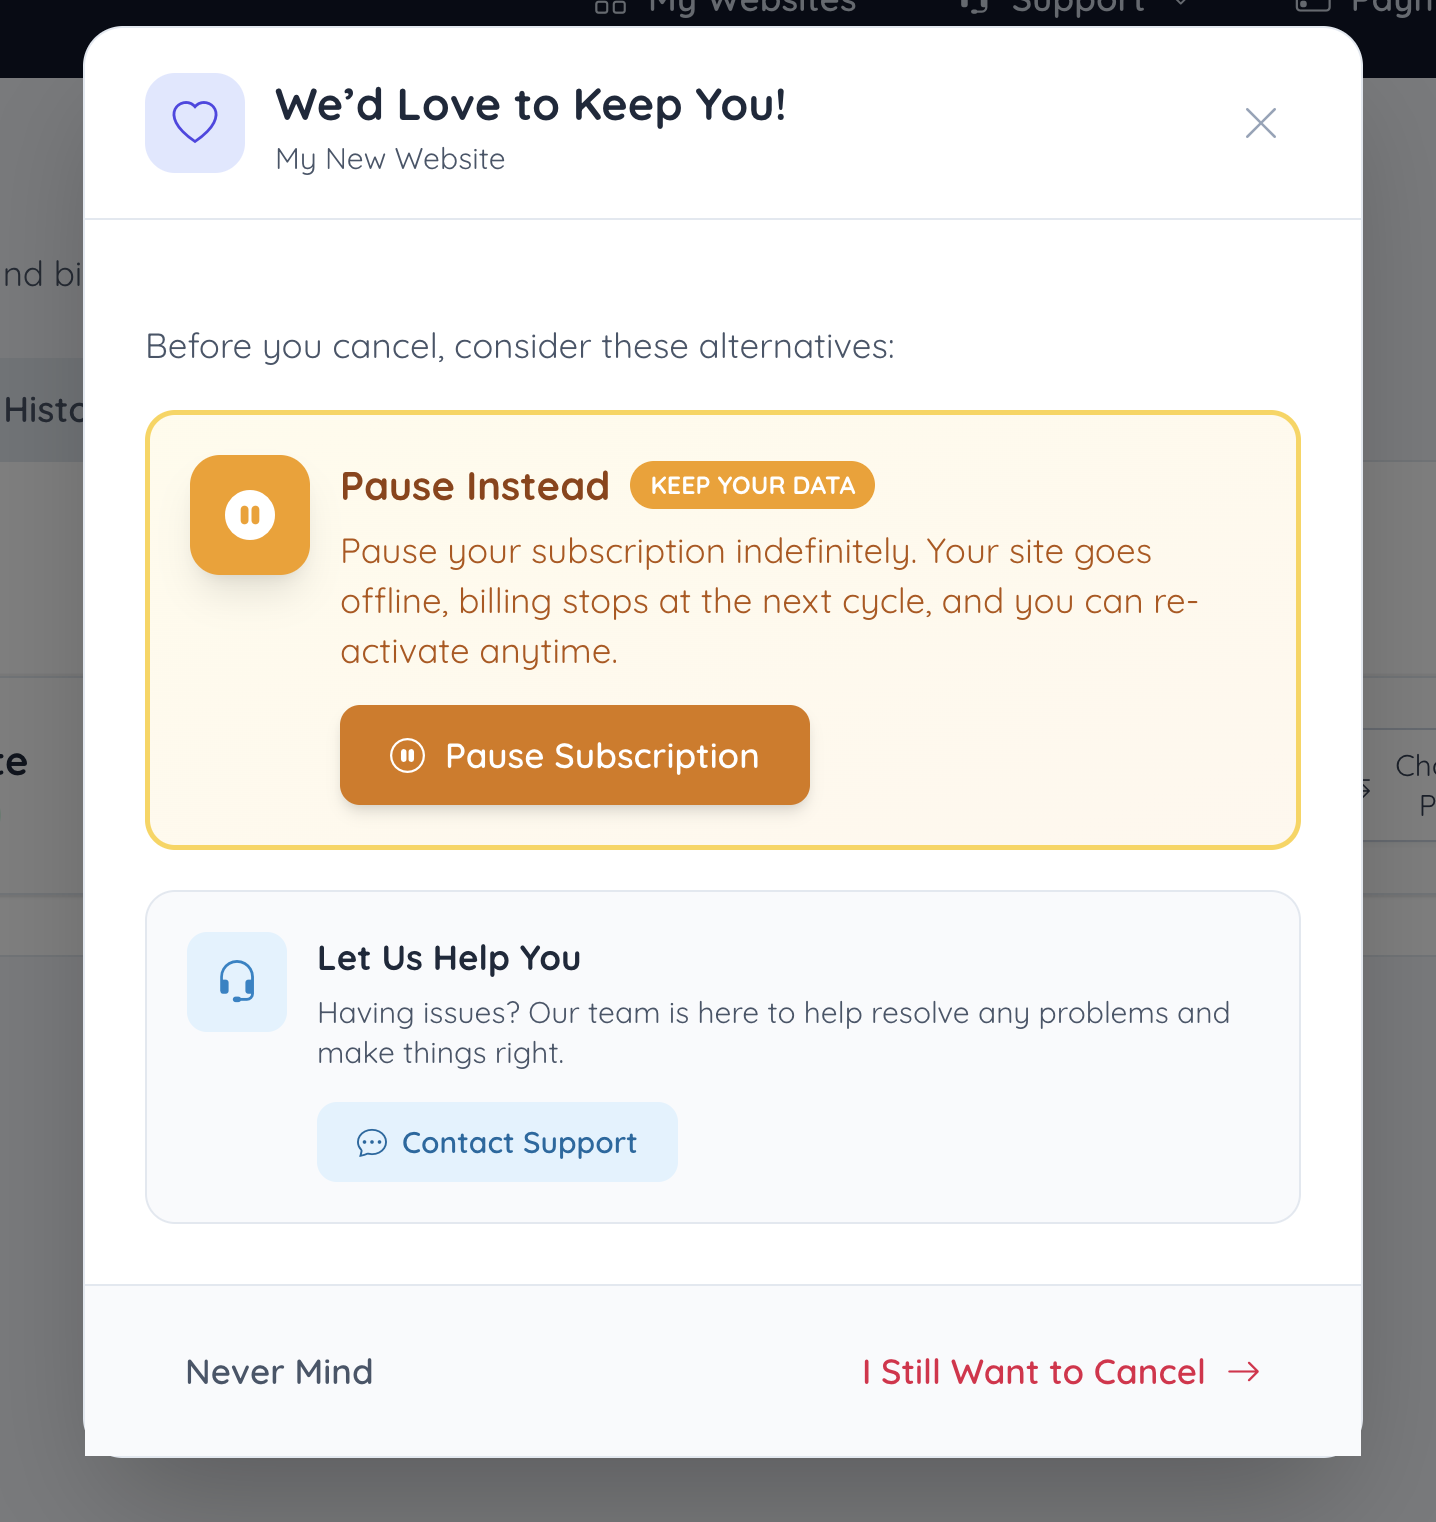
The available options include:
- Pause Subscription: Opens the pause subscription option instead of canceling.
- Contact Support: Opens the support option for help with the account or website.
- Never Mind: Closes the cancellation flow and keeps the subscription active.
- I Still Want to Cancel: Continues to the cancellation confirmation screen.
Choose When the Cancellation Takes Effect
The Cancel Subscription window allows the account owner to choose when the cancellation should take effect.
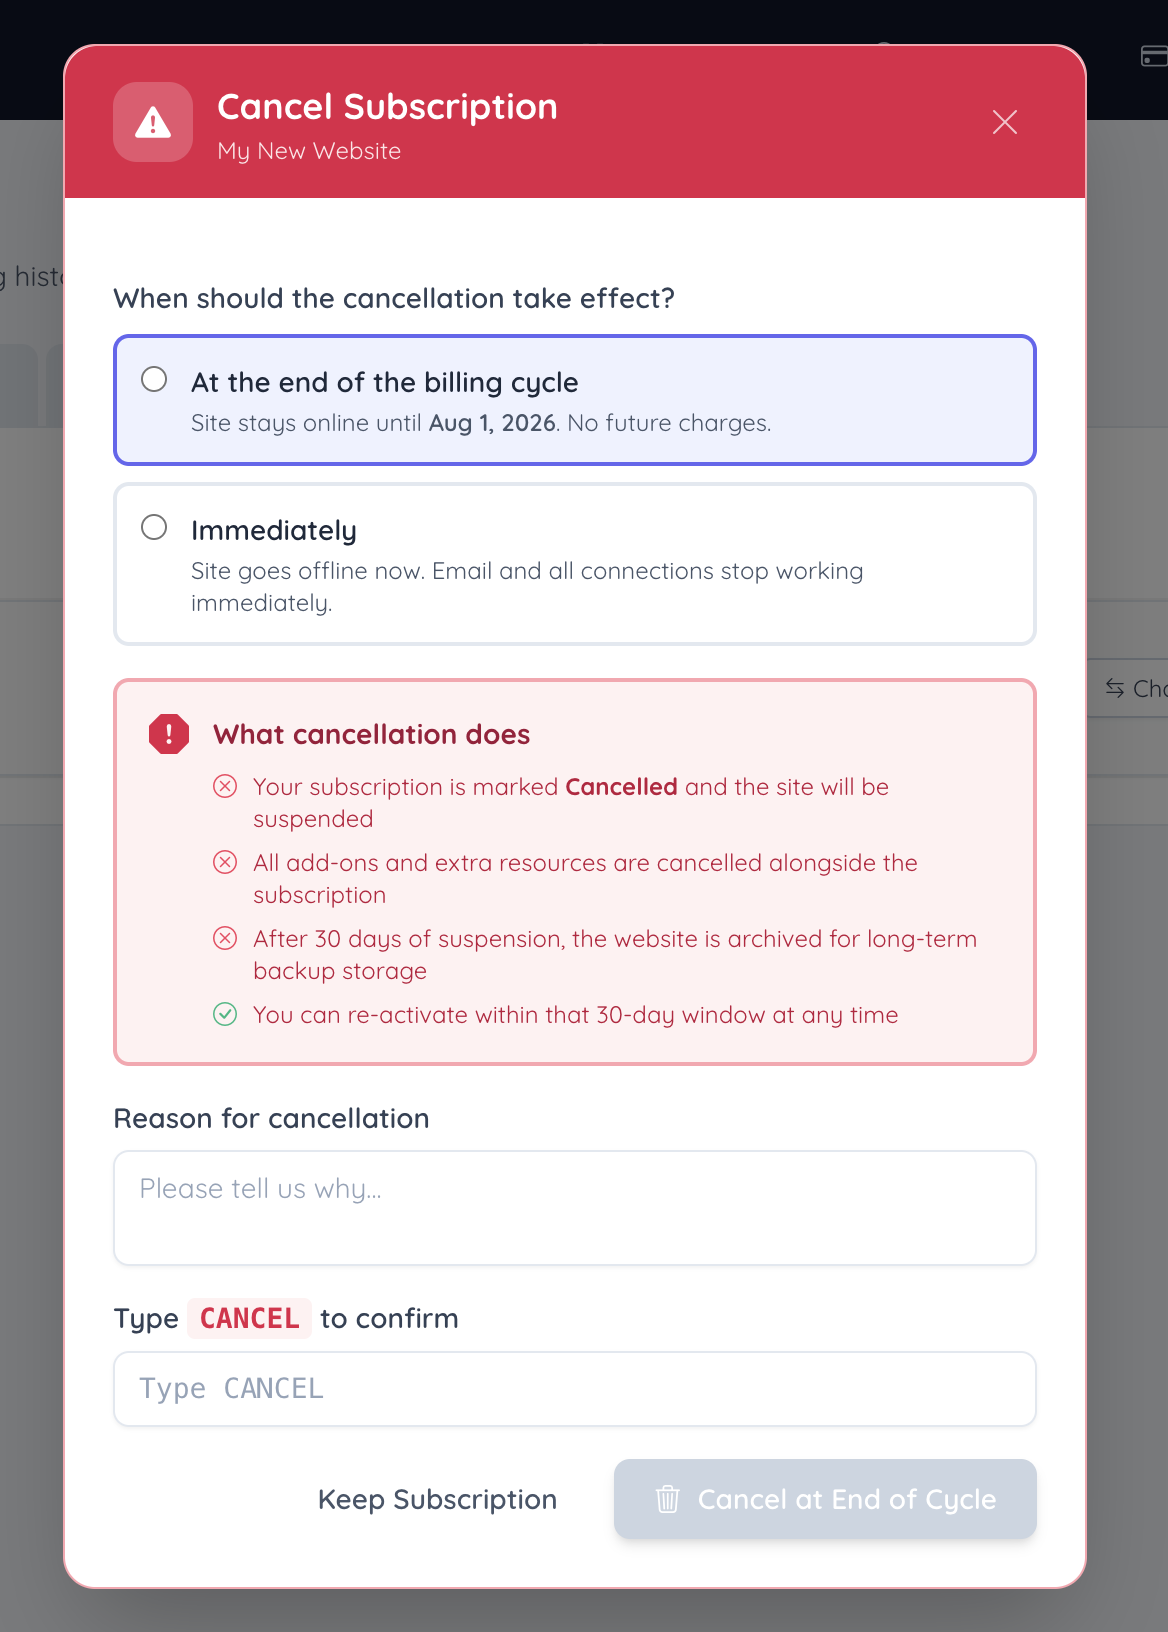 | 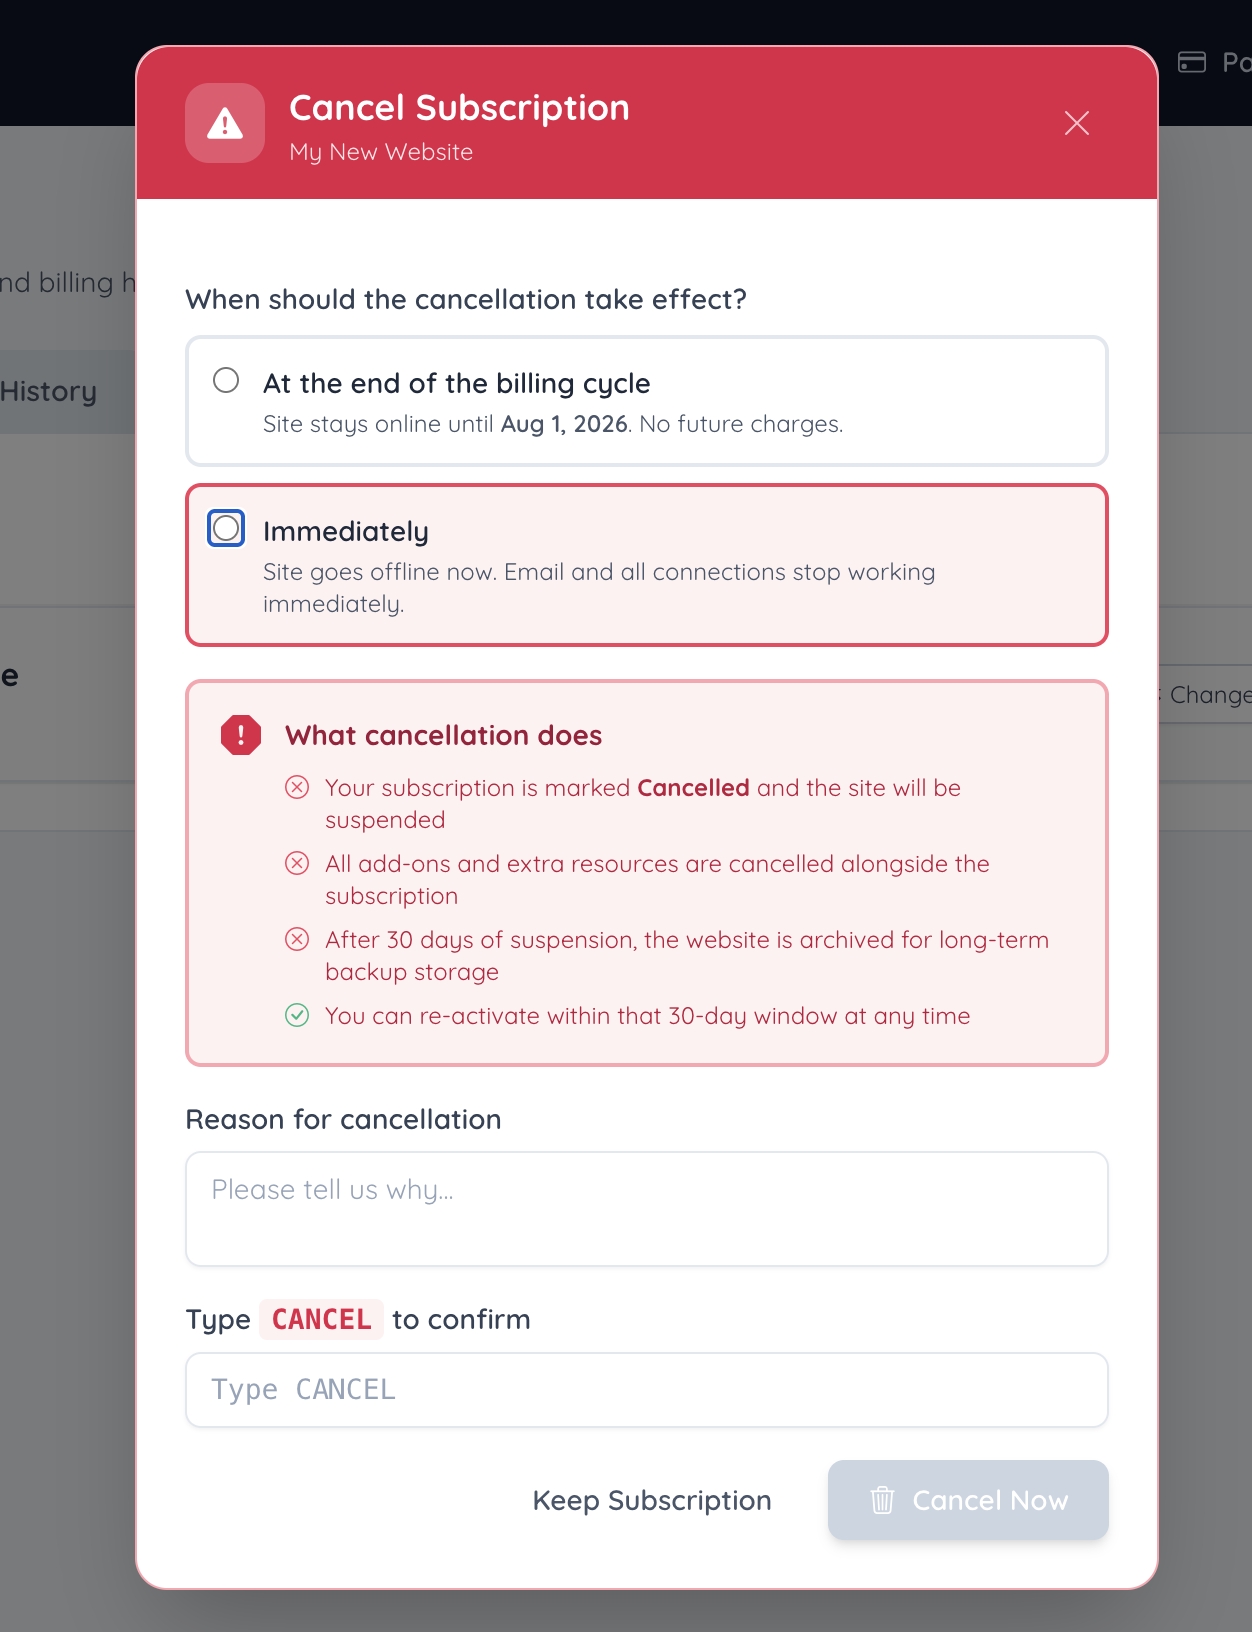 |
The available cancellation options are:
- At the end of the billing cycle: The website stays online until the listed billing date. No future charges are made after the paid billing cycle ends.
- Immediately: The website goes offline immediately. Email and all connections stop working immediately.
The selected option controls when the cancellation takes effect.
What Happens When a Subscription Is Canceled
The Cancel Subscription window explains what happens when a website subscription is canceled.
- The subscription is marked Cancelled and the website will be suspended.
- All add-ons and extra resources are canceled alongside the subscription.
- After 30 days of suspension, the website is archived for long-term backup storage.
- The website subscription can be reactivated within the 30-day window.
Review these details carefully before confirming the cancellation request.
Confirm the Cancellation
The cancellation form requires a reason for cancellation and a typed confirmation before the final cancellation button becomes available.
- Select when the cancellation should take effect.
- Review the details in the What cancellation does section.
- Enter the reason for cancellation in the available field.
- Type CANCEL in the confirmation field.
- Click the final cancellation button.
The final confirmation button may show:
- Cancel at End of Cycle
- Cancel Now
The subscription is not canceled until the final cancellation button is clicked. Click Keep Subscription to exit the cancellation flow and keep the subscription active.
Billing History Tab
The Billing History tab displays invoices connected to the account.
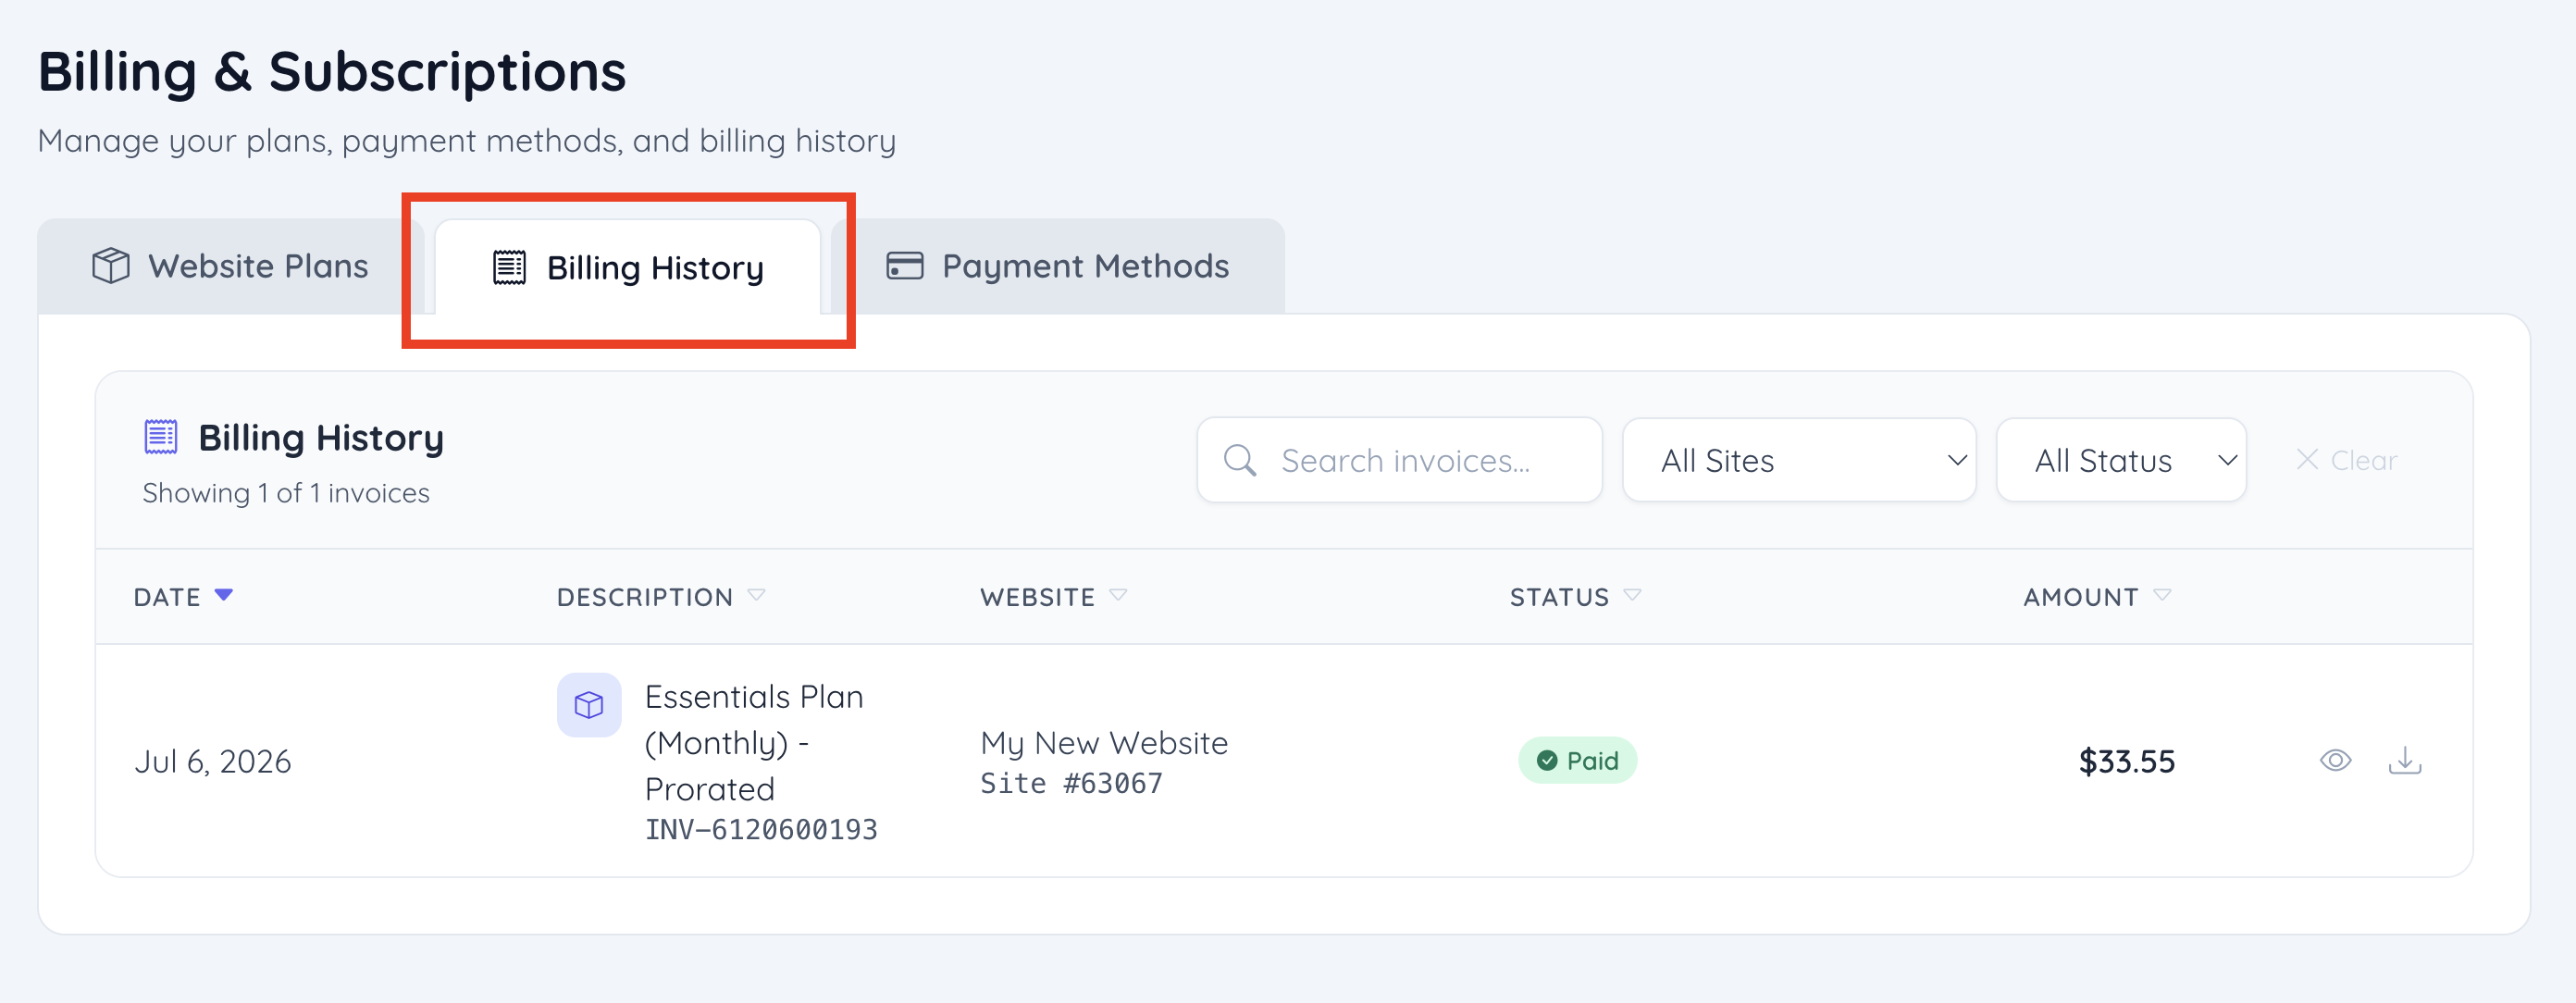
Invoice records can include:
- Invoice date
- Description
- Website name and Site ID
- Status
- Amount
- View invoice option
- Download invoice option
Search and Filter Billing History
The Billing History tab includes tools to search and filter invoice records.
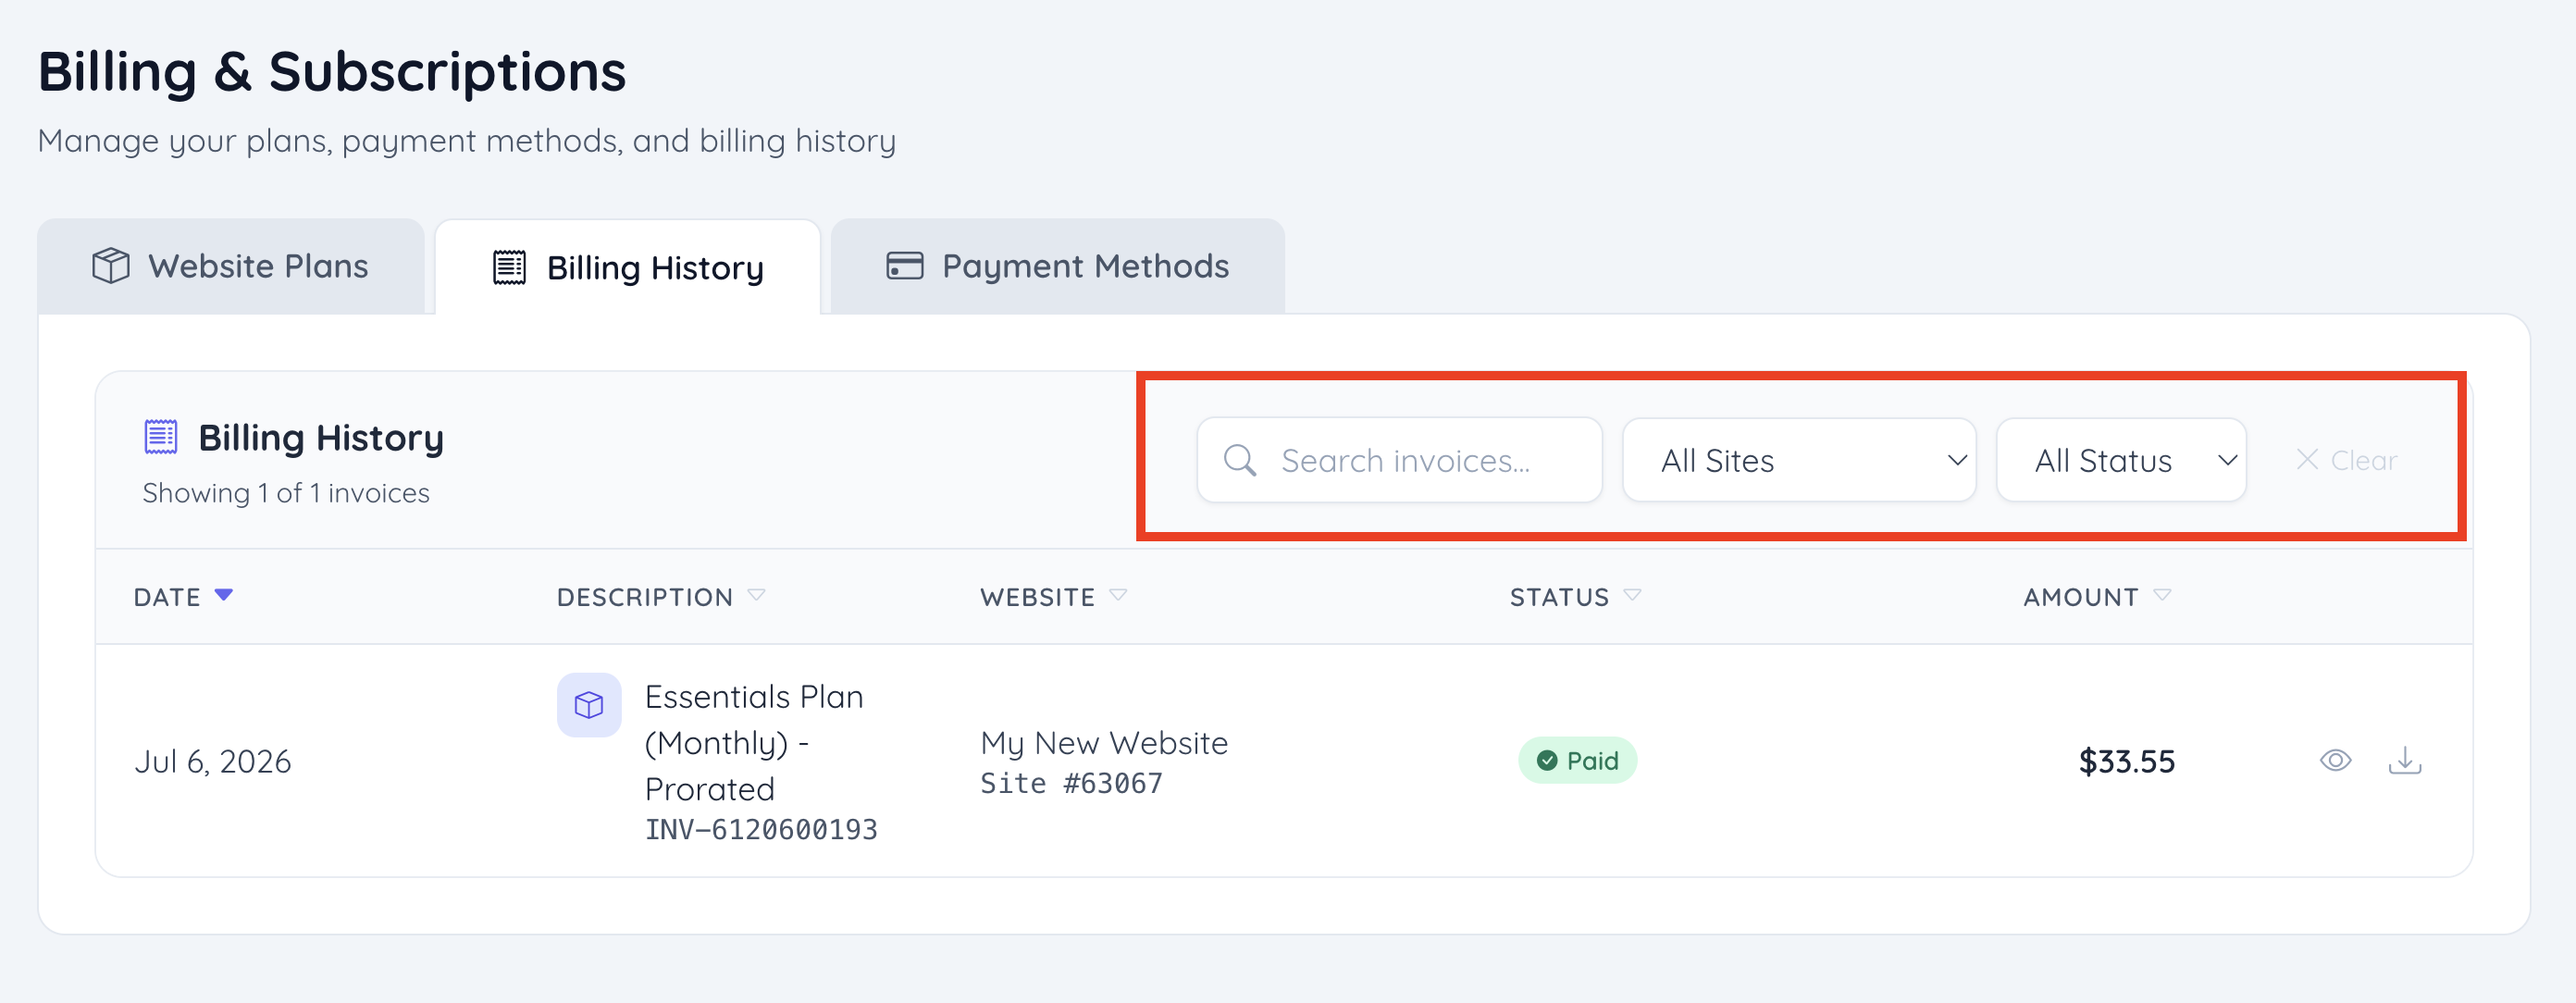
Available billing history filters include:
- Search invoices: Search billing records by invoice-related details.
- All Sites: Filter invoices by website.
- All Status: Filter invoices by invoice status.
The website filter can be used to view invoices for all websites or a specific website connected to the account.
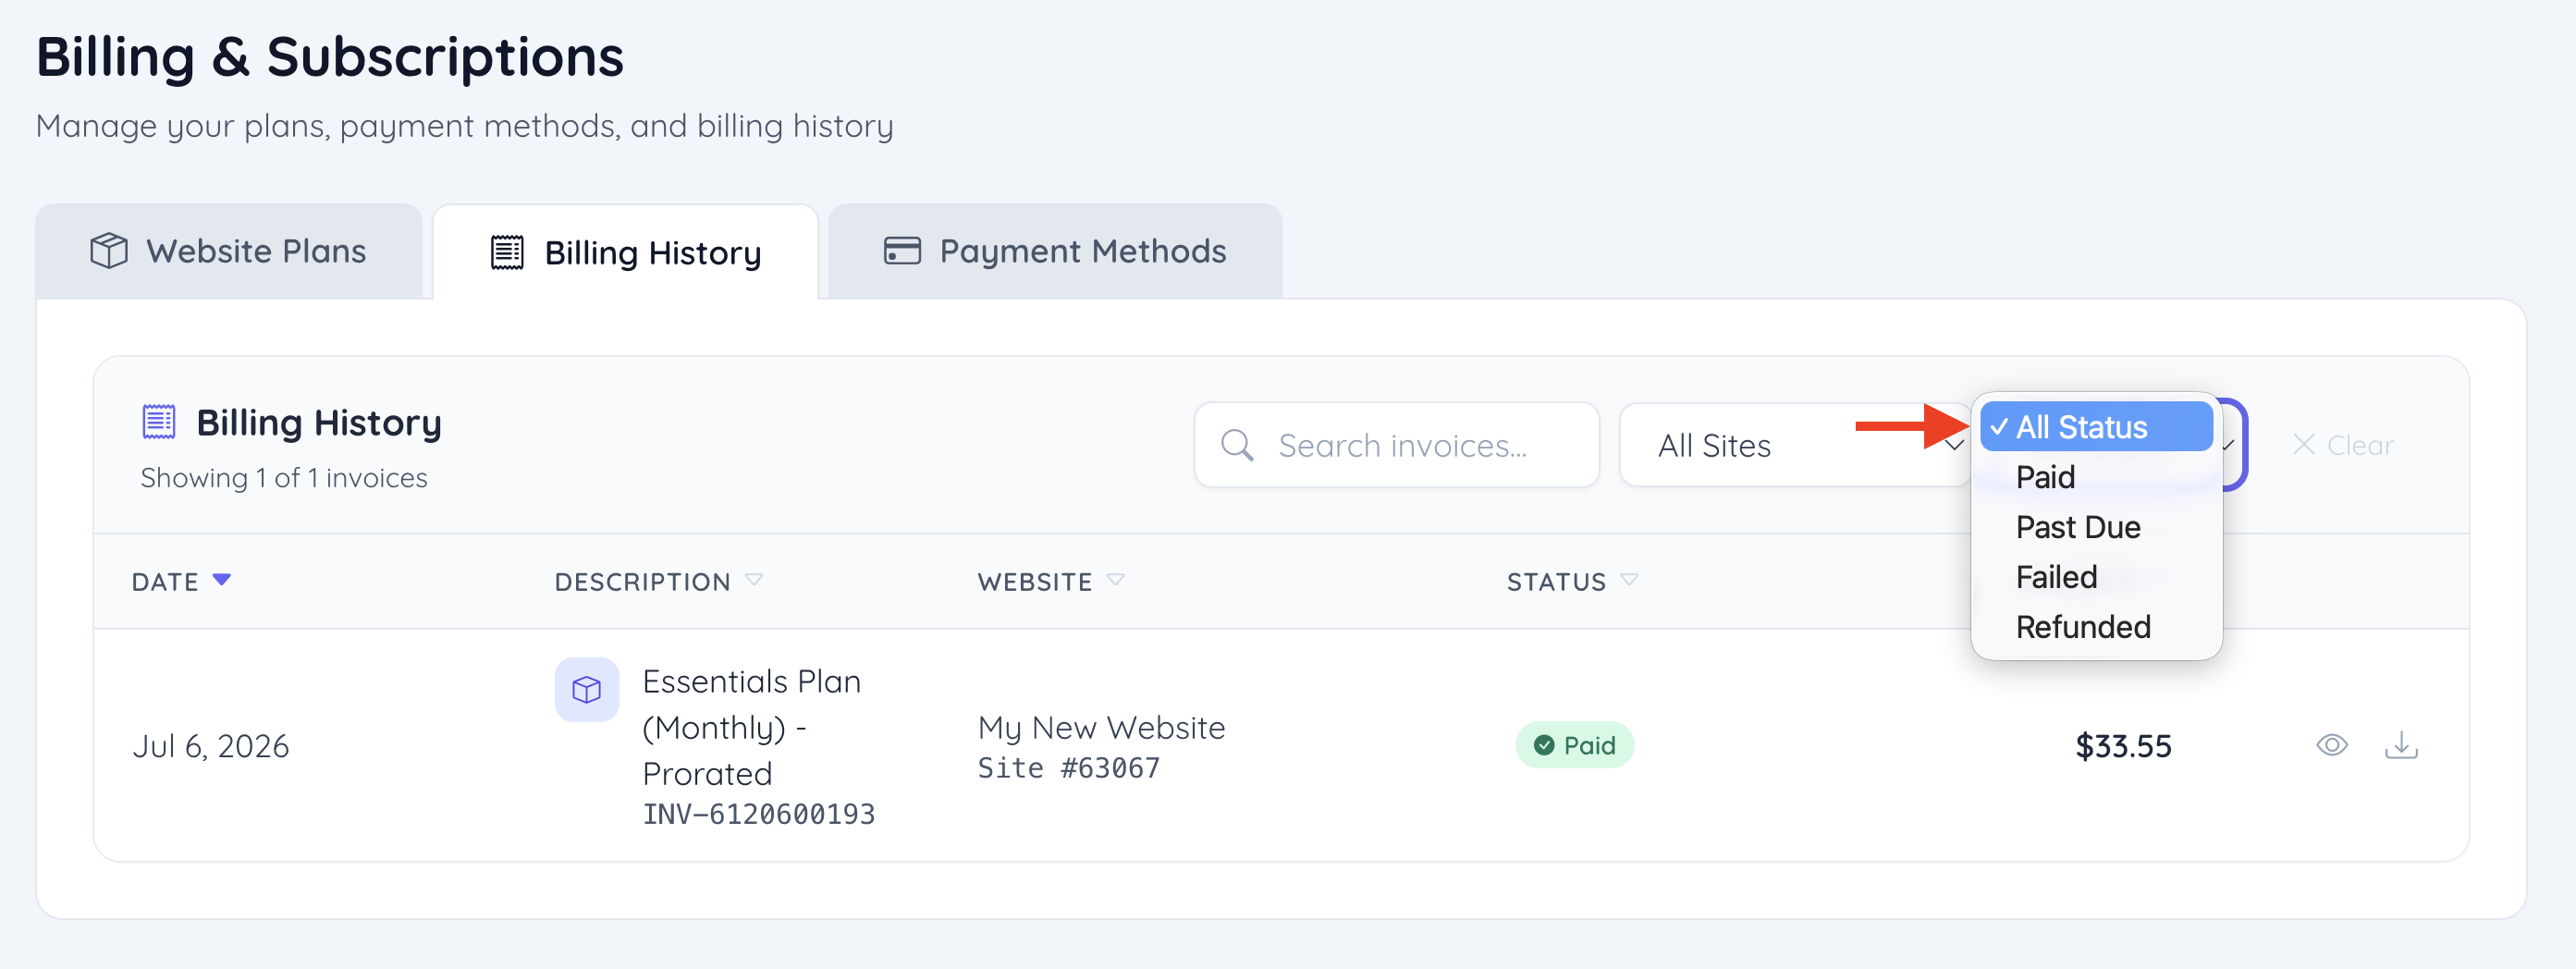
The status filter can include:
- All Status
- Paid
- Past Due
- Failed
- Refunded
View Invoice Details
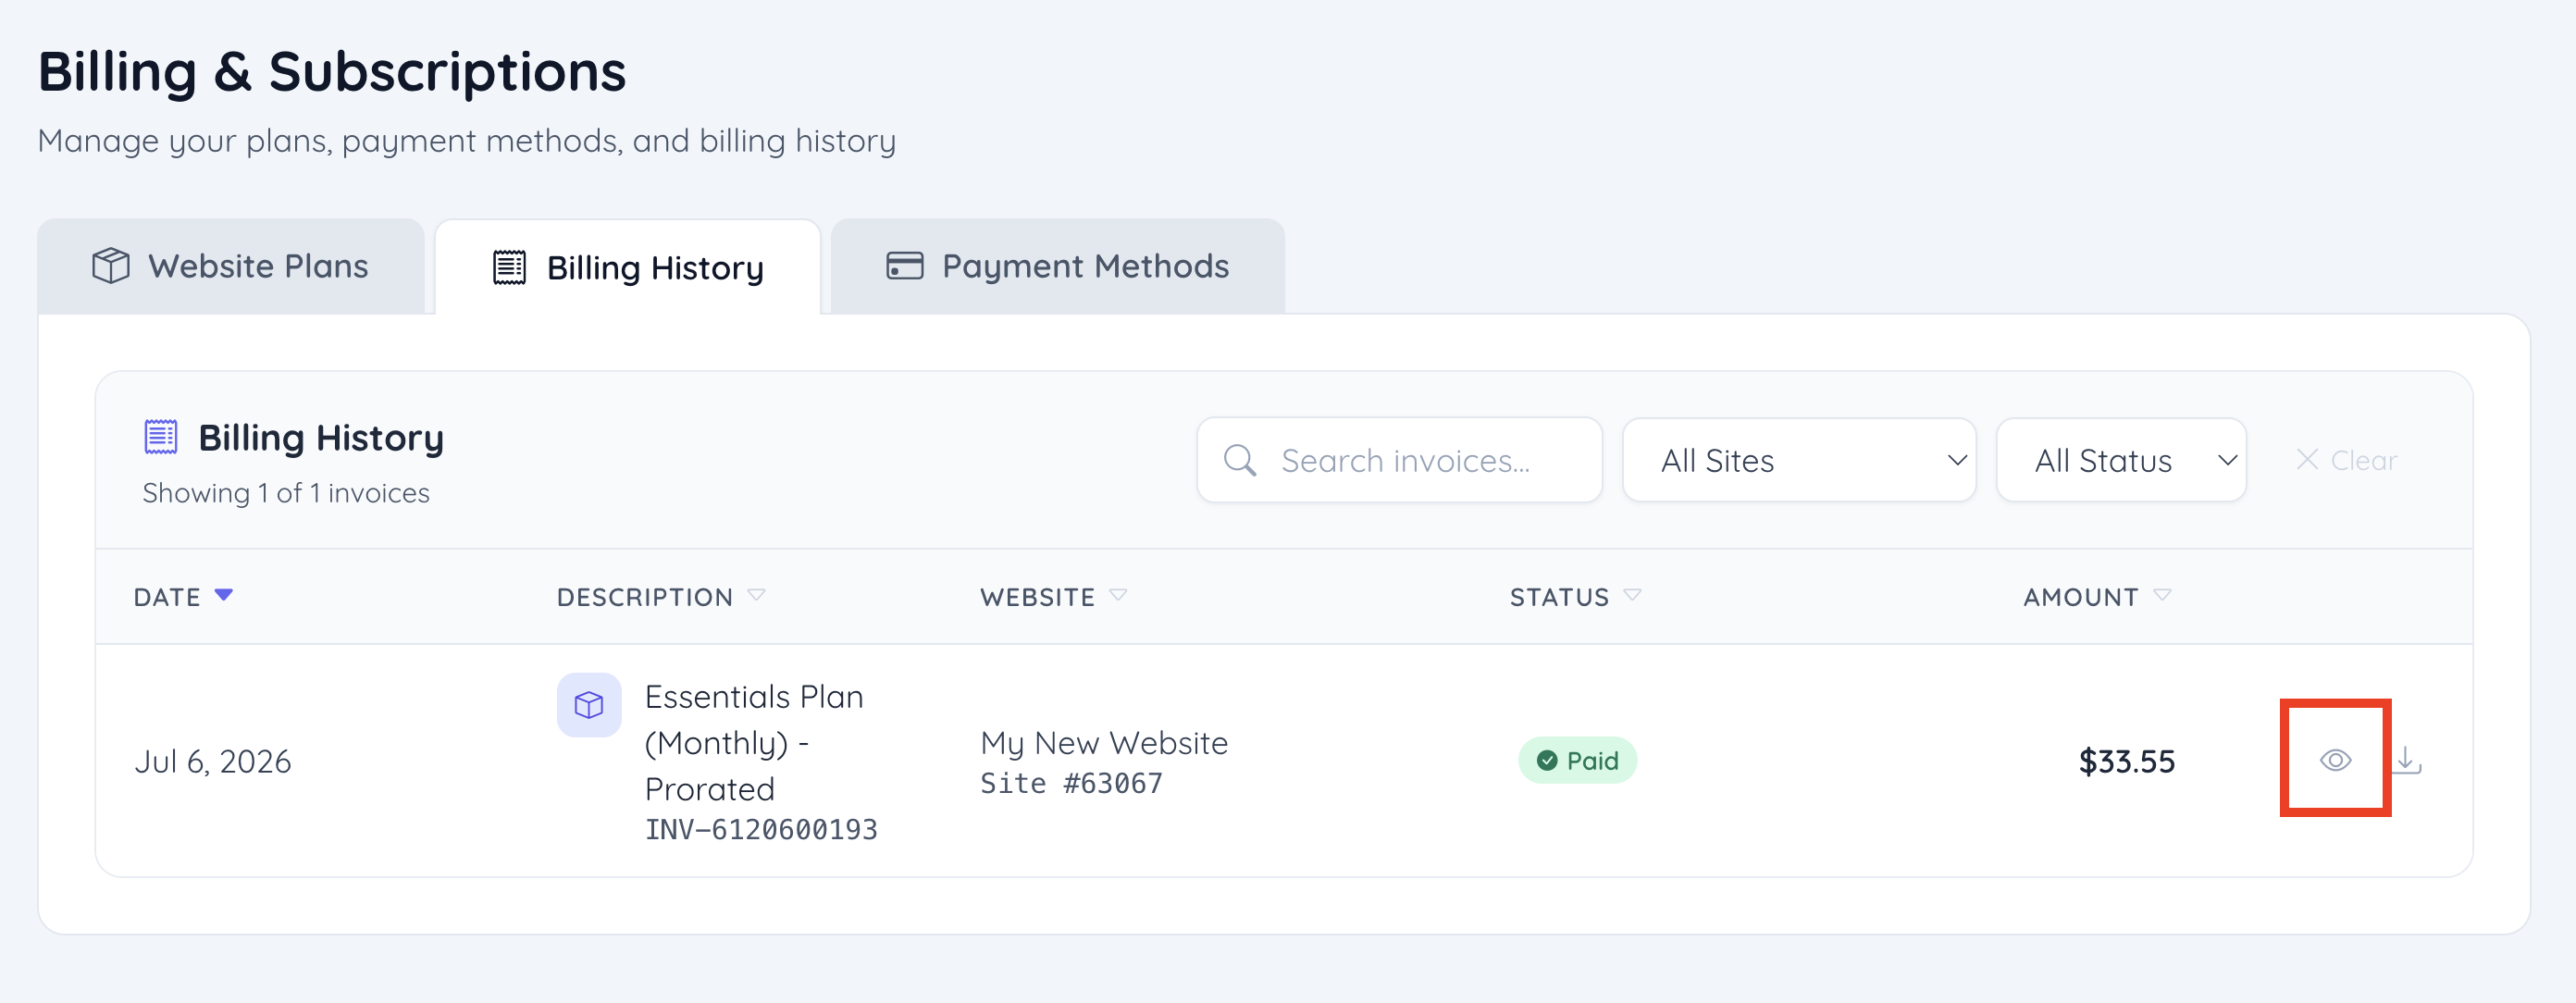
The eye icon opens the invoice details window for the selected invoice.
- Go to the Billing History tab.
- Locate the invoice that needs to be reviewed.
- Click the eye icon on the right side of the invoice row.
The Invoice Details window can include:
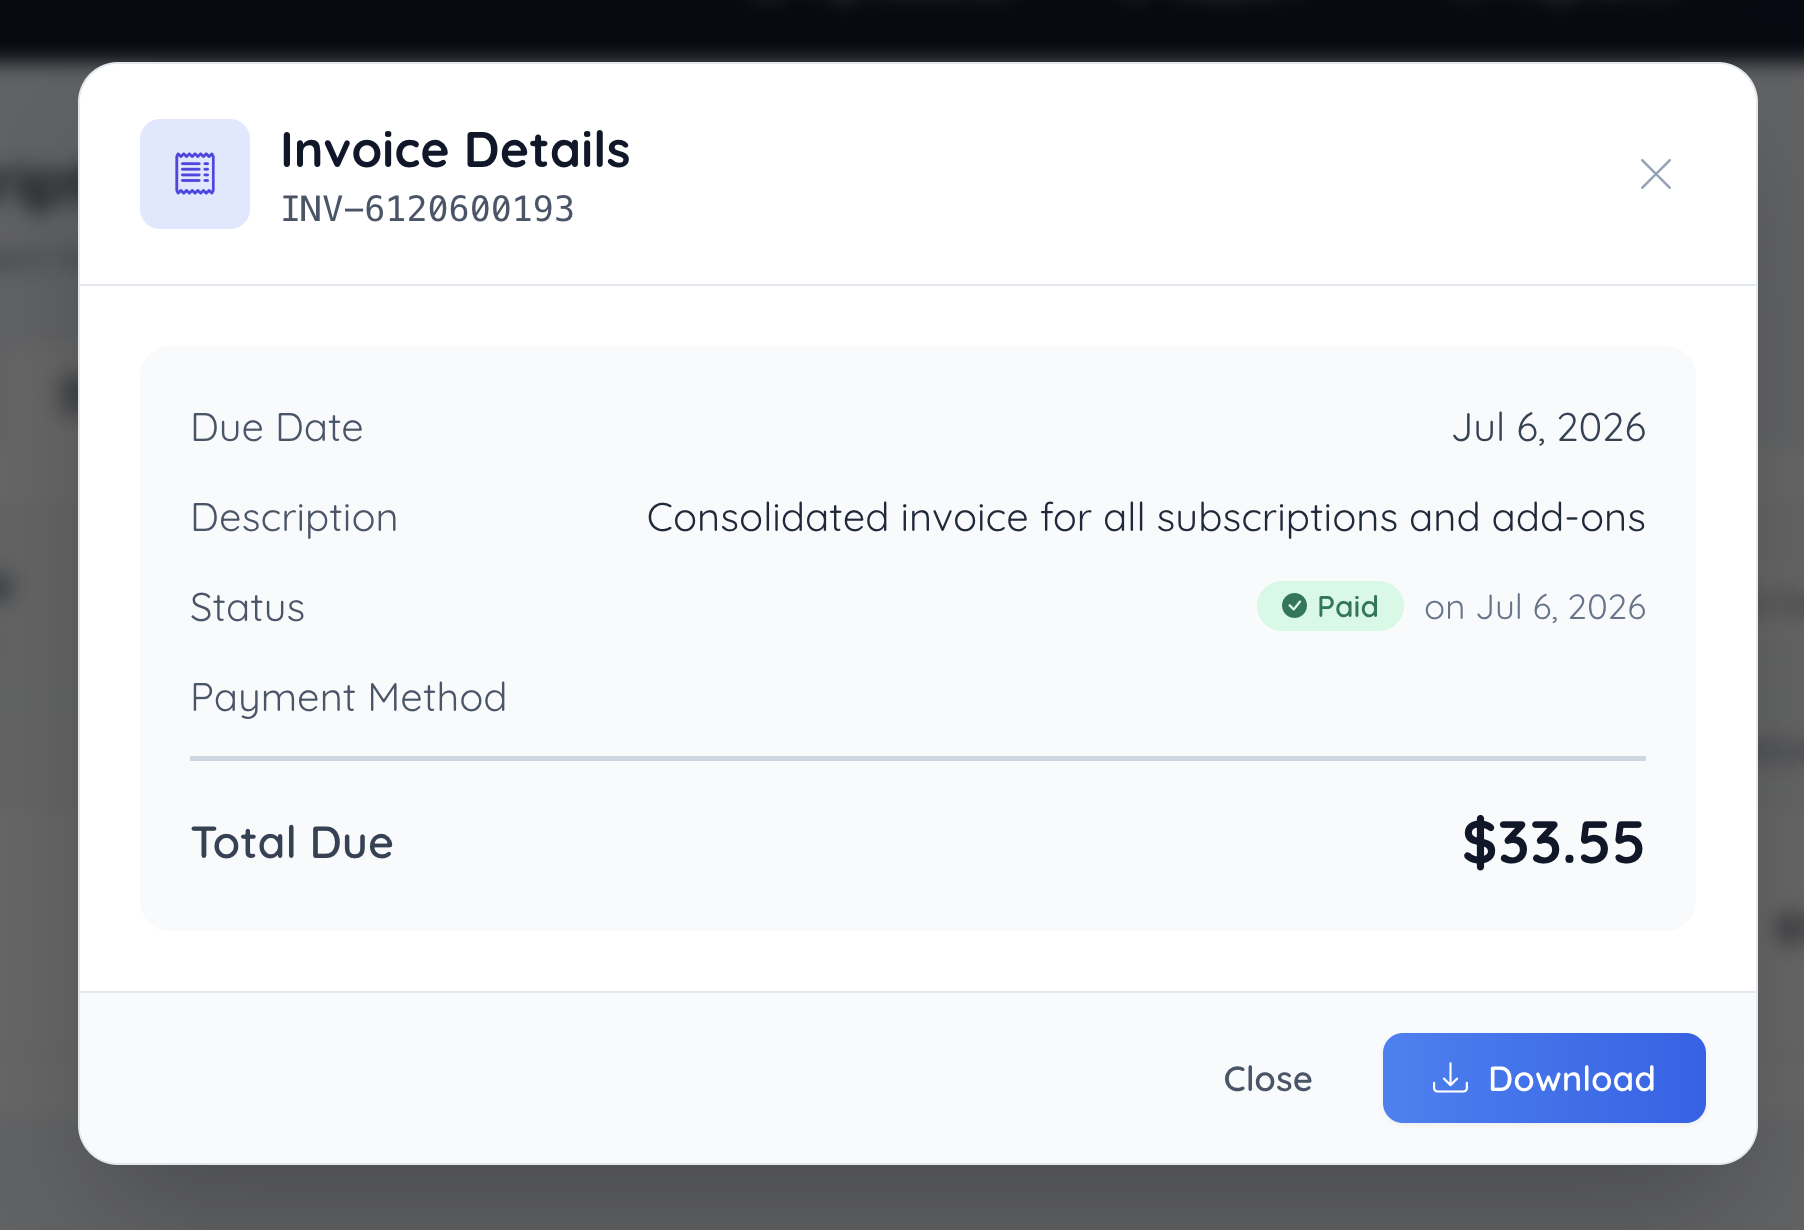
- Invoice number
- Due date
- Description
- Status
- Payment method
- Total due
- Download option
Download an Invoice
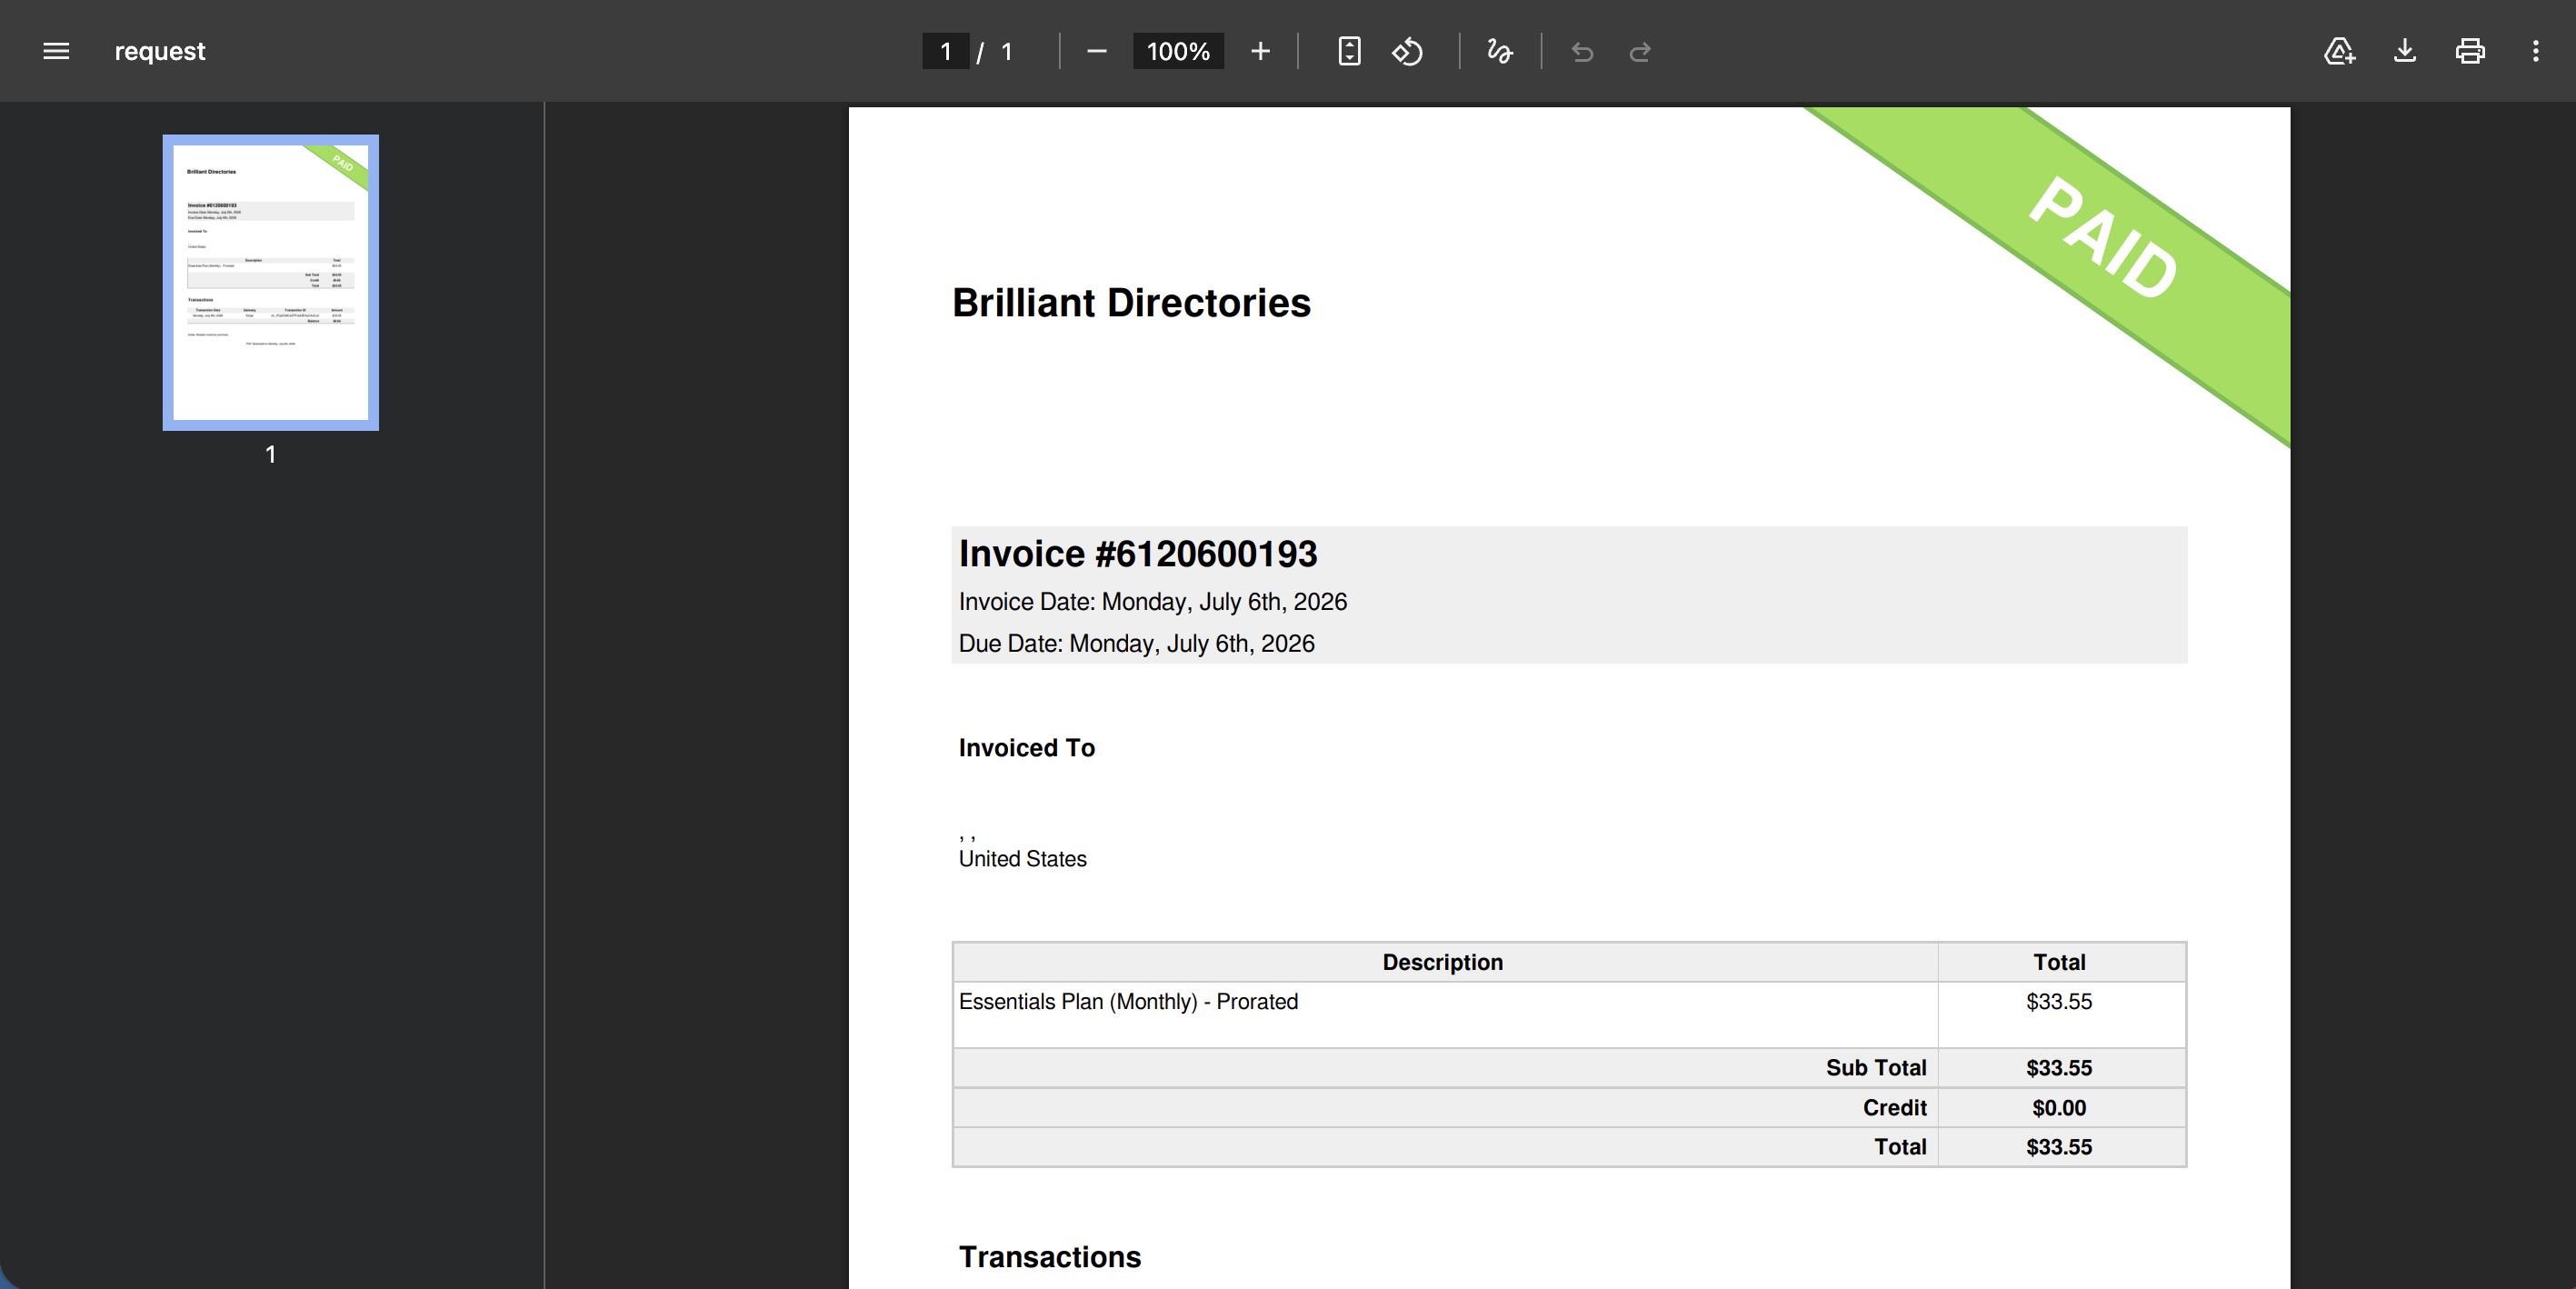
Invoices can be downloaded from the Billing History tab or from the Invoice Details window.
- Go to the Billing History tab.
- Locate the invoice that needs to be downloaded.
- Click the download icon on the right side of the invoice row.
A PDF copy of the invoice will open or download depending on the browser settings.
Payment Methods Tab
The Payment Methods tab displays saved payment methods connected to the account.
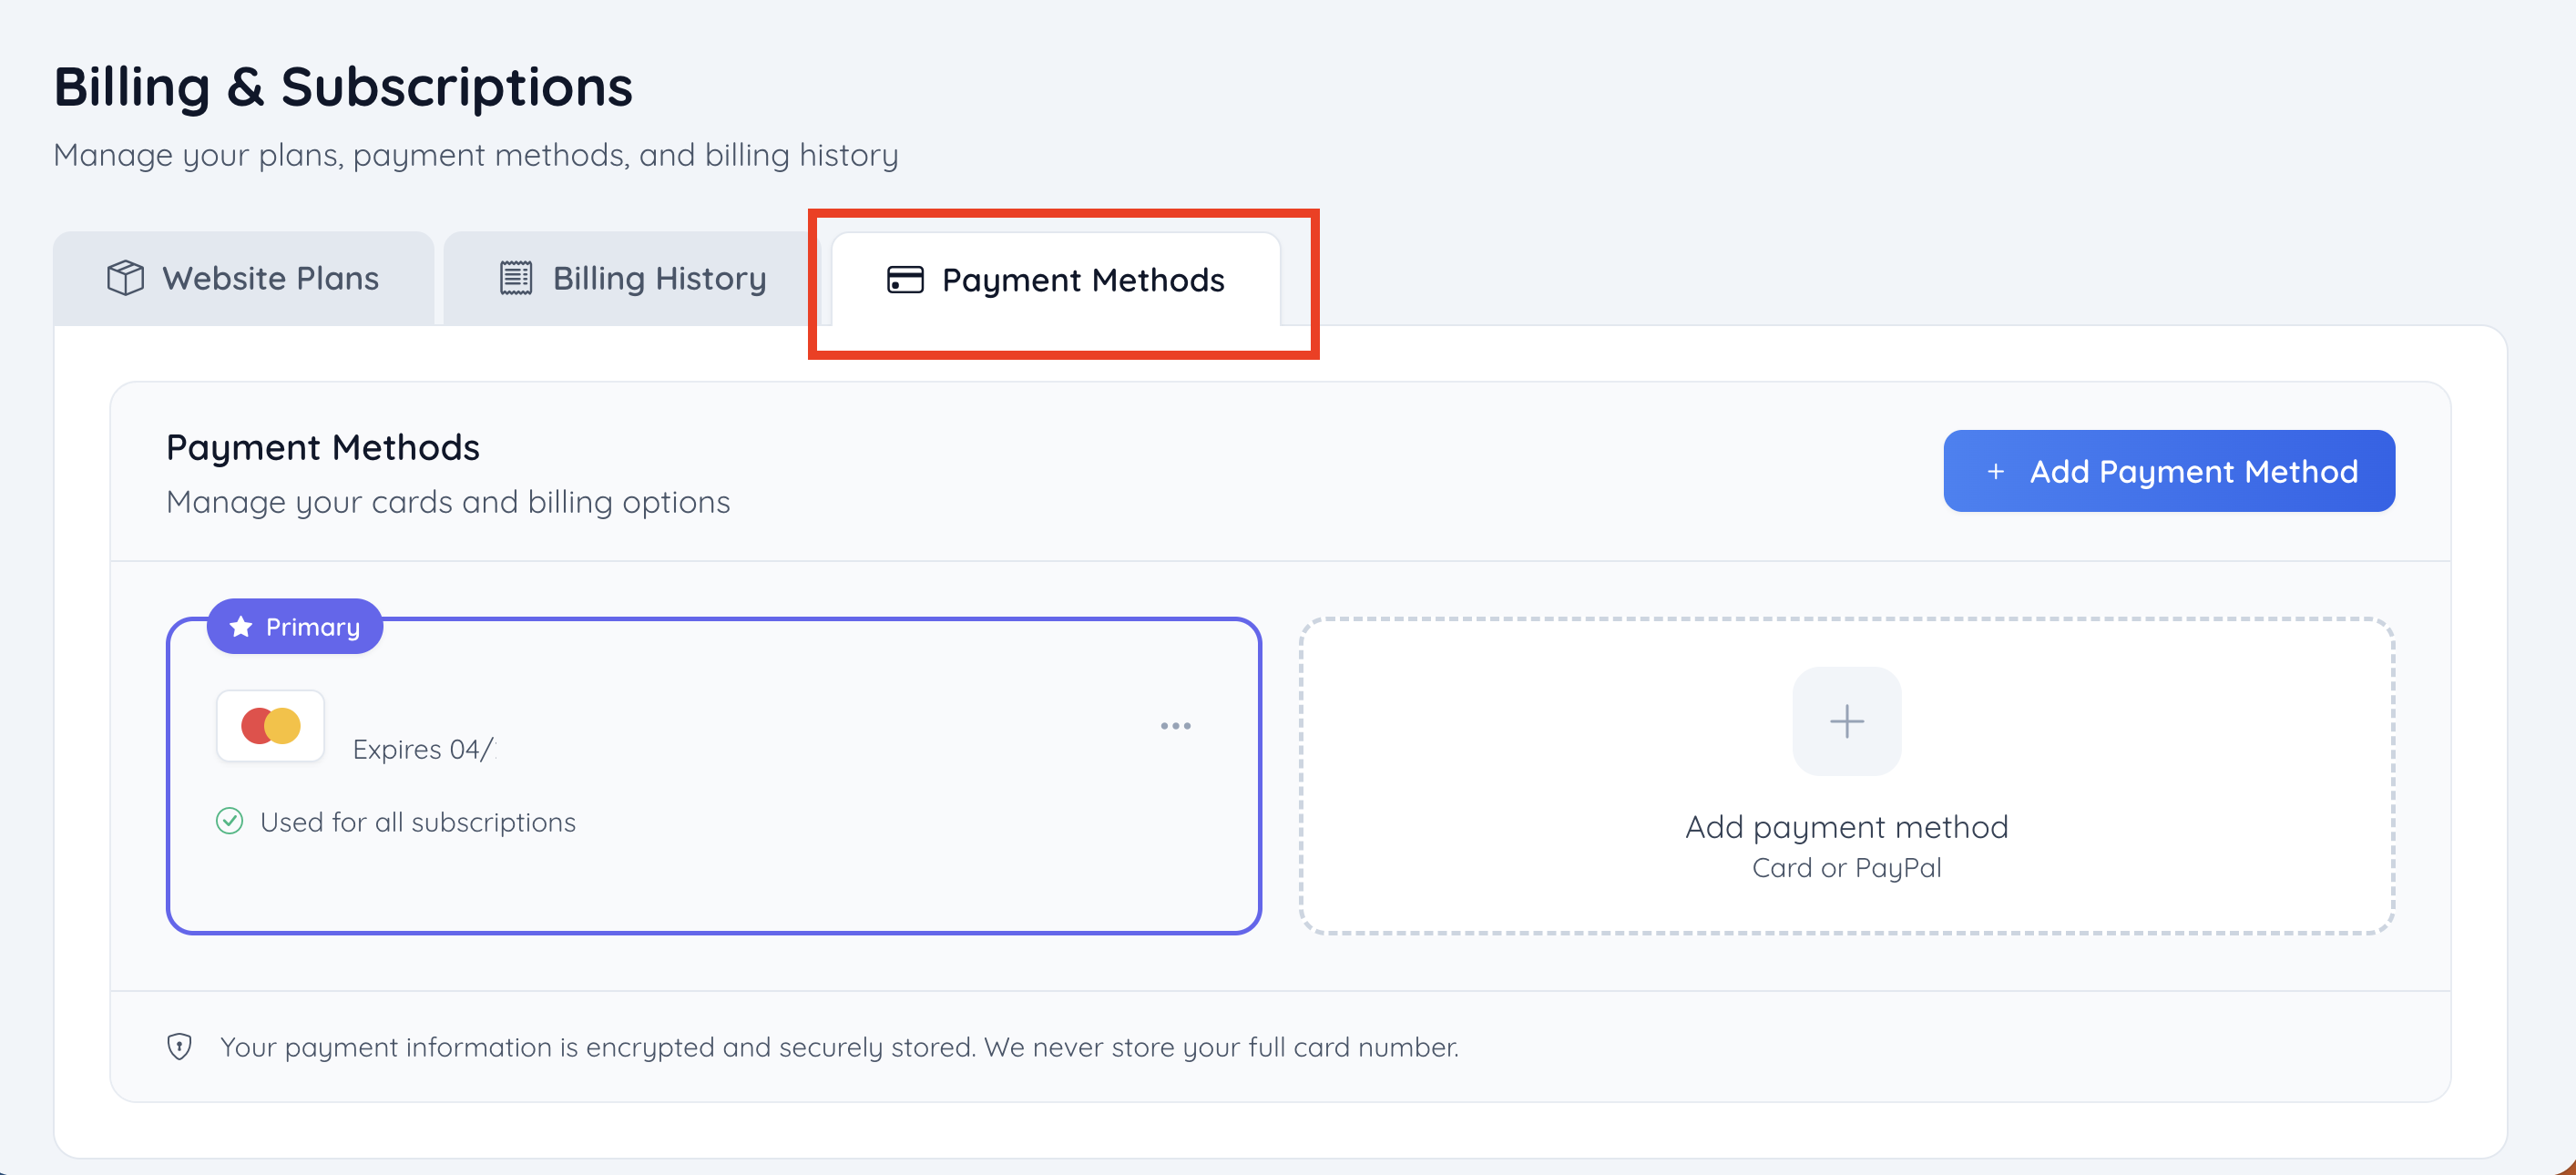
This area can be used to:
- View the primary payment method
- See which payment method is used for subscriptions
- Add a new payment method
- Remove an existing card when available
The payment method card displays limited card details, such as the card brand, last four digits, and expiration date. Payment information is encrypted and securely stored. Full card numbers are not stored in the Brilliant Directories account area.
Add a Payment Method
A new payment method can be added from the Payment Methods tab.
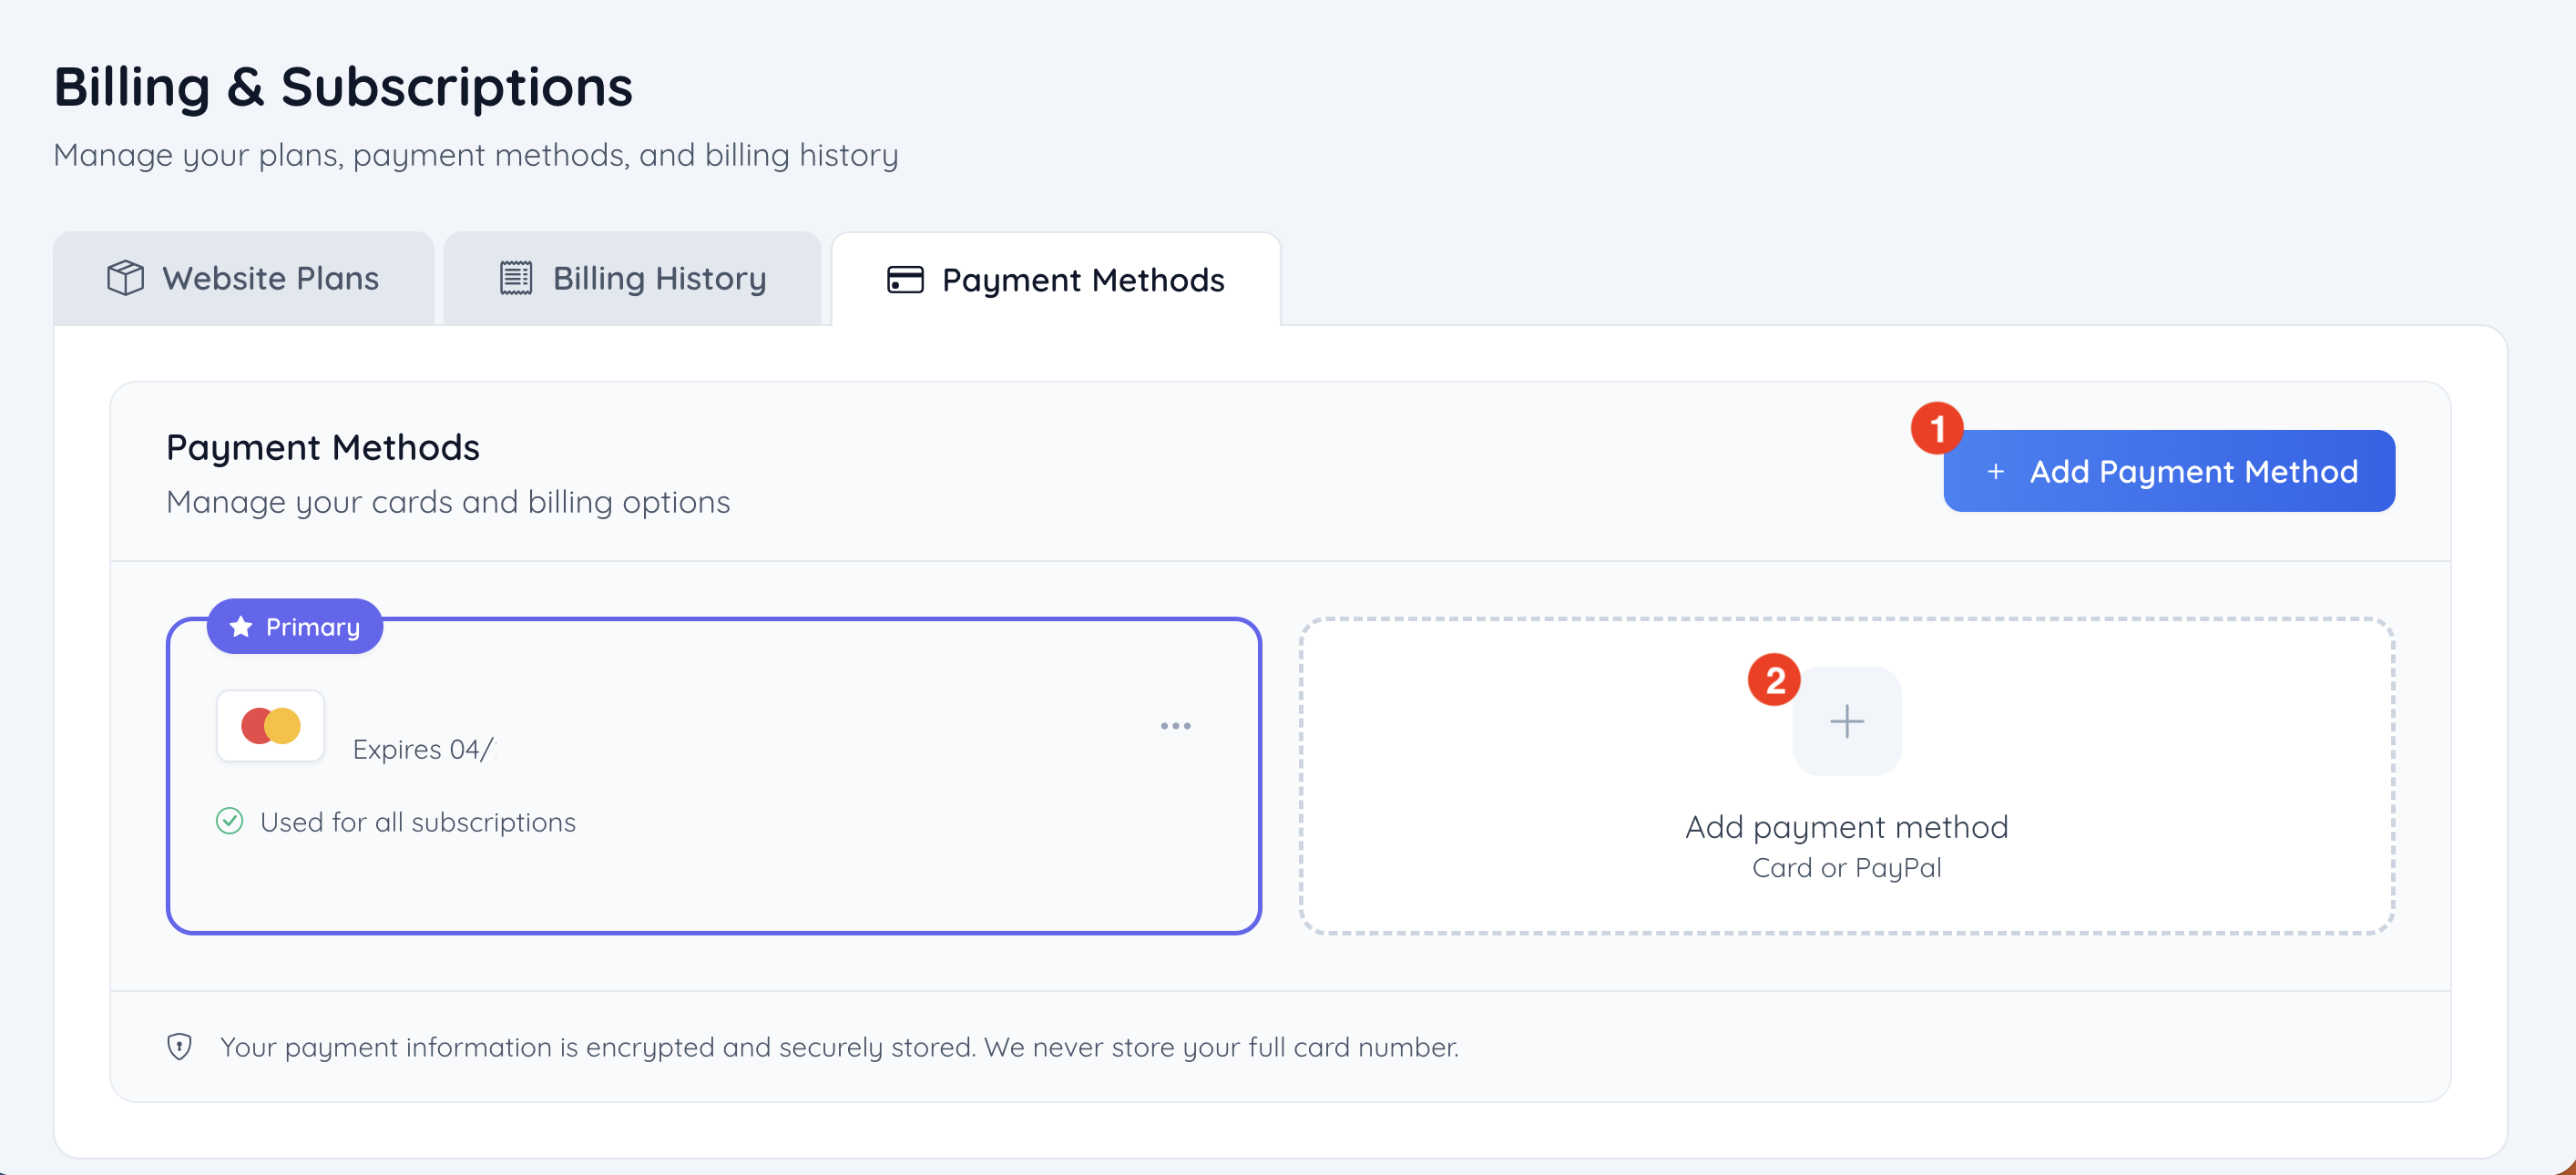
- Go to the Payment Methods tab.
- Click Add Payment Method.
- Enter the card number.
- Enter the expiration date.
- Enter the security code.
- Select the billing country.
- Click Save Payment Method.
The Add a Payment Method window may accept card details, PayPal, or other payment methods enabled on the account.
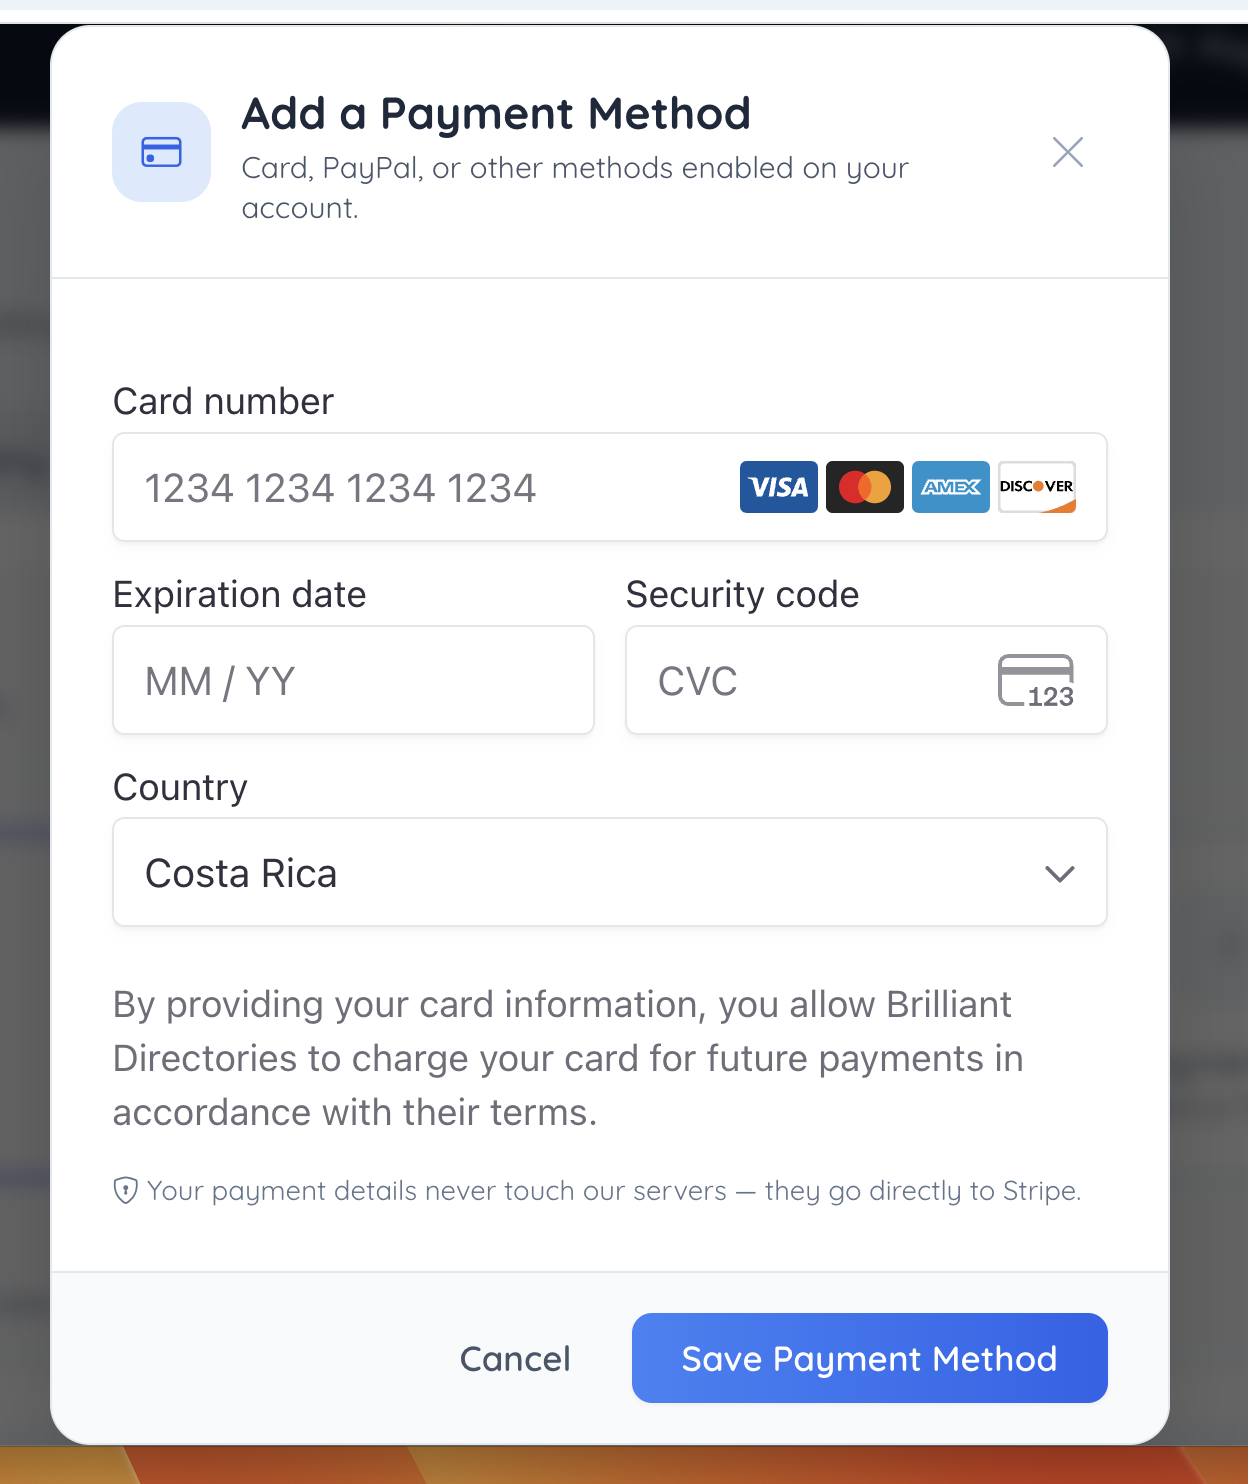
Payment details are sent directly to Stripe for processing.
Remove a Payment Method
An existing payment method can be removed from the Payment Methods tab when the remove option is available.
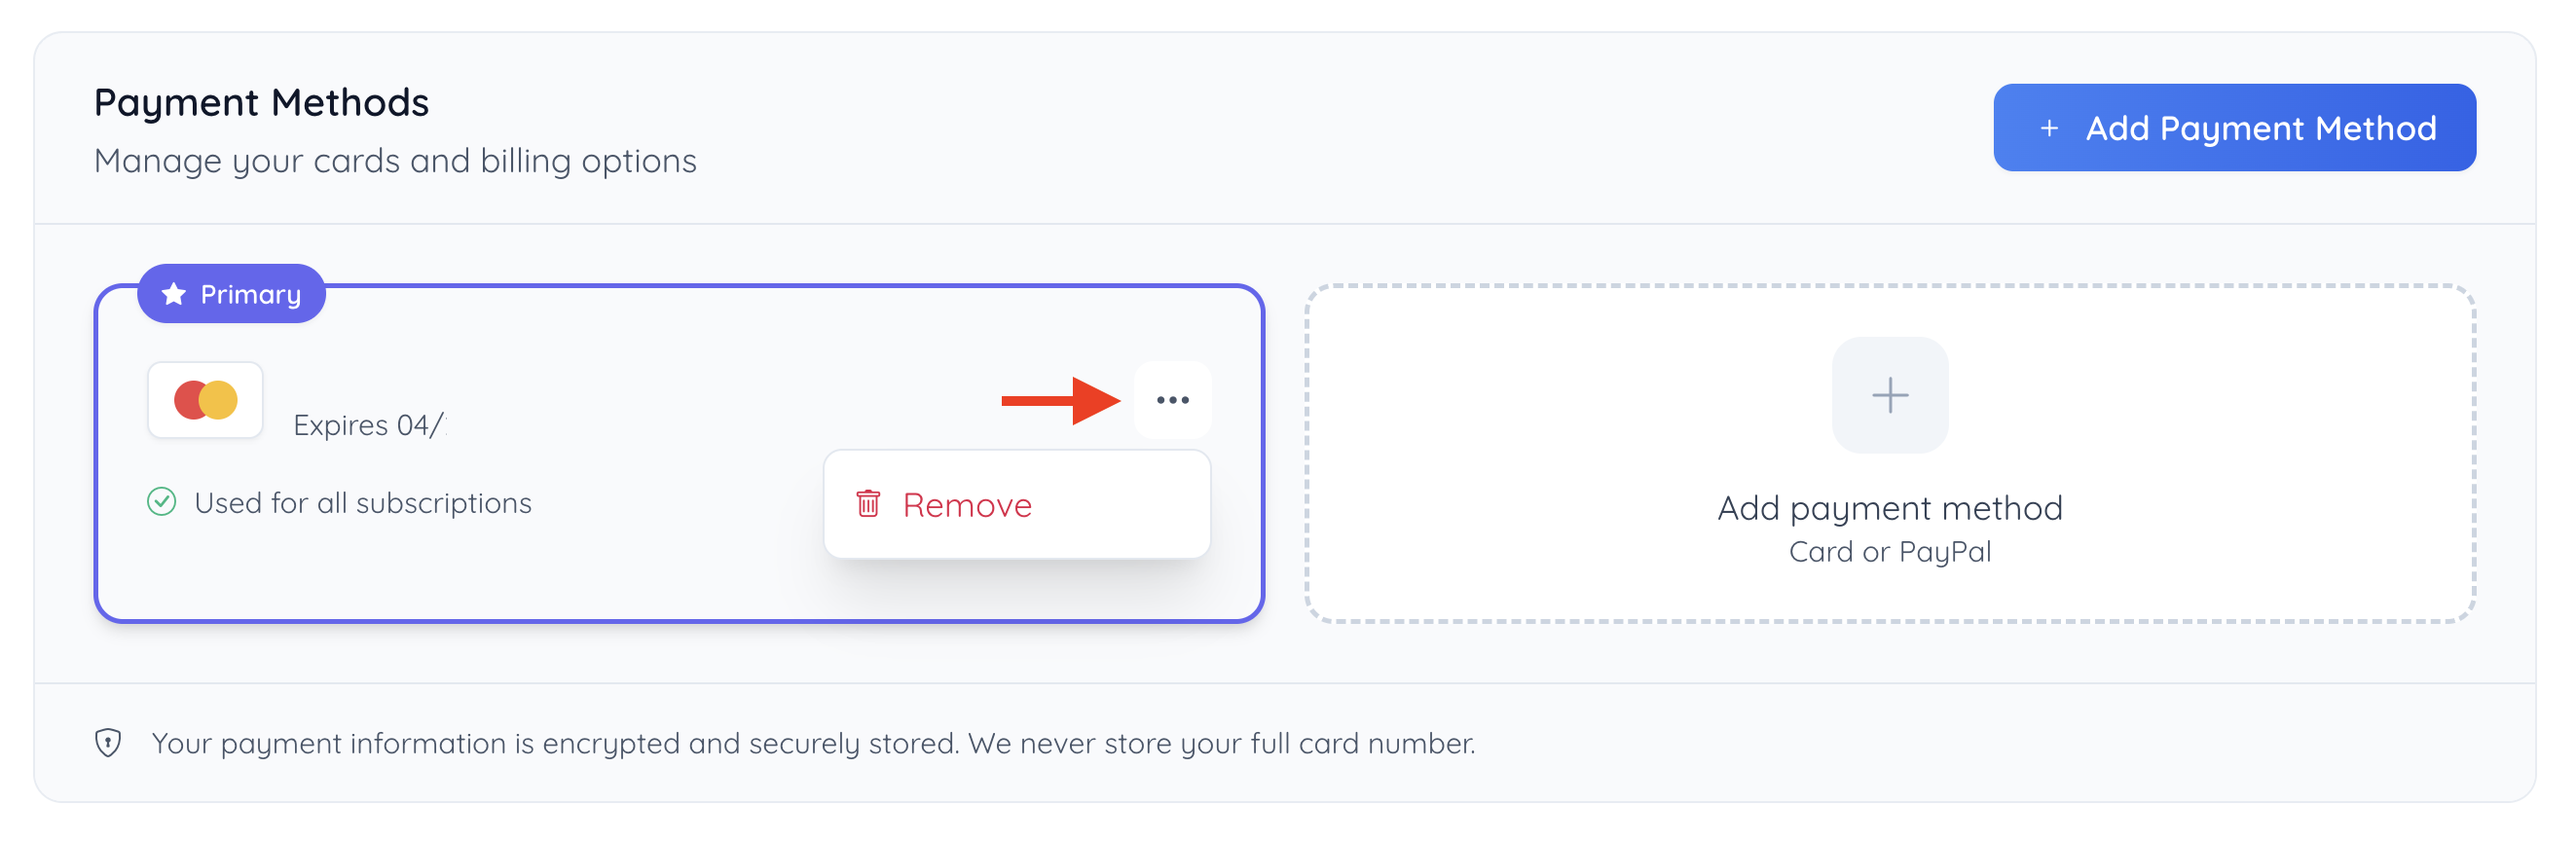
- Go to the Payment Methods tab.
- Locate the saved payment method.
- Click the three-dot menu on the payment method card.
- Select Remove.
If a payment method is being used for active subscriptions, another valid payment method may need to be added before the existing one can be removed.
Important Notes
- Always confirm the correct website name and Site ID before changing a plan, adding resources, pausing a subscription, canceling a subscription, or reviewing invoices.
- Pausing a subscription stops future billing based on the selected pause option.
- Pausing immediately takes the website offline right away.
- Pausing at the end of the billing cycle keeps the website online through the paid billing period.
- Add-ons and extra resources pause with the subscription when a subscription is paused.
- Canceling a subscription marks the subscription as cancelled and the website will be suspended.
- Add-ons and extra resources are canceled alongside the subscription when a subscription is canceled.
- After 30 days of suspension, a canceled website is archived for long-term backup storage.
- A canceled website subscription can be reactivated within the 30-day window.
