Account Dashboard
Link: https://support.brilliantdirectories.com/support/solutions/articles/12000048476
It is really important to know where to find the Site ID. Especially when an admin account has multiple sites, this information needs to be included when submitting a new support ticket.
To find the Site ID, log into the admin, and look at the top left corner of the page, click on the website logo website, a pop-up will show on the top left corner, this will display the website name, ID, status and license linked to this site, as well as the domain that's currently connected:

At the top right corner, there will be an option button to "View My Websites". Alternatively, click on the "Manage Websites" link.

This will display all websites linked to this particular admin account (active, cancelled and pending activation). This section also includes a list of the Add-ons pending activation, as well as the Quick Start videos and at the bottom, there is also a shortcut link to contact support.

Website Snapshot
The Admin Dashboard now always displays a website snapshot/preview for each site, providing users with a quick visual reference directly from the Account Dashboard. Once the To-Do List is completed, the Website Snapshot remains visible for easy access to the website at any time.

Account Dashboard Header
The Account Dashboard header provides quick access to key navigation areas, including My Websites, Support, notifications, and account settings. It centralizes essential tools and alerts, allowing efficient management of websites and account activity from a single location.

My Websites
Selecting My Websites redirects to the main Account Dashboard page. This page displays all associated websites and provides options to manage, activate, or create new sites.
Support
Selecting the Support button opens a dropdown menu with access to support resources and assistance options. The menu includes links to view support tickets, use the BD Helpbot, watch setup videos, search help articles, or create a new support ticket.
More information about the Support portal: Using the Support Center

View Support Tickets
Selecting View Support Tickets redirects to the support ticket dashboard. This page displays all submitted tickets and provides the option to open a new support ticket if none currently exist

BD Helpbot
Selecting BD Helpbot opens an interactive support chat window in Beta mode. This feature provides automated assistance for questions and troubleshooting, with the option to create a standard support ticket if needed.

Quick Setup Video Guides
Selecting Quick Setup Video Guides opens a page featuring step-by-step tutorial videos for setting up and customizing a website. The page provides organized video resources covering topics such as design, payments, membership plans, and general configuration.

Search Help Articles
Selecting Search Help Articles redirects to the Help Center search page. This page allows browsing and searching through documentation articles to find guidance and detailed instructions.

Create Support Ticket
The Create Support Ticket page displays a contact form to submit a new support request. It includes fields to select the website, choose a ticket type, enter a subject and details, and optionally attach files before submitting the ticket.

Activity Feed
Selecting the Activity Bell icon opens a side panel displaying real-time website updates and notifications. If no activity is available, the panel provides an option to enable notifications or configure settings.

DDC
Selecting DDC displays information about Directory Discount Club membership benefits. This includes access to grandfathered discount rates on lifetime sites and VIP Add-Ons.

User Account
Selecting the account email (signed in as dashboard@documentation.com) opens a dropdown menu with account-related options. This menu provides access to referral settings, notification preferences, dark mode, and the option to sign out.

Refer & Earn 50%
Selecting Refer & Earn 50% redirects to the Referral Program page. This page provides details about earning 50% commissions, explains how the program works, and includes options to join the program or access the affiliate login.

Notification Settings
Selecting Notification Settings opens the page to manage website activity alerts. This page allows configuration of notification frequency and selection of specific notification types to enable or disable.

Dark Mode
Selecting Dark Mode allows administrators to switch the interface theme from light to dark. This option provides flexibility to choose the preferred visual display style.

Account Snapshot
This section shows a snapshot of the website stats.
- The Active Sites section displays the total number of currently active websites in the portfolio. It provides a quick overview of all live sites under the account.
- The Total Revenue section displays the combined revenue generated across all active websites. Revenue may include amounts from sites using different currencies.
- The Total Members section displays the combined number of members across all active websites. It provides a quick overview of total user accounts within the portfolio.

New Website Button
This button leads to the Brilliant Directories Compare Pricing Plans page.
 My Active Sites
Selecting My Active Sites displays a list of all currently active websites within the account. This section allows management and access to each live site.

This section includes information pertaining to each individual site:
- Sort Dropdown – Displays sorting options for the website list (Site ID Highest/Lowest, Name A–Z/Z–A, Revenue Highest/Lowest, Members Highest/Lowest).
- Website Count Indicator – Displays the total number of websites associated with the account.
- Role Filter – Filters websites by assigned role (Owner or Collaborator).
- Search Field (Filter Name or ID) – Filters websites by website name or Site ID.
- View Toggle (Grid/List) – Switches between grid view and list view display formats.
- Site ID Badge – Displays the unique Site ID assigned to the website.
- Website Preview Thumbnail – Displays a visual preview of the website homepage.
- Website Name – Displays the internal website name.
- Website URL – Displays the primary domain associated with the website.
- Start Date – Displays the website creation or activation date.
- Role Badge – Displays the assigned role (Owner or Collaborator).
- Environment Label – Displays the environment classification (e.g., Internal).
- Total Revenue – Displays cumulative revenue generated by the website.
- Total Members – Displays the total number of registered members.
- Add-Ons Status – Displays active add-ons associated with the website.
- Business Credits Indicator – Displays available and total business credits.
- Manage Site Button – Provides access to the website’s Admin Dashboard.
- More Options Dropdown – Provides additional actions (Contact Support).
More Options Dropdown
The More Options dropdown provides quick access to additional tools and actions for each website.

View Limits
Selecting View Limits opens a resource usage panel for the selected site.
This includes: Members, Email Sends, Business Credits, Storage, Bandwidth
This feature allows users to monitor their current usage and understand how close they are to their plan limits.

Contact Support
Selecting Contact Support provides direct access to support resources.
This option allows users to: open the support center, submit a support ticket, and get assistance related to the selected site.

Move to Another Site
Move to Another Site allows users to transfer resources between websites within the same account.
Previously, transfers required contacting support, now they are self-managed.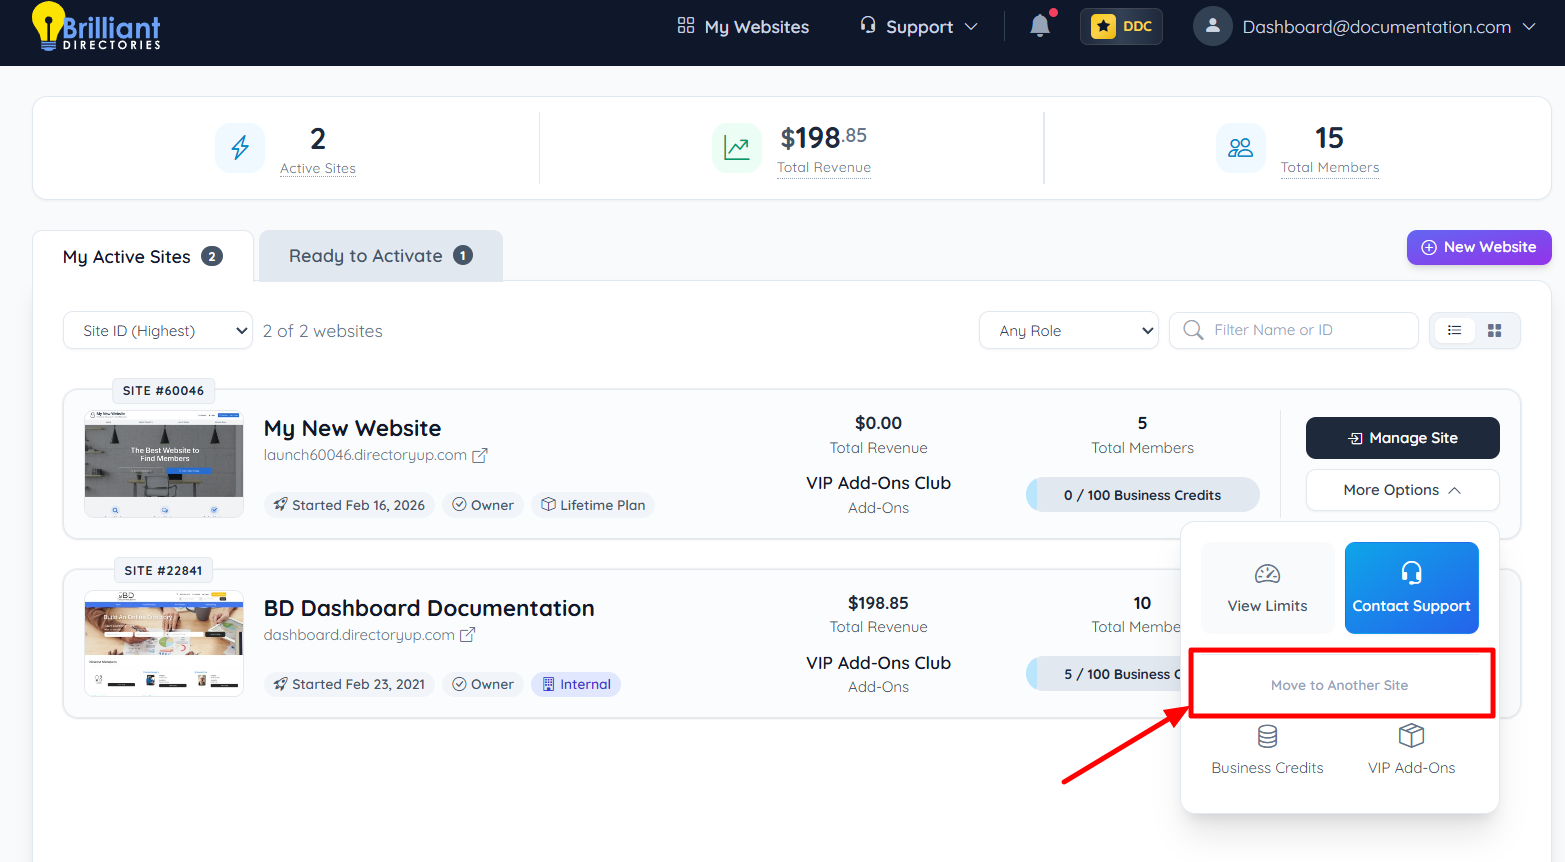
Transfer Business Credits
Transfer custom amounts of Business Credits between sites. Specify exactly how many credits to move between sites. This is useful for reallocating credits based on each site’s needs.

Transfer VIP Add-Ons
Move the entire VIP Add-Ons package to another site, including all included features. Individual add-ons cannot be transferred separately, so everything is moved together as a complete package.

Ready to Activate
Selecting Ready to Activate displays websites that have been created but are not yet live. This section allows activation of sites when ready to launch.

Inactive Sites
Selecting Inactive Sites displays websites that are currently not active. This section provides options to re-activate eligible sites or contact support if needed.

